Quantcast
Channel: Crafts - BlogHer Topic Feed - All Posts
Viewing all 1382 articles
Browse latest View live

Springtime Baby Birds

$
0
0

Baby birds cuddle together

Baby birds cuddle together

Make these adorable birds and their nests using craft Poms, plastic Easter eggs and brown paper bags.

Spring is the time of year when birds are returning to their northern stomping grounds, building their nests, and settling down to lay their eggs. In honor of bird migration and new beginnings offered by springtime, I’m posting this fun craft that entails making a bird’s nest out of a brown paper bag, which then becomes the home of a new baby bird that kids will make out of craft Poms and plastic Easter eggs.

I make this craft with students when I visit schools to read my children’s book,  Mallory the Forgetful Duck. The picture to the right shows a baby Mallard, but I bring all colors of Poms and eggs so that every child’s baby bird has its own “personality”.

Baby Mallard

Baby Mallard

The kids get a kick out of making their own “pets”. They give their new baby birds a name and then they assure me that they won’t forget about their baby birds, like Mallory does in the story. Actually, Mallory only loses her nest in the story (not the baby birds) and turns out to be a very good mommy bird (Spoiler Alert:)

Supplies you will need:

1 Brown paper bag

1 Craft Pom, any color, size 1 ½ inch

1 Plastic Easter egg, any color

2 Wiggle eyes, any color

Glue

Scissors

Baby birds collageDirections:

Cut the brown paper bag in half. Set aside the top portion to use later. Roll down the sides of the bottom portion so that the egg will nestle in the bottom of the bag with the sides folded down around it.

Glue wiggle eyes to the Pom. Then grab the top portion of the brown bag and cut small triangles for the bird’s wings and beak. Glue them carefully to the Pom in the appropriate places. Then place the finished Pom (baby bird) inside the plastic Easter egg, and put the egg on its new nest. You can glue the egg to the nest if desired. But, I have found that kids like to pick it up and nestle the egg in their hands.

I hope your children enjoy this baby bird craft and delight in the spirit of new life and new beginnings that it brings.

See our baby birds!

See our baby birds!


Elaine Ann Allen

http://elaineannallen.com


17 Great Ideas to Celebrate St. Patrick's Day

How to Make the Perfect Easter Bow

$
0
0

Hey y’all! Today I’ll be sharing how I made this adorable chevron bow for my embroidery hoop Easter wreath.

I showed y’all how I make my bows here, but I love this ribbon and we had a lot of snow here in VA this weekend, so I figured why not do another bow tutorial post?

Just a little FYI: I make bows a weird way. There is no tying of anything, just pipe cleaners and a crap ton of hot glue.

Get your hot glue guns ready, ladies, let’s get started!

What you’ll need: ribbon, hot glue gun and sticks, pipe cleaners and fabric scissors. (My hot glue gun is a little dirty, don’t judge me.)

2. Cut two pieces of ribbon the same length.

3. Fold each side in half.

4. Pinch each end of the ribbon and attach them together using the pipe cleaner.

5. Cut a small piece of ribbon: enough to go around the center of your bow to cover up the pipe cleaner. Hot glue that piece to the bow.

6. Cut two pieces of ribbon to make your tails and hot glue each tail to the ribbon.

I hope this helps all my fellow bow makers. If you have any questions, please comment below!

Product List

- Ribbon: Michael’s

- Burlap ribbon: Hobby Lobby

- Pipe cleaners: Michael’s

- Hot glue gun and glue sticks

- Fabric scissors

Sketchbook Updates

$
0
0
This past weekend was a lazy one. Ada came down with the stomach flu. BOO! And it knocked her out on the couch for 2 days. We rescheduled our monthly family outing. We were planning on going to an indoor water park! BOO! But laid low instead. We cuddled, watched way too much TV and movies and washed our hands A LOT.
Sunday we were all feeling much better and we got around to getting out some art supplies. Not too many days go by without us making art in some form.
I have really been inspired by the idea of making patterns lately. I've had a couple of projects come across my 'doorstep' that have required me to think about making my own prints and patterns. It's a fun challenge that gets me to think a little more strategically about painting and mixed media techniques.

Color is a huge source of inspiration for me. Coming up with new color combos is one of my favorite things to work through in my sketch book.

I am slowly rebuilding my supply of nicer acrylic paints. Here are few new colors I picked up last week at the Hobby Lobby.

I love neon pink right now. I have acquired quite a few articles of clothing in that same hot pink and they seem to work their way into my wardrobe A LOT lately.

These are a few of Ada's current art supplies of choice. The girl is all about purple and sparkly things right now. Where does that come from any way? The movies?

I have been encouraging Ada to try making shapes and more focused drawings and paintings lately. I love her paint scribbles, but I like showing her new possibilities too. She's learning her shapes really well right now and is quite good at drawing faces (like the circle, two dots and a line kinda smiley face) and bananas!

I'm not sure which of these I'm supposed to drink and which I'm supposed to rinse brushes in...

Here's some more patterns I've been working on.

I really love the contrast black lines add to a design, but I like the softness without them too.

STRAWBERRIES! Sweet strawberries. So looking forward to home grown ones out of my in-laws garden this summer!

A twist on the traditional polka-dot.

Playing around with color combinations.

Mixing iPhone images with mixed media and painting. This is becoming a fast fav technique of mine too. I like mixing photography and digital elements in with my painting.

I hope you have a marvelous week. The weather is getting warmer here this week. Can't wait to get out and play.

YAY!

How to Make Rugged, Leather-Bottom Concrete Coasters

$
0
0

Every year for my Lumberjack’s birthday, I like to throw at least one handmade gift into the mix.

I’ve been experimenting with concrete ad nauseam over the past month: different consistencies, additives, molds, textures, dyes, etc., and after a significant number of practice runs, I decided to make him some leather-bottom concrete coasters.

The part I love most about this project is that no two coasters are alike! You never really know what the final design will look like until the block is pulled from the mold.

The exact coasters I made require the following supplies:

  • 1 bag of fast-setting Quikrete Concrete
  • 4 square molds
  • 1 roll Saran Wrap
  • 1 paint stir stick
  • 1 medium-sized plastic mixing container
  • 1 scrap piece of leather
  • 1 tube of epoxy

Assembly process:

  1. Line each square mold with a section of Saran Wrap.
  2. Measure approximately 4 cups of Quikrete into the plastic mixing container and slowly add water until a pourable consistency is reached; stir until no lumps remain.
  3. Pour about 1 cup of concrete into each mold and gently tap the to release any air bubbles.
  4. Allow the concrete to cure overnight.
  5. Once dry, use the Saran Wrap to pull the concrete free from the mold. Carefully unwrap the coaster and smooth away any rough edges or loose pieces.
  6. Using the size of the coasters as a guide, cut four squares out of thick natural leather.
  7. Apply the epoxy to the leather pad and secure it to the underside of the coaster. Press firmly to secure in place and allow to cure overnight.

Serve immediately … they go quite well with beer!


My 3D Hand Drawing Pictorial

$
0
0
 
Now doesn't that look absolutely cool? I'd been looking for a cool way to start crafting away with my newly bought fresh Sharpies and found this idea being pinned away madly on Pinterest. It looked easy and so fabulous that I had to try it instantly!
A 3D hand drawing is much more cooler than the original 2D hand drawing I was made to do when I was a kid in school. The best part is that it is actually very easy to complete and all it takes is three steps. All you need is a paper, pencil, your hand (Duh!), and Sharpies in colors of your choice. Let's get started then!
 
This entry belongs to the 'DIY Projects and Decor' label
 
I began with a fresh piece of A4 size paper and drew my hand on it using a pencil. I drew my fingers, my palm, and a little bit of my wrist as well.

Using a black colored Sharpie, I then drew horizontal lines on the entire drawing. The lines are supposed to be parallel throughout, except where you've drawn your hand; that is where you draw an upward curve to give it the 3D effect. The curves will continue all through the fingers, the palm, and the wrist. In between the fingers I connected with straight parallel lines.

Last step is the coloring. I wanted my drawing to have girly colors because I intend to use it in my scrapbook so I decided to use pink, orange, and yellow. Using each color one by one trace the black lines you've originally drawn. When you're done, fill in empty spaces with the same colors so that there are no white areas left in your drawing. When you're done, step back and you'll find your hand looking like it's coming out of the paper!
 
I'm not usually too good at drawing, unless you're counting my adorable original doodles. I loved that this was a DIY project easy enough for me to successfully complete. A 3D hand drawing can even be made by little children or those who do not have any experience with drawings. Personally, I can think of numerous uses for this project: As a gift, as a framed art piece on a wall, as a greeting card cover, as a scrapbook page, and etc. I totally want to do this for my sister too and it will be super cool if I could somehow sketch out my baby niece's hand (she is almost four months old) each year and then compile all of them together to gift her when she grows up. Now all I need to do is find her at a time when she patiently lets me trace out her hand on paper.
 
This is an accomplishment from my Bucket List too!

Global LOVE- International Wedding Decor

$
0
0

Sharing a little global LOVE this morning : )

Global LOVE Painted Globe by Country Design HomeAs those of you who follow my blog may know, we are deep into the planning stages of our daughter’s wedding that is happening this August. What you may not know is that now we have TWO weddings in the making, as our son proposed to his lovely fiancé over the weekend as well!!  For our daughter’s celebration (#1 on the calendar), we’ve started having  monthly “craft days” to start chipping away at all of the DIY designs and decorations we are hoping to have displayed at this very international wedding. But of course, before we could begin crafting this past Sunday, we popped some bubbly (and shared some fries : ) to celebrate both of our lovely brides-to-be!

Engagement Rings BFFs Fries with Ketchup #McDonaldsThe project of the day was painted globes featuring the cities and countries of some very special places around the world that are near and dear to our daughter’s and her fiancé’s hearts.

Global Craft DayCoach has been collecting globes for the past few months and we’ve been painting the bases and handles teal blue, one of the chosen colors in the wedding palette. So even though they are all a little different in shape and size, the base colors tie them all together.

Painted Globes CitiesThe process of painting the globes is fairly simple, but tedious. First, we chose these cutout letters

Michael's Crafts Sticky LettersI got from Michaels as the font pattern and traced them onto contact paper,

Global LOVE contact paperone city at a time. Then they were carefully cut out (this was, thankfully, not my job!) with little scissors and an exacto knife. We decided each globe would have a slightly different letter placement depending on the colors of the globe itself. You have to make sure that the unpainted lettered areas show through once you paint the globe, so you want to choose the darker areas of the globe, like the land masses vs. the oceans.

New Zealand Globe CloseupOnce the placement was determined, the letters were peeled off the contact paper backing and placed on the globe, rubbing the edges firmly to ensure proper adherence so the paint wouldn’t bleed under.  (I really couldn’t take an accurate photo of this, as the contact paper is clear…) I made a concoction of Americana Paints, clear wax and soft finish varnish because I wanted it to be opaque and dark enough to contrast with the lettered areas.

Americana Creme Wax and PaintOnce the letters were in place, we simply used small brushes and started adding light coats of the white paint/glaze, allowing to dry until we were happy with the depth of color and contrast. Once slightly dried, we peeled off the letters using a small Exacto knife and tweezers. Voilà! Aspen!

Peeling letters off painted globeThe very first craft day, we were able to create this one LOVE globe while sorting out all of the exact craft details.

Tall LOVE Globe Country Design HomeThis past Sunday, we busted out 8, even while shipping champagne and discussing all of the wedding(s) planning. We have more to do, but we are at a standstill because we didn’t run out ofcountries, we’ve run out of globes! So if anyone has a globe they are willing to donate to the cause, let me know! Have a world class Wednesday everyone! Susan

Moss Covered Easter Bunny

$
0
0

Moss Covered Easter Bunny Tutorial - A Pottery Barn Hack of a $79 moss bunny for less than $20.

I think it's safe to say that most of us love Pottery Barn. However, for many of us Pottery Barn is a bit too pricey. So, when I saw their live ivy topiary bunnies at $79 and twig bunnies for $179 (very large bunnies), I knew I there had to be a less expensive alternative. 

PB Bunnies 

My less expensive version is a cross between the two Pottery Barn bunnies with a much lower price tag. The only downside is that this is a VERY messy craft*. You will be covered in moss bits and will need to break out your vacuum cleaner or broom after this project is done.

*If you are highly sensitive to dust or have respiratory issues, you may want to use a mask for this project.

Moss Covered Easter Bunny Tutorial

Supplies:

Make sure to use craft store coupons to save the most money on this project.

  • Roll of moss mat
  • paper mache bunnies
  • glue gun & 4-5 glue sticks
  • scissors
  • ribbon
  • fray check (optional)

 Directions:

Moss covered bunny supplies

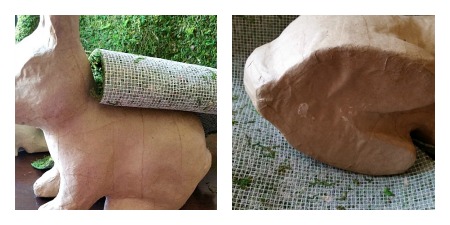
Gather your supplies. Unwrap the roll of moss mat and remove any paper backing that remains on the back.

 cover back of bunny

Cut a strip of moss that is large enough to cover the back of the bunny from the neck to the bottom of the bum. I cut my sheet about 6.5 in. x 18 in. Glue moss 

Glue* down the moss in sections. I started from the top of the back and worked my way down the sides and back.

*Don't use too much glue or it will seep through the moss. Use just enough to hold the moss mat down. If glue does start to seep through, use the moss bits that have fallen off to cover any glue that has seeped through.Cutting moss

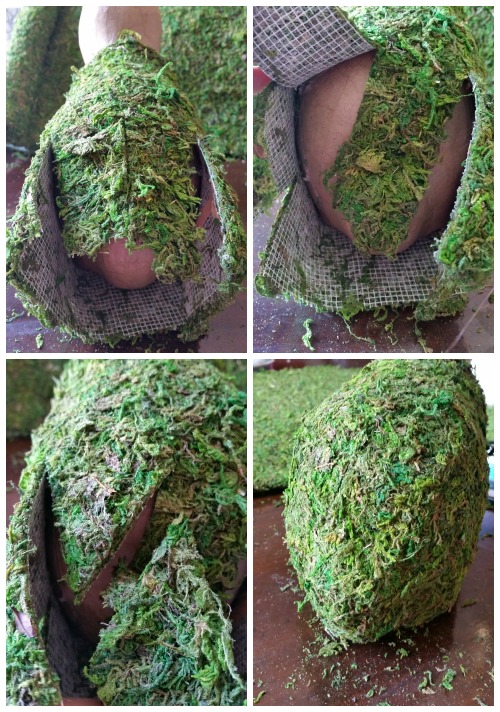
When you get to the legs or any angles, cut a slit in the moss. Don't worry if you end up with odd shaped moss areas as this can easily be covered. The main thing is to be able to wrap the moss around the bunny and glue it down. moss covered bunny bum

Here are more pictures of how I covered the back of the bunny. Make cuts in the moss mat where you want to fold down and wrap around your form. Again, don't worry about odd seams as the seams will not show once the moss mat is glued into place.

Oh, and you see those tiny bits of moss that have fallen off? These are the bits you want to use to cover any glue that may have seeped through. Just grab a pinch and smash it down into areas where you feel glue coming through the moss mat. Also, don't throw out any moss mat scraps because you will need these to cover other areas on your form. moss covered bunny neck and legs

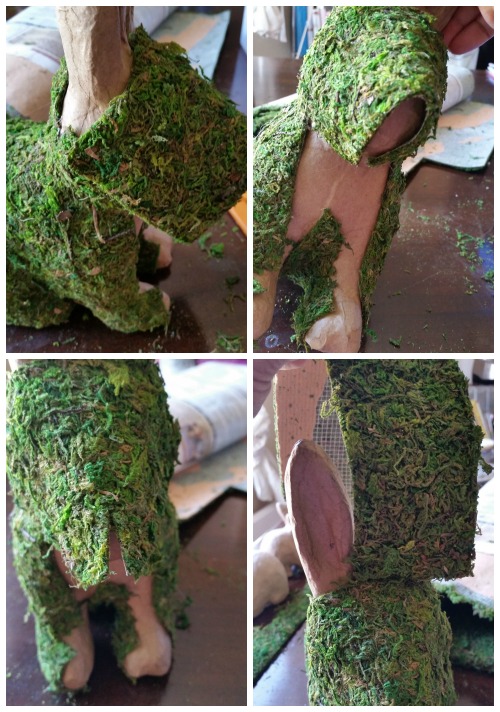
To cover the neck and front legs, I used a long 1.5 inch piece of moss mat. Again, cut the mat in areas that are rounded and curved to allow the mat to fit. I also used scrap pieces of moss mat to cover the odd shaped areas behind the neck. wrapping moss on bunny

Continue to cut pieces of moss to fit around the face and ears of the bunny. Glue these pieces down. Fill in moss pieces on bunny Once the majority of the bunny is covered, there will be small areas that will need to be patched with the scrap pieces of moss mat. Cut pieces to fit into these areas and glue down. Tie ribbon on moss covered bunny Cut ribbon and tie around the neck of the bunny. Optional - Apply fray check to the cut end of the ribbon to prevent fraying. Moss covered bunny savingsNow dust yourself off and enjoy your new moss covered bunny!


How to Repurpose Shoeboxes

$
0
0
Lately I've been eyeing quite a bit of office supplies as I plan out my new instagram and pinterest inspired desk area in my soon-to-be new apartment. My favorite's include Kate Spade office supplies but I can't see myself paying $40 for office storage boxes even if they are really cute with gold trim. Instead, I turned back to my DIY roots and remembered the endless number of shoeboxes I have in my closet (most with unworn shoes I must admit). So alas my latest project has unfolded and turned out quite cute if I do say so myself.

Wrapper Paper
Tape
Scissors
Ruler
Pencil/Pen
Shoebox
1. Measure the width and length of the bottom piece of your shoebox. You can also try to center your shoebox on the paper and eyeball a large piece to cut out.
2. Center the shoebox on the piece of wrapping paper and draw three lines at each edge. The first two lines will be from the corner of the shoebox to the edge of the wrapping paper.
3. For the third line, measure 2 inches from the vertical line. Create these lines for all four sides and cut out  your wrapping paper according to the picture below.
4. Start by wrapping the front and back of the shoebox and bending the wrapping paper at the line where the flap was created.
5. Cut a slit at all four upper corners of the wrapping paper where the excess is.
6. Fold the excess over the the edges and tape them down. Make sure to smooth out the paper and wrap tightly for a more finished look. 
7. Fold the remaining wrapping paper over the sides of the shoebox. 
8. Repeat steps 1 through 7 for the lid.
9. Enjoy!
You can use these new organizers for your office or closet. I chose to make one for each type of accessory I own in my closet!
Until next time. <3

How to Make Glitter Easter Eggs

$
0
0

My new favorite craft and DIY blog, Tater Tots & Jello, featured this super-cute idea (from the craft queen "A Pumpkin and a Princess") for decorating Easter eggs with glittery polka dots and I had to give it a whirl ... but with my own spin!

I decided to use my new favorite craft supplies, my Martha Stewart Fine-Tip Glue Pen and Martha Stewart Iridescent Glitter and get to work!

What You'll Need

  1. Hard-boiled eggs (obviously). If you need cooking instructions, click here
  2. Martha Stewart fine-tip glue pen, $2.99 store.scrapbook.com
  3. An old makeup brush
  4. Martha Stewart glitter, $19.99 for a 12-piece set store.scrapbook.com


Holding the egg vertically between your index finger and thumb, make glue dots all over with the glue pen.


Continuing to hold the egg between your thumb and index finger, shake the glitter tube all over the egg covering the glue dots completely.


Blow off all the excess glitter and let the dots dry for just about a minute. Then use the makeup brush to dust off any extra sprinkles of glitter for a polished look!

And that's it!

The glue pen is also fantastic for writing pretty script on the eggs too, and I finished off my Easter basket with some solid-colored traditional ones, as well.


So, do you guys get all into Easter egg decorating?

*originally posted on my personal/lifestyle blog, http://www.thejackchronicles.com/

DIY Book Page Bunting

$
0
0

Are you up for a cute and easy paper craft project?

I used this easy-to-make book page bunting to decorate a little reading nook I created in my daughter’s nursery, but it could easily be used to pretty up other areas around the home. A project like this is a versatile way to add a little whimsy to your home décor.

DIY Book Page Bunting

I'm not sure why I was inspired by Peter Pan for the nursery. The adorable quotes? The chance to use vintage clocks? It captured me one day and I couldn't shake the idea. There is something so whimsical and sweet about the story. Hold on to innocence for as long as possible... and while you're at it, never stop believing. I couldn't think of a better message to surround my baby girl with.

There are so many images that come to mind when you think of the timeless story, but I didn't want to fill the walls up with too much visual clutter. This easy bunting strand allowed me to incorporate some of the story's silhouettes in a quiet and charming way.

I started by printing the images onto the bookpages I had chosen. This was as simple as resizing the paper output in Microsoft word and adjusting the image to fit.

DIY Book Page Bunting

I trimmed the bottom of the page, and added some string...

DIY Book Page Bunting

...and kept going, spacing them out as I went.

DIY Book Page Bunting

A couple of thumbtacks and we had beautiful and simple wall decor.

DIY Book Page Bunting


DIY Book Page Bunting

For a more detailed tutorial and many more projects and ideas, visit my blog Lovely Weeds!

Decorate Your Eggs Differently This Year: Draw Frames on Them!

$
0
0

Easter Egg Ideas :: Drawing in Frames -- an easy and creative egg decorating idea for kids!

I've been thinking a lot lately about Easter egg ideas for kids. I included a bunch in my spring crafts eBook, both new ideas as well as some of our older faves, but there are others floating around in my head that didn't make it into the book. This is one of those.

Drawing in frames.

I have a bit of a thing for frames. You may remember the DIY frame wallpaper we did last year. Or the various creative drawing prompts we've done with frames.

Frames provide a good balance of open-ended inspiration within a defined space. They sometimes seem to inspire kids more than just a plain piece of paper. Or, in this case, an egg.

Easter Eggs Drawing in Frames 37

The materials & set-up for this Easter egg idea:

  • White eggs, hard-boiled
  • A new set of '80s glam Sharpie markers -- an impulse purchase inspired by Rachelle from Tinkerlab (any permanent marker would work, of course)
  • Cheap plastic place mats to protect the table (from Ikea)
  • Silicone ice cube molds (an impromptu idea for holding the eggs in place -- you could also use egg cartons or muffin tins)
  • Individual cups to keep eggs from rolling around as the child draws
  • Kool-Aid + white vinegar for dyeing the eggs (or use food coloring or any commercial kit)
  • Tongs

Easter Eggs Drawing in Frames 02

To begin with, I drew a variety of frames on hard-boiled eggs using a black sharpie. I did this ahead of time, in order to have everything set up as an after school activity.

Easter Eggs Drawing in Frames 14

Maia, Stella, and Daphne all drew pictures inside of the frames using the Sharpies.

Easter Eggs Drawing in Frames 18

Here's a bunny drawing.

Easter Eggs Drawing in Frames 23

And a spring scene with a bird, flowers, and a nest with eggs in a tree branch (by Stella).

Easter Eggs Drawing in Frames 34

Besides drawing within the egg frames, the girls also colored in some of the frames.

All in all, the results were quite different from the many times I have set out plain white eggs (no frames) and markers or crayons.

Easter Eggs Drawing in Frames 40

The next day, we dyed the eggs around the frames with a Kool-Aid dye. Maia poured the powder into tea cups and bowls, then we added hot water and 2 tablespoons of distilled white vinegar to each cup of powder (talk about a fruity smell!).

Easter Eggs Drawing in Frames 42

We used tongs to dip the eggs into the Kool-Aid dye to keep the dye around the frame rather than inside where the drawings were.

Easter Eggs Drawing in Frames 45

Luckily the dye was intense and worked quickly so we didn't have to hold the eggs in place for long.

Easter Eggs Drawing in Frames 47

We were quite pleased with how the eggs turned out!

Easter Eggs Drawing in Frames 54

Some of our new frame Easter eggs have joined the rest of our decorated eggs in a big wire fruit bowl on our dining table. We also nestled a few eggs in the makeshift yarn nest (loose yarn piled in a small basket) on our spring nature table.

How about you? Are you decorating and dyeing Easter eggs with your kids yet? What methods are you using?


Jean Van't Hul
The Artful Parent
ArtfulParent.com

When Crafts Go Wrong - My Accidental Egg Cosy

$
0
0
March 20, 2015
Final Egg Cosy 1

It's slightly later than planned, but as promised here is my post about when crafts go wrong.

You would be forgiven for thinking that all DIY and craft bloggers are brilliant at most crafts. We put a lot of time and effort into giving that impression. Taking images that are 'perfectly pinnable' and light and bright. I have a new lens that blurs out the background - which is fantastic as that can hide all manner of imperfections as well as looking very 'bloggy'!

It's time to come clean - I have a lot of projects that never make it on to this blog and the above egg cosy was almost one of those projects. I have 2 reasons that I changed my mind and decided to share this project with you. Those reasons are:

ONE: If you experiment with crafts that you have never done before, things will not always go as planned. We should celebrate that and share what we discover with others so we can all learn together.

TWO: My second reason for sharing this 'egg'sample (ha ha, sorry!) is that the first part of this project - my DIY loom has proved my most popular post so far. So I felt compelled to share that the second stage of the project didn't go as well. Hopefully then, you guys don't make the same mistake - unless you really want to make an egg cosy!

I was trying to make drinks coasters in fun spring colours for our house. The weaving was going perfectly and looked lovely but as soon as I cut and tied the ends off to finish my coaster it became apparent I had gone the wrong way about it.

I will show the steps where I think I went wrong but I have to admit, I haven't made my coasters yet so don't know for sure if doing it differently would work any better.

crafts go wrong step 1

Once I had finished weaving, I tied my weft thread to one of the warp threads I tied the two loose warp threads together. 

crafts go wrong step 2

I then cut loose all of the remaining warp threads and paired them up and tied them together in the pairs.

I don't think I should have done this. I think pulling these threads together to tie them has resulted in me pulling all of the warp threads tighter than they should be and therefore making my coaster curve into an egg cosy type shape.

crafts go wrong step 3

I then threaded the loose ends through the back of the coaster.

When I next try to weave myself a FLAT coaster I am going to try tying each warp thread individually and thread through the back of the coaster - however I've not tried this so don't know if it would make any difference.

crafts go wrong step 4

Above is my egg cosy coaster with a drink on it. It's curling up - not what you want your coaster to do - a sure fire way to see your drink being spilled all over the table.

Final Egg Cosy 2
Final egg cosy 3
Final egg cosy 4

So, this craft did not turn out as I planned but I've ended up with two bright spring coloured egg cosies. My timing is perfect with Easter soon!

I'd love to hear of any crafts that have gone wrong for you, did you throw it out or turn it into something else? I've done both in the past!

If you liked this post - please keep up to date with my latest DIYs through facebooktwitter or instagram. You can also keep up to date on readers like bloglovin or feedly

Adorable Paper Easter Egg Holders

$
0
0

easter egg holder - Copia
Today I want to share with you a new project very quick to make: flower-shaped paper egg holders. In five minutes, the time it takes to prepare soft-boiled eggs, it is done!

porta uovo2 - Copia

Flower-shaped paper egg holders are very easy to make, very decorative and can be also used as a placeholder for Easter dinner.

porta uovo - Copia

egg holder2 - Copia

How-to: Download the pdf you find here and then the possibilities are endless. Print it on colored cardboard or decorated paper (the one I used is of Tiger), and cut out the flowers. Or cut out the flower shapes on white cardboard and decorate it as you like (this can be a fun activity to do with kids!).

For the base, cut along the two lines carefully, cross them and attach with tape inside and out. Cute, isn't it?

fiori uovo - Copia

egg holder - Copia

Modern Gallery Wall

$
0
0

Gallery walls are tricky business, especially for detailed oriented, type-A sort of people--not that I know any of those sort of people, cough, cough. At our previous house my first battle with the gallery wall involved hanging a group of empty picture frames going up the stairs, as a sort of artistic statement. I then decided to replace the empty frames with pictures. From there I switched out some of the older cheap frames, for more high quality frames. However, this meant the spacing was off when I replaced a few of the frames with different sizes. It was a domino affect--I then had to rearrange the whole thing. My husband would find me rearranging the pictures or re-hanging them in the wee hours of the night. It worried him that I just couldn't leave them alone! (see below the first stage of the gallery wall madness).

gallery wall stairs

Round two came when we moved into our current house and I arranged the same frames over our couch in the living room. I arranged the frames first on the carpet all together, eye-balled a good spot on the wall, and then marked the nail holes with a pencil, using a tape measurer. However this was done with two people--one person to hold the frame up on the wall and the other person to eye-ball a good spot. Miraculously the gallery wall seemed to come together on our first attempt.

book page art gallery wall

This luck soon ran out though. Inspired by our gallery wall, my mother-in-law enlisted me to help her hang a group of photographs in black picture frames. We used the same technique--laying out a variety  of picture frames on the carpet, and rearranging them to our liking before eye-balling them up on the wall, marking, and hanging them. Alas, what looked good on the carpet didn't seem to transfer to the wall. Chagrined I later called my husband to go over and fix it, which he did, re-hanging a few pictures and replacing others with different frames.

So it was with much trepidation I approached the gallery wall in our second bedroom. A blank canvas can be somewhat overwhelming, and I desperately wanted to avoid peppering the wall with gratuitous nail holes this time.

I decided to take on a different strategy. I traced the outline of picture frames onto some extra supermarket ads to make a hanging template. I also marked the nail holes on the template, so all I had to do was tape the template to the wall, nail through the paper and pull away the paper to hang the pictures. It worked relatively well, although I did end up changing out the top/middle picture frame for a smaller version, after I had already hung the gallery. It's a work in progress. Either that or I used up all my gallery wall luck already.

how to hang a gallery wall

The items on the gallery wall include a pallet arrow that the husband made. He honestly just looked at a picture and made it, so I don't really have a tutorial. If you need one, I'd recommend the one here at Love Grows Wild.

close up gallery wall

The second item we made was the swiss cross sign which you can read about here. The other items include photographs from Hawaii, and Oregon, as well as a framed notecard with a quote from Louisa May Alcott, which reads: "I am not afraid of storms for I am learning how to sail my ship." Which gives me pause--"Is she speaking to me about persevering with hanging my gallery wall?"

gallery wall

The crocheted animal head, a fox, is from a local craft shop, Wholly Craft. The artist, Taylor Hart who makes them also has an etsy shop.  She has other cute animal heads, including a platypus which I found unexpected and charming. I originally planned on including a hanging sign I bought from Three Potato Four in the gallery wall, but then thought the better of it, because it seemed to overwhelm the space. I ended up with just hanging it over the bed. I may change my mind and reincorporate it back into the gallery wall like I originally planned. What do you think? (see below for the original plan).

gallery wall plan

The gallery wall is "done" for now, which means I might change it up again when I feel like it, or when my husband isn't looking.

kid room with gallery wall


Anne with an E


Tea Cup Bird Feeder

$
0
0


My daughter came to me on Saturday morning with a picture of a bird feeder that she wanted to make, but unfortunately I didn't have all the specific materials, so this is what we came up with instead. I'm happy to finally have put these tea cups to good use since I've had them since last spring! The finished product is adorable and took less than 5 minutes to make, so two thumbs up!  Here we go!


You'll need these plastic tea cups from Target, which are sold in the party aisle. 


Get your hot glue gun warmed up and align the cup and saucer. 


Use a quarter-sized blob of glue and hold them together until they set. 


When the glue is completely cool, tie a ribbon to the handle, hang on the tree, and fill with bird seed. 


That's it! They look so cute hanging in the tree and are a great way to welcome spring!


   Bloglovin'  /  Instagram  /  Facebook  /   Twitter  /  Pinterest  /  Etsy


Why Children Should Color Outside the Lines

15 - Dollar Store Easter & Everyday Crafts

$
0
0

15 Dollar Store Easter & Everyday Crafts

These are so great! And they don’t cost much!

I hope this is helpful for many of you that do crafts!


EASTER-CRAFTS-KIDS-BUTTON


These crafts are just so cute and I think kids will really have fun making them! Crafting in the spring is a great in-house activity. It rains so much in the spring. I hope your family enjoys these!

GO HERE PLEASE

Make Your Kids Some Easter Egg Sidewalk Chalk

$
0
0

Sure, there is a little candy, but there is also a new swimsuit, beach towel, pool floaty, bubbles, chalk and more. Being someone who always likes to give a little something handmade and knowing I wasn’t going to make a towel or pool floaty, chalk seemed like the logical choice.

A wise friend with older children once told me that each spring she fills her Easter baskets with outdoor summer fun toys.

Sure, there is a little candy, but there is also a new swimsuit, beach towel, pool floaty, bubbles, chalk and more. Being someone who always likes to give a little something handmade and knowing I wasn’t going to make a towel or pool floaty, chalk seemed like the logical choice.

paint

Plus, my kids didn’t believe me that we could make our own chalk, so I needed to prove them wrong and sing nana-nana-boo-boo. Actually Easter-egg-shaped chalk was surprisingly easy to make. I feel inspired to make it into all kinds of shapes now.

chalk

SUPPLIES

  • Plaster of Paris
  • Kids' paint
  • Water
  • Silicone baking mold of an egg
  • Disposable cups

chalk

Plaster of Paris

I had a six-egg mold, so first I added plaster of Paris to six disposable cups.

plaster of Paris

Next I squirted kids' paint, little bits at a time, into each cup. We tried some glitter paint, but sadly our chalk did not glitter. You want the plaster to be thick and smooth, but not super runny. You may have to add extra water, plaster and paint accordingly.

paint

Stir like a crazy person. Your plaster will start to set up pretty quickly, so I learned the hard way not to put paint in all six cups at once.

Make one cup of chalk at a time or the last cup will be starting to go in to rigor mortis by the time you get to it.

paint

Pour your plaster into the molds. At this point, I realized some of my eggs had enough plaster and some needed a bit more. Feel free to experiment and make swirly chalk.

Once your molds are full, them set aside on a flat surface to dry. Mine took about 24 hours.

paint

Is it easier to buy ready-made chalk? Of course it is.

Is it better to pat yourself on the back and brag to your other mommy friends that you made your own? Duh. Also, and most importantly, my kids had fun helping me and were pretty amazed at their own awesomeness after making chalk. Next stop, popsicle chalk!

10 favourite free online dishcloth patterns

$
0
0

As requested here are my 10 favourite free online knit and crochet dishcloth patterns- Click here 


Viewing all 1382 articles
Browse latest View live


Latest Images