Quantcast
Channel: Crafts - BlogHer Topic Feed - All Posts
Viewing all 1382 articles
Browse latest View live

Overachieving mommies: Stop ruining Valentine's Day for the rest of us

$
0
0


Overachieving mommies, I beg you: Hands offa Valentine's Day.

Checking Facebook tonight before bed I saw a disturbing number of posts from people who were still up near midnight. Why? Because they were making homemade Valentine's Day cards for their kids' classes. I even read a few posts that mentioned presents for classmates that needed to be wrapped in actual wrapping paper.

Ladies, do you realize what you're doing with all that wrapping paper? You're taking an easy holiday and making it a pain in my ass.

This is the one farking holiday that slacker moms like me can handle with $10 and a trip to one store. Sending your child to school with your homemade handiwork means that it's only a matter of time before my daughter starts guilting me into spending every fucking February 13th in the living room with a hot glue gun while I mutter a stream of profanity so intense that it would certainly burn a hole in the rug.

And I'm a renter, people. I'd have to pay for that shit.

Whaddaya say we all agree to take this one holiday and phone it the hell in? We're all busy enough, aren't we? The last thing I need to do is spend hours combing Pinterest for cute Valentine's Day cards that will certainly require supplies that I cannot find floating around my junk drawer. Then, when I finally gather said supplies, I'll get to sit down and make 30 of something. Thirty. Even if each card takes one minute to assemble (and who are we kidding here?) that's thirty minutes that I could've been trolling the Internet for gossip on Downton Abbey or sleeping on the couch with my mouth open while The Dead Files plays in the background.

So do me a favor: Back it up, sisters. Quit raising the g-d bar on every holiday and ruining it for the rest of us.

Now put down whatever it is you're gluing to paper doilies and go to bed. I don't want to have to talk to you about this kind of thing again.

Psst ... now go share this post. Together, we can save Valentine's Day for the slackers! 


Be Mine! Valentine's Card

$
0
0

Hey everyone, I just wanted to say a quick hello and show you this cute Be Mine! Valentine's Day Card I made.

BeMine1

Supplies include white cardstock for the card itself, pink heart patterned paper, Be Mine! journaling block and heart stickers.

It's so pretty I hate to give it away lol...thanks for stopping by today and visiting with me!

signature

I will be sharing this post at some of these great parties, check them out here

Valentine's Day Crafts for Kindergarten Kiddos

$
0
0

I teach Kindergarten, Grade 1, and Grade 2.  My Kindergarten classes have reading buddies a couple times a month with a grade 2 and a grade 2/3 split class.  I wanted to do something for buddies that had to do with Valentine’s Day, so naturally I headed on over to Pinterest.

Unfortunately, the Pin that I pinned is gone, and so I can’t link it up for you.  I can find the idea on Google in an image search, but I’m very leery of posting Google Image pictures in my blogs to avoid copyright infringement, so you’ll just have to deal with my explanation and a picture of my end result.

SO here’s the general idea!  Take a glue gun and make all kinds of cool Valentine’s Day messages on sections of cardboard.  I did things like hearts, flowers, and quotes like “You are my Sunshine” and “I wuv you” and “You Rock.”  Just be creative and make a whole bunch.  Just like the leaf rubbings we used to do as kids, then, you slip them under a piece of paper and go over them with a flat crayon.

I gave the plates to my Kinders and let the 2s and 3s help them keep the paper and plates still while they did the rubbings.  They got to make a Valentine’s Day Card for anyone they wanted, and if they wanted a personalized message, their buddies would help them with the writing.

This is my sample (all four pages of it).  They turned out pretty well!  I was pleased.  The kids made some really cute ones.

ImageImageImage

Image

Pro Tip:  Don’t use corrugated Cardboard.  The corrugated lines show up through the glue gunned words/pictures unless you colour/rub VERY carefully (which, if you’ve ever asked a 4-year-old to do, you’ll know won’t happen).  I found cracker boxes and cereal boxes worked best.

workshop-button-1

Check me out at http://thisblogisepic.wordpress.com

Featured Artisan ~ Grahams Bazaar

$
0
0

Featured Artisan ~ Grahams Bazaar

 
This week meet Sebnem and Darral, a husband and wife team from Canada. How can you not love their creative shops, particularly when their motto goes something like this: 

'We live to discover, create, share and love ♥ We enjoy laughing, loving, learning -- LIVING!'

Be sure to visit them online - they have everything from hats to clothes (even for your pup) to photos. They love to create!
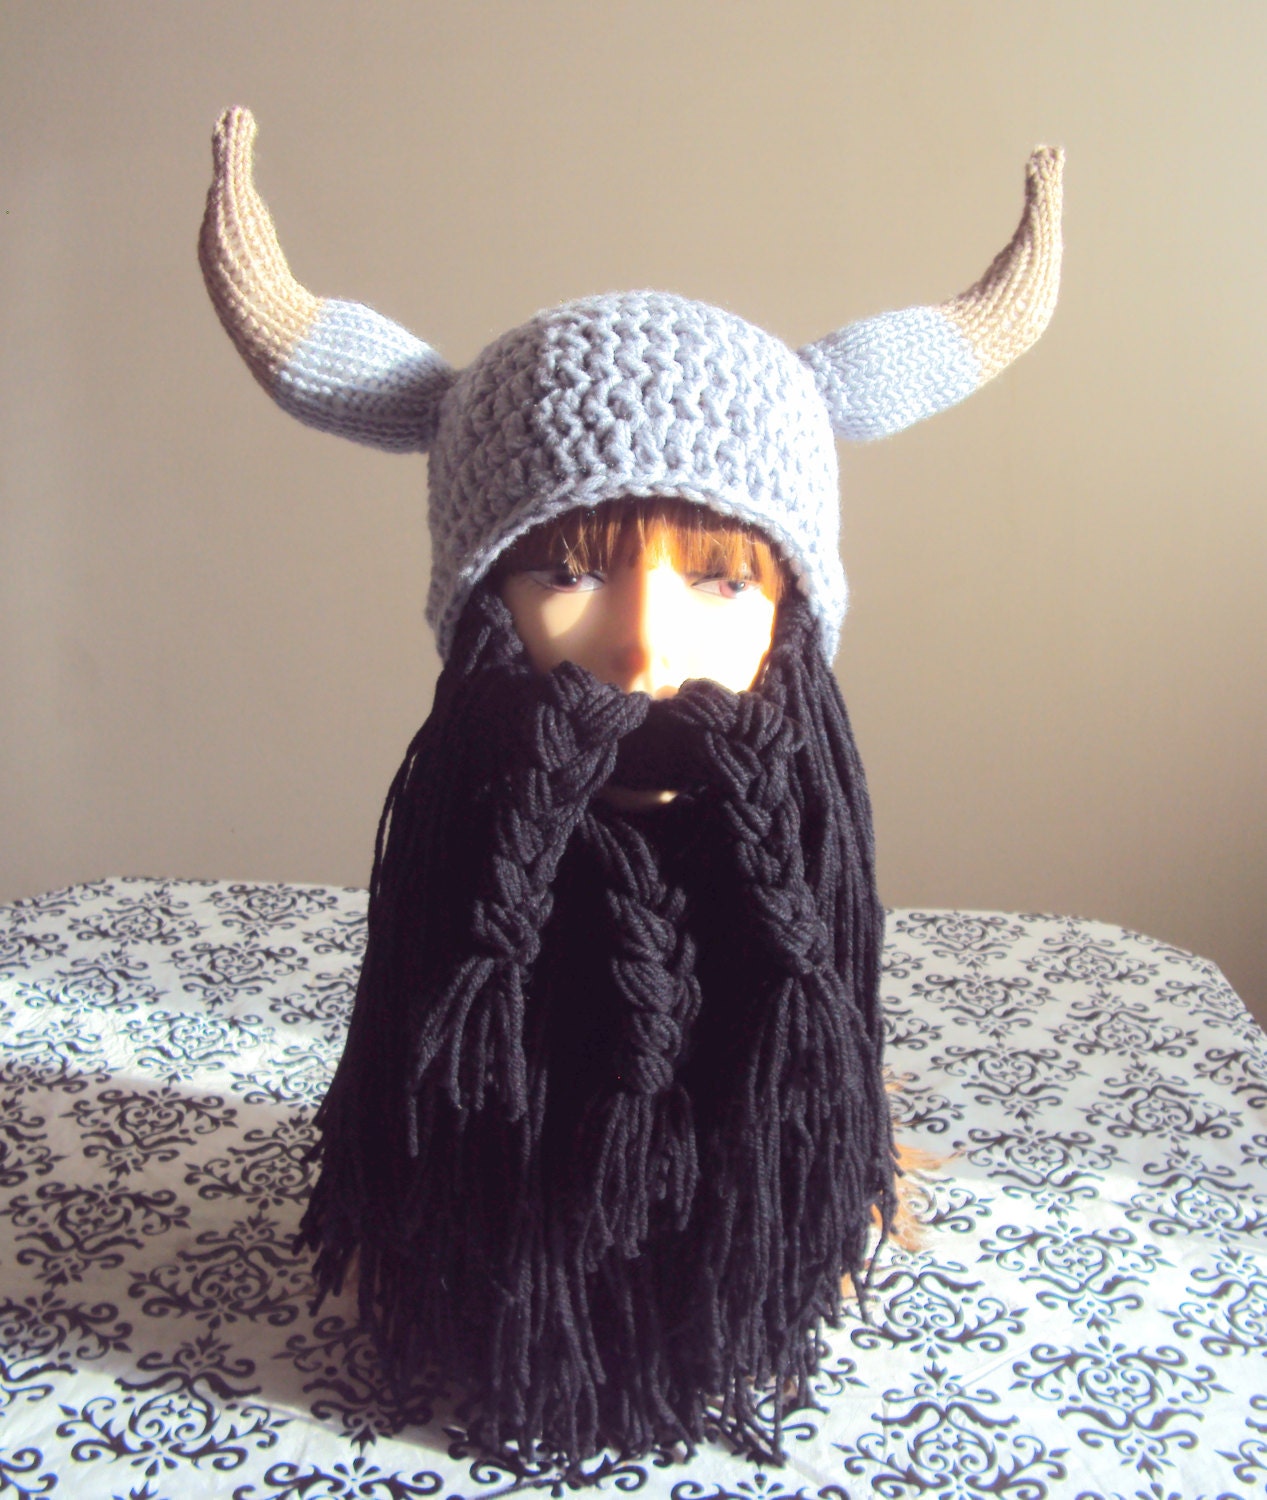
(and who doesn't need a Viking Hat?)

Grahams Bazaar


Featured Artist

Share the Love Blogger's Unite

Grahams Bazaar is this week's Feature Artists on Share the Love Blogger's Unite! 

Handmade Accessories Gifts Photographyhttp://www.etsy.com/shop/GrahamsBazaar 

All creations in our shop are limited edition and unique... Our inspiration comes from everything, everywhere. We live to discover, create, share and love.

You can Find Grahams Bazaar on:

Etsy Facebook Blog Etsy Shop 2 = http://www.etsy.com/shop/sebsurer 

Are you On Fire for Handmade? 
http://onfireforhandmade.com 
Shop at On Fire Gift Guide! 
https://onfiregiftguide.com

Valentine's Day Round Up

Simple elegant packaging

$
0
0

 Sometimes it costs as much to package things as to make them.  I'm always looking for creative ideas that will help save money.   I have learned recycling is the crafter's friend...Behold, thank-you note envelopes!  Perfect for earrings, smaller bracelets, necklaces, and more.  

Click through to the Lady Lazarus Designs blog for a how to on this thrifty packaging solution for small jewelry sales!


-Liz

Etsy  |  Wordpress  | Twitter

Sharing Two Layouts

$
0
0

It's once again that time when I share with you my latest layout creations. I have actually been really busy lately creating layouts. However, since some of them were for yet unreleased products, I can't show you them just yet. I do have two layout creations that I am excited to share with you today.

This first layout was created as part of my work for Crafty Button Designs (CBD) creative team. I love being part of the CBD team. Love all the artsy stuff that she creates. For today's layout, I scrapped one of my wedding photos. I scrap these a lot when I am working with more feminine colors. I had a lot of fun using all of CBDs new Love Story collection.  I especially love the great paper packs that are part of the collection.

Forever Love

This second layout was created for Tracy Martin Designs. Tracy also includes lots of paint in her kits. I've only been on this team for a few weeks, although I've known Tracy since she was a new designer, and I love being part of the team. For this layout, I used a photo of myself from what I think is the 7th grade. I am lucky enough to have had my mom scan a lot of childhood photos a few years back, so I get to scrap with them.

7th Grade Layout

For this layout, I used Tracy Martin's The Sweetest Thing newsletter and Facebook freebies along with Doting Doilies and Brushed Gold Alpha. I have to admit I love this alpha. I think it works perfectly with all the brightly colored paint on the page.

This is it for me today.  Have you done anything creative lately?  If so, link me up in the comments below.  I'd love to see what you've done.

I hope you have a wonderful weekend ahead of you.  Whatever you do, don't forget to document your memories.

THE BULLET ON A BOTTLE :: UPCYCLING WITH DECOUPAGE


ROAR! Make a Dinosaur Felt Play Mat with DIY Tips and Printable Templates

$
0
0

This Christmas I made several gifts for the little ones in my family. One of the things I made was a felt dinosaur play mat. I kept track of the process so I could share some tips with you, and a PDF set of templates. There are multiple posts for dinosaur play mats out there, but most of the ones with templates are for little ones. I must say mine is nice and big, and the templates make it easy to crank it out. This is how I did my DIY dinosaur felt play mat.

Dinosaur Felt Play Mat - DIY Tips and Printable Templates from The More With Less Mom

Skip to the template download


NEXT: {LET'S GET STARTED!} -->

The first thing you do when making a gift like this is to go on Pinterest and get some ideas. Then get distracted by Pinterest for an entire day. Then get back on track, and get some actual ideas.

Sketch

Make a sketch of what you want. Plan what colors you need and gather your materials. If you have any important props, like little dinosaurs, you need those so you can make sure you have the right scale. I got mine from the dollar store.


NEXT: {KEEP GOING!} -->

I knew I wanted a volcano, cave, hill, tar pit, lake, stream, beach, palm trees, rocks, and ferns.

Mock up

Use brown kraft paper, which you can get at the dollar store, to make a full-size mock up.


NEXT: {LET'S GET DIMENSIONAL!} -->

I vaguely traced the lines from my kraft paper to make samples of my 3D elements, using another piece of kraft paper.

I knew sewing would take forever so I used hot glue for my project.

Mock up

I used newspaper to stuff the paper hill.

I made darts in the rounded items to help the curves come together.

Mock up

Use your little dinosaurs/figures to make sure things fit right. I made sure the dinosaurs fit in the cave and the tar pit.


NEXT: {A WORD ABOUT PROCRASTINATION!} -->

I used white chalk to trace my pattern pieces onto the felt. I also neglected to take a single photo during this process. I may have been delirious from sleep deprivation at that point. I may have procrastinated until the literal 11th hour, thus the dark nighttime photos, except for the ones that are in glaring morning sun. Sorry!

Dinosaur mat

In this photo the strap is laid out on the bottom of the mat.

For the mat I got one yard of 72" width green felt (off of eBay for under $10, actually I bought more so I could make one of those wall Christmas tree thingies). I cut a strap about three inches wide off of the short side, to use as a tie for the mat. There are lots of solutions for keeping these play mats together. I was going to make a bag to attach to the strap, but then I realized how big the volcano was going to be and decided there was no need.

I cut the remainder of the felt in half and then used (lots of) school glue in between the layers to give the mat a little structure. I may suck at cutting stuff; there was a little trimming to be done to neaten it up. You can also glue some cardboard to the bottom so the mat does not stick so much to a carpeted floor, but I knew this wasn't an issue for the house it was going to. This dried overnight but I didn't do anything else to it so I could do this the same night. I left the mat plain on purpose so later I could make different felt sets and it would be open to the child's imagination.

I bought paint pens ($1 each: black, white, and glitter) to add detail to our felt features. You can also try fabric markers but I'm not sure how well that would show up on the felt.


NEXT: {GET IN THE PIT!} -->

Tar pit

The tar pit is two circles, one slightly larger so there is a little bit of a pouf. There is a slit in the larger circle for the dinosaurs to fit through. Kid #2 painted some tar swirlies and glitter on it.


NEXT: {BEWARE THE VOLCANO!} -->

Volcano

The volcano is three conical pieces and a circle for the bottom. The sides are about the height of a regular piece of felt. If I was going to use primary colors I would have made this purple. I put in darts for the curve. I put the sides on so that one piece was "on top" so I'd have a pretty side, but I think it looks okay regardless. The four-year-old who got this totally doesn't care. This was the hardest one to put together; do an easier one first to get the hang of it.

For the lava we free-handed based on our kraft paper templates. We cut red, yellow, and white and made each color smaller. Apparently I lost these pieces at some point, so there is no template for the lava. I think next time I would layer some larger red pieces, and then smaller yellow pieces with different lines, so it looks like it's flowing rather than lined up and layered. I put glitter on some of the lava.


NEXT: {CAVEMEN, ER, DINOSAUR TIME!} -->

Cave

The cave is two circles, one much larger. I cut the edge off of the larger one. I used darts for the curve. Kid #2 drew stones on it.


NEXT: {TO THE TOP OF THE HILL!} -->

Hill

For the hill it is two circles, one much larger. I had scraps from making a felt Christmas tree so I used the same color as the mat. I cannibalized a dollar store stuffed animal for stuffing. I think you could get away with using kraft paper or newspaper for stuffing. I put darts in the sides to make it fit the curve. On my sketch there were two hills, but I thought the mat was too busy so I only made one.


NEXT: {NAME IT!} -->

Strap with name

For the strap we just left the felt as is. Kid #2 used the paint pens to write the recipient's name on it.


NEXT: {EVERY DINO MAT NEEDS A LAKE!} -->

Lake

For the lake we cut blue felt in a circle, following our template so the beach would match. Maybe it should have been a kidney. We painted squiggly lines on it.

For the beach we followed our moon-shape template from the kraft paper so it would fit on the lake. I traced the side of the lake to get that touching edge right. I do not have a template for the beach. We added glitter so it would look like sand. If I had sandpaper on hand I would have cut some of that and glued it on top.


NEXT: {DON'T CROSS STREAMS!} -->

Stream

For the stream I cut the whole thing from kraft paper first. We painted wavy lines on it, you could make more waves for rapids, or widen and narrow it. I cut the stream into thirds so the little can turn them and change the stream (don't cross the streams!!). The template seems like a waste of felt; I might make it more narrow so I could get more pieces.


NEXT: {PALM TREES!} -->

Palm tree

For the palm tree trunk, I wrapped brown felt around a pipe cleaner cut in half. For the base you can use a layer of hard cardboard like the back of a legal pad, a poker chip or quarter, and a layer of felt that matches the mat. It has three large leaves and three small ones, with small notches cut in them. You could try using two layers of four leaves each. The leaves were pretty floppy so I ran a line of hot glue like a vein down the middle of the leaf underneath. You could also glue pieces of pipe cleaner underneath.


NEXT: {FERN (VALLEY?)!} -->

Fern

The ferns were scraps cut in a shape like a hill, with notches cut out. If you use scraps from the base this won't stand out as much on the dark background. But you can use lots of colors to make different ferns. I may have procrastinated my way out of a pretty forest of different-colored ferns.

I was going to make little bushes like short palm trees, but apparently totally spaced on this part. If you want to make bushes just make a much shorter palm tree.


NEXT: {LET'S ROCK!} -->

Rocks

For the rocks, once I had the scale, I just free-handed them. Kid #3 helped to decorate them. There are babies in the recipient's home so I didn't make any little ones. You can use scraps to make a bunch of different colored rocks.


NEXT: {PUT IT AWAY!} -->

Pieces in volcano

All tucked away

All of the pieces except the mat fit in the volcano. You can pack it all away in there, roll the mat up and tie it with the strap, fold it over and stick the bottom of that in the volcano. Then the whole thing can be tucked away.

These are not strict templates. I saved the kraft paper mock ups from my freehanded sketch and scanned them. They may need adjustment and I invite you to customize them.

Download dinosaur felt play mat templates

Download dinosaur felt play mat templates, black and white 16 page PDF

More Dinosaur Play Mats On the Web

Dino Play Mat from the Romantic Seamstress sewing, folds up
Dinosaur Play Mat from Serving Pink Lemonade small, fusible web, printable templates
How-To: Dinosaur Play Mat from Make: Craft Magazine sew and fusible web, templates for parts
No Sew Dinosaur World Playmat from Fun at Home with Kids big, glue

Pinterest Boards:

DIY Handmade Gifts For Kids
DIY Handmade Gifts (Not Food)
DIY Felt Gifts


Original post: Dinosaur Felt Play Mat – DIY Tips and Printable Templates ~ The More With Less Mom - Words of wisdom to live frugally and well

Winter Sun

$
0
0

While I was on my making things for me kick, I finally squared away an essential piece of my winter wardrobe.  I have what can charitably be called quite a big head.  I also have wavy hair that can tend towards huge and frizzy.  Finally, I am always freezing.  This means that a winter hat is necessary, but always risks making me look terrible and ruining my hair.  This winter, though, I solved that problem at last with my new Helmet Hat.

 
I had two gorgeous skeins of Malabrigo Worsted in Cadmium that I was looking to use (I only ended up using one) and I've had my eye on the Helmet Hat since the relevant issue of Vogue Knitting came to my door.  I finally decided to put them together, and I'm so happy that I did.  I used a size larger needles than necessary for gauge and knit the middle piece until it was long enough.  This gave me a hat that isn't slouchy, but is big enough to give my hair room to breathe.  I liked the hat as is, but I really wanted a button to wear on it, like the pattern called for.  I decided to save my button shopping for Vogue Knitting Live, and I'm so happy I did.


When I had basically given up, someone at one of the booths suggested this 130-year-old Victorian picture button.  My friend commented that it reminded her of the mockingjay from The Hunger Games.  I agree and it makes me like it even more.  I think it finishes the hat off perfectly, and I'm really happy to have warm ears this winter!

 
Sorry the pictures are all blurry.  Baby doesn't like naps anymore and time is hard to come by around here!  (Thus the not one, but two, pictures of me without makeup for the whole world to see.)

7 Easy Bookmarks You Can Make

$
0
0

I recently went on vacation and overall we planned rather well. We didn't end up bringing many things we didn't need and we only forgot to pack a couple of minor things. Part of that planning was figuring out how many books to bring, something that BlogHer's Facebook community helped me with. It was a screen-free vacation so I only packed paper books. As I settled into a lounge chair on the first day of our vacation I realized I had made an error. I had not packed a bookmark.

Usually that's not a problem for me. I always have a receipt or business card nearby. I had absolutely nothing in my beach bag to mark my page unless I wanted to start using pesos as bookmarks (and I really didn't want to). I ended up doing something I never do -- I dog-eared my pages. I can hear your gasps. I'm kind of surprised with myself. Now that I'm home I'm looking at bookmarks I can take on my next screen-free vacation. Maybe I'll just keep a couple permanently stored in my carry-on.

DIY Monster Bookmarks

DIY Monster Bookmarks
Image Credit: The Haphazard Homemaker

I need to make these monster bookmarks. They remind me of the Yip-Yips on Sesame Street. I love the Yip-Yips.

NEXT ⇒

Magnetic Washi Tape Bookmarks

Magnetic Washi Tape Bookmarks
Image Credit: A Lemon Squeezy Home

Of all the different types of bookmarks, magnetic bookmarks might be my favorite. I love how they give me the option of not only marking my page, but marking the paragraph where I stopped reading. I usually try to stop reading at the end of a chapter or section but there are times, especially when I'm reading in bed, when my eyes get droopy and I just can't make it to the end of a section. I have a pretty new love affair with washi tape crafts, which makes these DIY washi tape magnetic bookmarks perfect for me. I need at least a dozen of them.

NEXT ⇒

Paper Clip Bookmarks That Don't Ruin Pages!

Paper Clip Bookmarks That Don't Rip Pages
Image Credit: What Do We Do All Day?

I'm sure you've been in a store and noticed bookmarks that resemble paper clips. I have a bunch of them. I even have a pretty one from Venice that is decorated with a Murano glass mosaic. These bookmarks are really convenient but they just have one little problem -- they tend to damage, or even rip, book pages. Erica started making her own paper clip bookmarks and they are really, really easy to make. I especially love the ones she made with the spiral clips.

NEXT ⇒

Paper Clip and Pompom Bookmarks

Paper Clip and Pompom Bookmarks
Image Credit: Raising Up Rubies

I like the simplicity of these paper clip and pompom bookmarks but I really love how Jaime matched the pompom colours to the paper clip colours. The rainbow of colors makes me think of children's books and these would make great treat bag items for a children's party. If pompoms aren't your thing, Spoon and Spool has a bunch of ideas for other items to you can use to make paper clip bookmarks.

NEXT ⇒

Easy Paper Bookmarks

Easy Paper Bookmarks
Image Credit: Etcetorize

Tamara's easy paper bookmarks function much the same way paper clip bookmarks do but are made out of thick paper. She used pretty printed paper but we still have some card stock lingering around from the days when we actually printed our resumes to apply for jobs. (Remember those days?) My paper is pretty plain but it would be easy to decorate it stamps, stickers and online printables.

NEXT ⇒

DIY Leather Bookmarks

DIY Leather Bookmarks
Image Credit: Made by Me & Shared With You

There's something about a leather bookmark that feels a bit decadent to me. I was surprised to discover how easy it is to make one. They require very little material, making them a great way to use up any scraps you might have lying around.

NEXT ⇒

Paper Heart Bookmark

Paper Heart Bookmarks
Image Credit: Just Crafty Enough

Susi's paper heart bookmarks are in the same style as the leather bookmarks but even faster and easier to make. My sewing skills aren't great (and my sewing machine is broken) but I'm sure I could MacGyver a way to make them without sewing them, even if they wouldn't look quite so cute without that sewn edge.

What is your favorite kind of bookmark? Have you made your own?

Karen Ballum is a Community Moderator on BlogHer.com. She also blogs at Sassymonkey and Sassymonkey Reads.

DIY Menu Planner with Scrabble Tiles!

$
0
0
In part of our budget-friend meal planning efforts, I wanted something that would help us be accountable and squash those "What do you want for dinner?""I don't care, what you do want?" convos. So I took about FIVE minutes of my life to whip this up!
 
You'll need:
Hot Glue
Magnets
Scrabble Tiles
 
I bought an old game of scrabble at a garage sale for $1 a while back and wanted to put it to use. I spelled out "Feed Me" as a fun caption, then I used SMTWTFS to list out each day of the week.
 
 
Start by trimming your magnets to fit on the backside of your scrabble tiles. ..
 

Thrift Store Chair Makeover-Living On The Upcycle

$
0
0

I spotted this chair in the back of a Goodwill store.  There were various misc items piled on top of it, and It involved quite a bit of work to break this chair free. I was attracted to the chair design  ( The chair featured a fleur de lys) and I loved the detail.  The chair seat was in very rough shape and it would require re-upholstering.  The overall chair frame seemed like it was in ok shape, and I thought enough of this chair to assume the risk.  The chair was priced to sell at $3.99.

When I got it home,  I ripped the blue material off the seat and discovered the seat was broken and could not be repaired.  Now, I had to salvage another chair in order to repair this one!  My husband and I kept our eyes open for any “curbside” or “free” chairs, I prefered to use  a free chair and not purchase one, but months went by until I found a freebie chair that would be perfect, A lucky find at a thrift store. The chair seat would turn out to be a perfect replacement, and I have future plans to upcycle what’s left of the chair frame.  Stay tuned!

First, I cleaned the chair, and primed the chair frame with 2 coats of a white latex primer.  Once the chair was dry, I began to paint it in a white and black color scheme.  I used black and white acrylic paints to paint the entire chair.

This chair was quite a challenge to paint. The chair had a lot of cut-ins, and detail, and required a lot of patience when it came to the paint brush. I sat the chair in front of the fan until it was dry, and then added a layer of Mod Podge overtop to seal the chair.  It dried nicely.  Now I was ready to re- upholster the chair seat. The original fabric I chose was a black fabric with white roses.  When I placed it up against the chair, I despised how it looked!  So, It was back to the fabric store to pick out another style and I went with the Elegant look of Damask.  I used less than a yard of material and cut and traced it to fit the new seat, leaving extra material for underneath the seat.  I used an upholstery stapler and carefully stapled the material to the back of the chair seat.  Once I was done I screwed the seat back on to the chair.

This chair was not short in challenges, but in the end it was worth it. Looking at the finished chair,  I would say this chair turned out to be worth the risk, and a broken piece received an elegant new lease on life!


Back of B&W Damask Chair

Rear View of Black and White Chair

Before and After Chair Made with aint,cloth and Mod Podge

Before and After

Black and White Demask Upcycled Chair

Materials:

Roughed up chair

White Latex Primer

Black and White acrylic paint

Mod Podge

Damask Fabric

Brushes/Scissors

Upholstery stapler and staples

Screwdriver

Black Marker to trace seat to fabric

Upcycling a Garage Sale Find!

$
0
0

I love it when a plan comes together.

Like when I bought these wall-mounted candle holders at a garage sale… They weren’t really my style in their original state, but it was only $5 for the pair and I had a plan.

Supplies

  • 1 piece of plain wood (6’ x 10” x 1” - $8 at Lowe’s)

  • 2 screws

  • 2 wall mounts

  • Rustoleum Oil-Rubbed Bronze spray paint

Alt text

I’ll admit - after reading Stacy’s article on how amazing this spray paint is, I was kind of looking for an excuse to use it. Best part? It gave this plain ol’ wood a funky, metallic appearance, really making it stand out. Here’s the wood after a couple coats of the spray paint.

Alt text

I was spray painting outside and the sunlight made it look a little crazy, but I kept on because I’m stubborn. I just KNEW it would be beautiful.

Once the wood was completely dry, I measured about 12 inches down on each piece, marking a place to put a screw. I then nailed the mounting gear to the back of the wood.

Alt text


Read the rest on littlebitpretty.net!

How to Make a Living as a Crafter

$
0
0

I have made a living as a crafter for close to 15 years. It has not always been easy. There were times I was poor, and there were times I felt rich. There were times without health insurance, and times when I was staying in hotels in Beverly Hills. The craft industry waxes and wanes like anything else. This, my friends, is why I always live by the motto that you need to have several financial irons in the fire at once.

How to make a living as a crafter

A lot of people think they can’t make a living off of their craft business. Most of those people are right. However, could they make a living selling their jewelry at festivals, selling supplies on Etsy, writing freelance articles for magazines, and running paid ads on their blog? Maybe. That's a lot of balls to keep in the air, but it can be done. Most people who make a living in the craft industry don’t make it off one paycheck alone. This is the most important lesson I can bestow on you. Sure, you could work a 9-to-5 job and make $50K a year. You could also work several smaller craft-related jobs, never wear pantyhose again … and still make $50K a year.

FIRST STRATEGY: SELL!

Strategy #1: Sell

Naughty Secretary Club jewelry

How many times have you heard, “Hey, you should start selling those!” about something you made? Maybe all those people are right. I’ll be honest: With the advent of Etsy, the market for handmade goodies has become a lot more saturated than it once was. Since the barrier to entry for running an online craft business has been lowered, there is a lot more competition out there. That being said, it has also never been easier to open your own online craft store.

And online is just one way to sell your handmade soap, dolls, art, or what have you. Are there shops in your town that might be interested in taking out a wholesale order with you? Do you have any craft shows, even seasonal ones, in your town, and would you consider getting a booth? When I made jewelry for my company, Naughty Secretary Club, I was doing all three. Again, it is a lot of work, but it's one way to turn your side business into your full-time business.

NEXT STRATEGY: BLOG!

Strategy #2: Blog

Naughty Secretary Club blog

If you craft, chances are you also blog. (What’s the fun of crafting if you can’t share what you made with the world, right?) So, are you making money off your blog? You could be. You can apply to a number of companies, including BlogHer, to do so. Usually it works like this: The more traffic your blog gets, the more people look at the ads, and the more money you make.

In addition to ads on your blog, BlogHer (and other companies) also offer additional opportunities for members, such as writing sponsored content. You can also start your own ad program and sell ad space on your blog or set up something like Google ads.

Another way to get paid for blogging is to be a spokesperson for a craft company. Craft companies are always looking for design team members. Keep an ear to the ground for when your favorite craft supplier puts out a casting call. I, for instance, work with I Love to Create. I get paid weekly to write a sponsored how-to post for them, in which I use their products. If you use a company's products constantly, don’t be afraid to pitch yourself to them!

Note that if you're involved with a network that offers advertising and sponsorship opportunities, there may be rules about approaching brands directly. And the brands you approach may also have requests for working elsewhere. Make sure you ask, and make sure to review all agreements carefully.

NEXT STRATEGY: WRITE!

Strategy #3: Write

Kids Crafts 1-2-3

If you are already writing a blog, why not get paid to write for other blogs and magazines, too? Did you know BlogHer pays for great how-to articles? Many websites do -- and magazines, too. Check out your favorite publications online, and look for their submission guidelines. I am the editor of a magazine called Kids Crafts 1-2-3. I am constantly looking for creative how-to projects and articles, and I pay for each one of them.

NEXT STRATEGY: TEACH!

Strategy #4: Teach

Teaching at a sewing studio

Teaching is another great way for crafters to make money. Sure, we would all love to have an online class at Craftsy or Creativebug, where people are paying to download our expertise all the time. But if you're handy with cameras and computers, you could also make that happen on your own blog.

Downloadable classes and projects are something I call PIGs: Positive Income Generators. These are things that make money while you sleep. You teach one online class and have it available for download, and -- while you are sleeping -- people are paying you for something you already did.

Even something like starting your own YouTube how-to channel can be lucrative, if you opt to run pay ads on your videos. Not so comfortable in front of a camera? Why not check with some local stores and craft studios and see if they are hiring new teachers? Maybe they have been dying for someone to come in and teach screen-printing or embroidery, and you are just the gal.

Did I mention making a living as a crafter is a lot of work? Yeah… I wasn’t kidding. It can be done, but prepare yourself to work. If you love what you are doing (and what crafter doesn't?), then it shouldn’t really feel like work at all.


Cutest Exorcism Ever

$
0
0
V was baptized last weekend.  The deacon explained that it's a type of exorcism (first time hearing that for both of us) and I think it may have worked -- she's ditched the 4 AM wake-ups for the week!  I also got a 40-minute, not-on-me nap today.  Glorious!

We were lucky enough to have my baptism gown and a blanket my mother made for me to use for her, but no shoes.  I had been considering just popping some white tights on her and calling it good, but realized that my crafting skills should be good for something, so I crocheted her some booties.  I used some ancient Lion Brand Pound of Love that was taking up space in my stash and buttons from a dress that I don't like much anymore that was missing a button anyway, and made shoes.  It felt pretty powerful to go from no shoes to shoes in one day using only things found around my house.  Just call me MacGyver.


How cute are those?  And at this point I'm starting to think I might be a crocheter.  Those involved lots of stitches that were new to me and it was NBD.  I even modified the pattern to fit her feet, on the fly, and did so correctly!  Plus, so pretty on!
 
(with Oma, Grandpa, and cousin Noelle)
 
Yes, her pacifier was in her mouth for all of the pictures.  It was there for the entire ceremony because she slept!  And was quiet!  The whole time!  I was not changing anything.  As evidenced by my arm pain the rest of the day from barely moving.  We were also lucky enough to have gorgeous weather, so we got to enjoy the rooftop views at our party.  It was a really special day.  
 
Plus, we're now demon-free.


Card Making Ideas

$
0
0

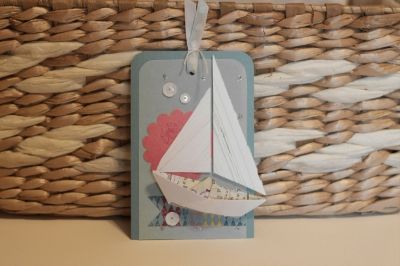
I’m so proud of this tag! Yes, I think I need paper crafting anonymous. Clearly I’m having to much fun and I’m addicted!  With this project I was able to use my paper boat making skills. Which was a blast.  I’ve been noticing some really cool paper boats on this site, Mamompopjes. She has the most charming and adorable paper boats featured on her site right now. Read More...

Card Making Artists

Sophisticated Bug Repellant!

$
0
0

It'll be summer before we know it, and in Texas, that means MOSQUITO BITES. 

Time to get crafty and fancy bitches. To make these sophisticated mosquito repellant bottles, just follow these easy steps. 

Here's what you'll need:

Wine Bottles

Glitter and Mod Podge

1/2 inch metal washers (Super cheap from any hardware store)

Replacement Tiki Torch Wicks

Tiki Torch fluid (The green bottle is specifically to address mosquitos)


First soak your wine glasses in warm water with soap until the labels become easy to remove. I use this handy gadget below (which you too can buy at Bed, Bath and Beyond for 99¢ at the checkout) to really scrape off any difficult labels. Don't abuse your fingernails! The leftover label residue takes incredible magic powers to truly remove, so I found a much simpler alternative.....GLITTER!


Read the rest on littlebitpretty.net!

Color of the Year: Radiant Orchid

$
0
0

Last week, I was on a mission to find an inexpensive wardrobe mirror that I could doctor and transform into something fabulous. I took a trip to Old Time Pottery. Instead of a mirror, I fell in love with the color of some of their flowers, and brought home everything I would need to make a new Spring arrangement for my front doors.

Little did I know, I was choosing Pantone's color of the year, Radiant Orchid. Quite honestly, I didn't even know there was a "color of the year" until I read a fellow bloggers' post about it. Well, I do now, and my front doors are looking so vibrant and cheery. I hope you'll agree.

Here are the planters that I usually fill with live plants every year and hang on my front door. I bought them a few years ago at the Fairhope Arts and Crafts Festival and they've been a favorite ever since. The front of the planters are made of old ceiling tiles and the body is solid wood.

Empty planters
Empty planters

Supplies for the project include:

  • styrofoam
  • wire cutters
  • floral wire
  • ribbon
  • ribbon maker kit (this is so much easier than trying to hold the ribbon in your hands).
  • moving tape
  • floral stems
  • greenery filler
Floral Supplies
Floral Supplies
Styrofoam
Styrofoam

I taped three pieces of styrofoam together and placed them loosely in the planters. I do not want them to be permanently glued into place because I will change out this arrangement again in the summer.

Planters
Planters

I had an idea floating around in my head of what I wanted it to look like, but it is mostly trial and error. If I place a flower and then don't like it, I keep working until I do. I began with the wide mesh ribbon to have something pretty to see from the back, since my front doors are glass. I used a darker purple ribbon than the flowers for a little contrast.

Wide Mesh Ribbon
Wide Mesh Ribbon
Decorative Grasses
Decorative Grasses

I love decorative grasses, so I started with these as a backdrop for the rest of the flowers.

Door Arrangement
Door Arrangement

And here is the finished project.

Floral Arrangment Side View
Side View
Radiant Orchid on my Front Door
"Radiant Orchid" on my Front Door
Front Door Planters
Welcome All!

This may not be the exact color of Radiant Orchid, but it is close and I love having purple somewhere in my house. It wouldn't work anywhere inside, except perhaps as place settings for my spring table.  HUMMMM, I need to go shopping again.


Thanks so much for reading,

Kim @ CoziNest

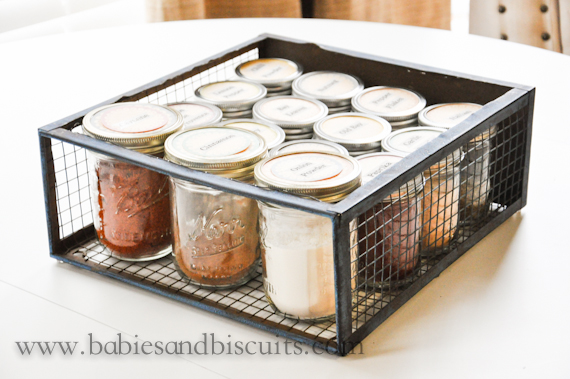
DIY Spice Holder

$
0
0

DSC_3344

It’s widely understood around these parts that I like Mason Jars.   Ok, maybe more likeLOVE  them.

I even make layered cakes in them.  If you missed that post, you can see it here.

Well, the other day, while going into my pantry to pull out things for dinner, I noticed my stash was overflowing.  I can never bring myself to part with a mason jar, so I thought of something I could use them for.  Then it dawned on me!  I have been trying to clean out my lazy susan in the kitchen.

Since I didn’t want to spend any money doing that, I decided to make my own version of a “spice rack”/holder thingamajig.

SO!  This is what I did:


DSC_3331

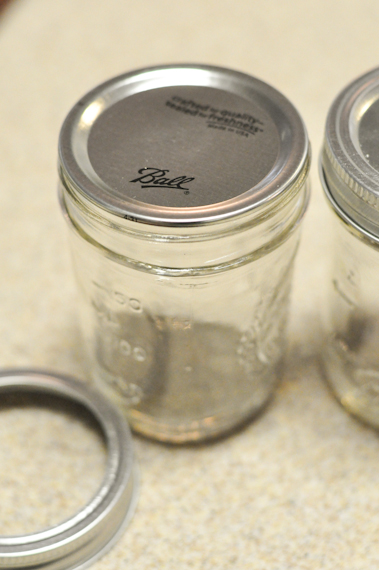
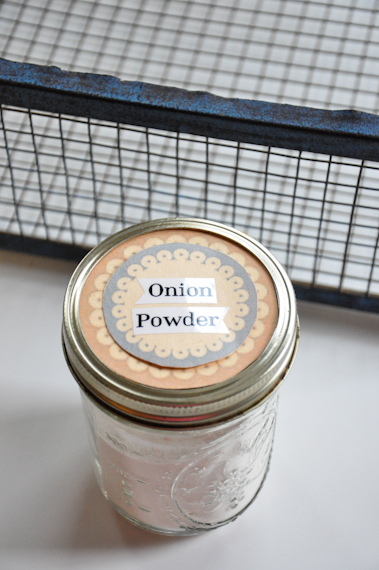
First, I took the mason jar…

DSC_3333

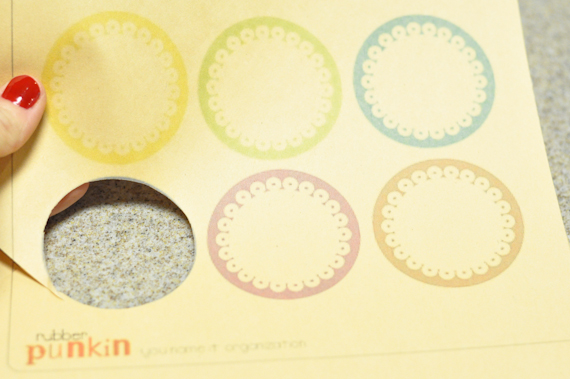
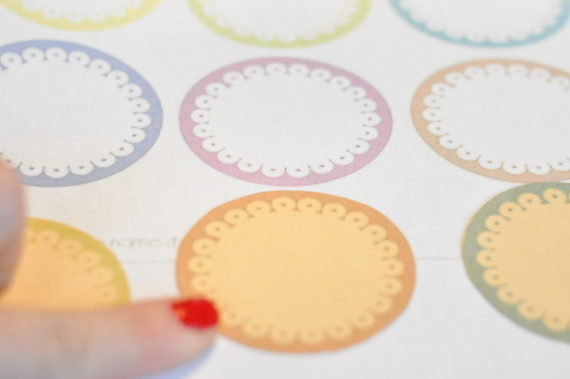
Then, I hopped online and searched free circular printables and found these.  They were perfect size for the seals on the small jars I was using.  My computer allowed me to size them this size and also slightly bigger.

DSC_3334

If you notice, I chose to put them on a slightly yellow tinted paper compared to white because I wanted the labels to have a vintage appearance on them.  You could use any color you like though.

DSC_3330

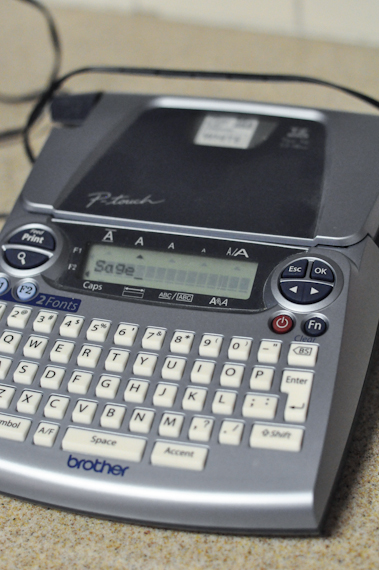
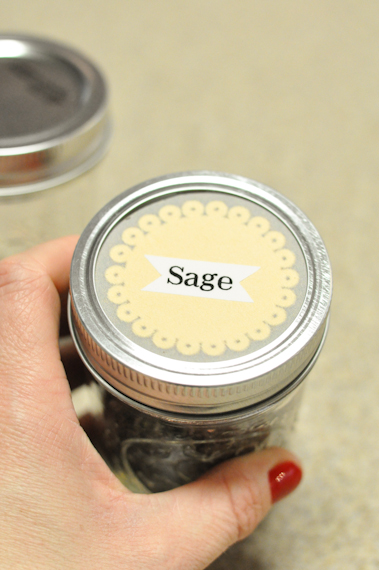
After cutting out the labels for the seals, I took my label maker and made each spice name I wanted to use.  I decided to cut the ends in a banner like point to give it some flair.

DSC_3332

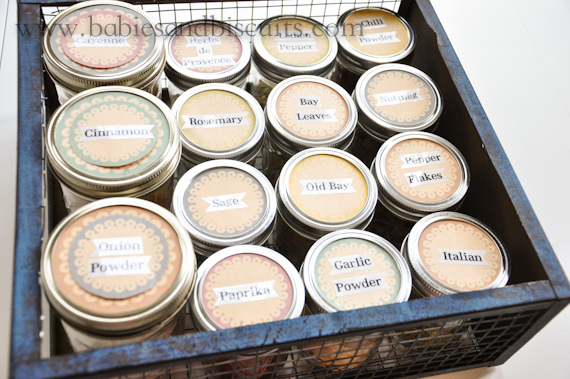
This was the end result.

But then, I needed something to put them in…….


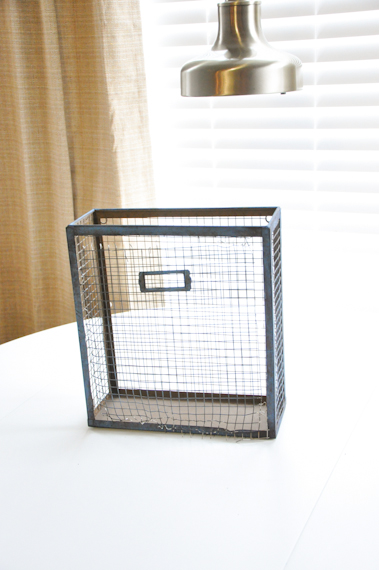
DSC_3335

I had this metal thing I bought from Homegoods a while back and was planning on trying to sell it in a yard sale.  I say thing because while I thought it was a good idea to buy it at the time, I just couldn’t find a permanent home for it.  It held a few papers once, then was a shoe holder for my little man, and then just went into the yard sale pile.

So, I decided to give it one more try.  Unfortunately, it just wasn’t a contender in it’s original state.

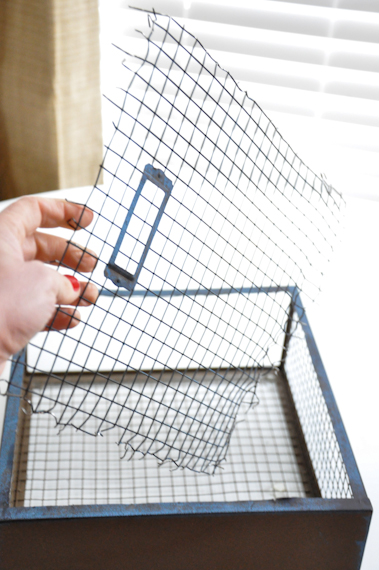
DSC_3338

So, I laid it down and deconstructed it, a bit.

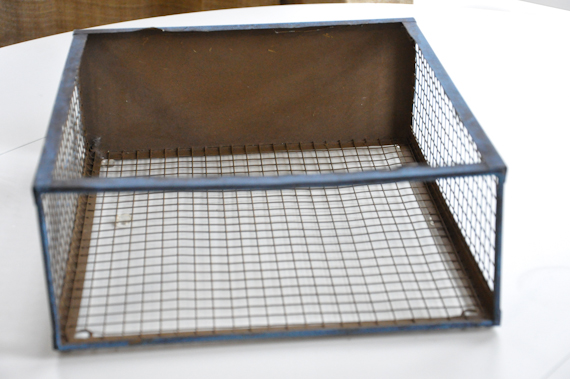
DSC_3339

Ending up with this.  I call it RUSTIC FLAIR!  LOL!

DSC_3341

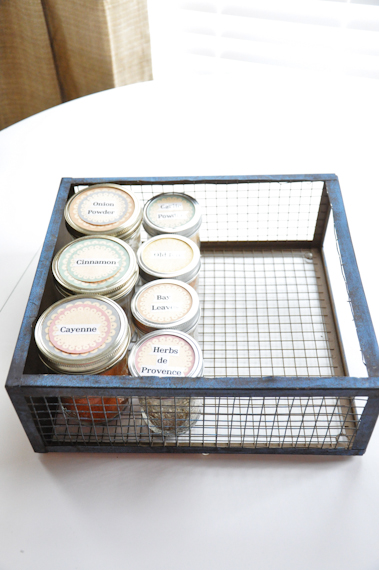
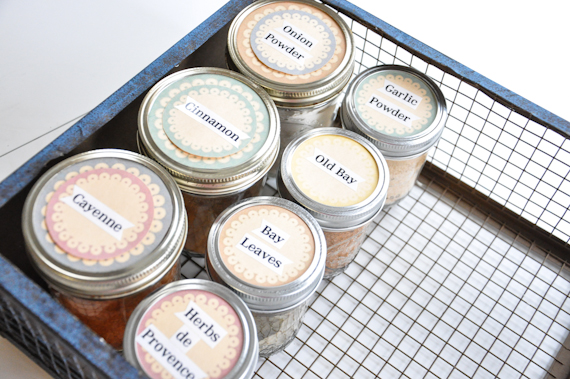
So, in the spices went.

Now, there are a few spices I use more of, so I thought it would be good to make their jars a little bit larger.  Unfortunately, the labels in the original size were too small for their lids, so I doubled them up.

DSC_3340

This was the end result.

DSC_3343

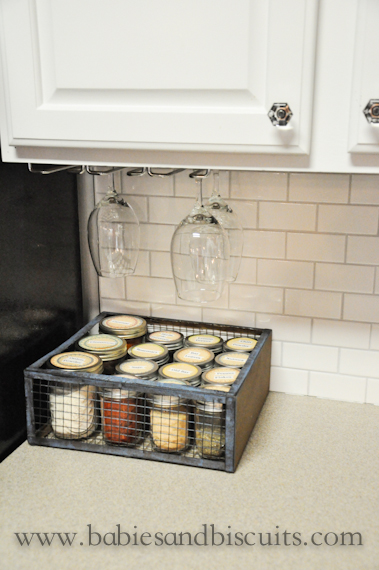
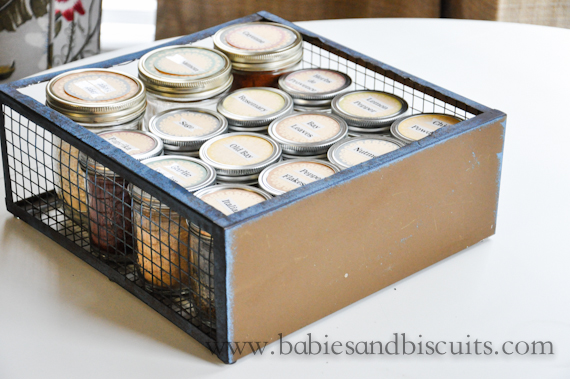
Now, I realize that one side of the basket, basically being the bottom of the holder, is a different color than the rest of the holder.  Then you have the opening on the side of the holder that was originally the top, but I had a solution for that.  Hee!  Hee!

DSC_3350

The opened side went up against the fridge (so you can’t see it, unless I point it out), and the other end just looks brown.

DSC_3346

Yup!  I’m just lazy like that.  Of course, I could paint the brown side, but I kinda like it.  If I end up not liking it in the future, I’ll probably paint it.

DSC_3347

So there you have it.  It really has been a nice addition to my kitchen.  I thought about using the piece I cut off and piecing it on the opened side.  However, you DO remember I said the word lazy, right?

Happy Weekend, Everyone!

XOXO,

Esther


Viewing all 1382 articles
Browse latest View live