Quantcast
Channel: Crafts - BlogHer Topic Feed - All Posts
Viewing all 1382 articles
Browse latest View live

The Tally Tales: DIY Burlap Bow Tutorial

$
0
0

Note: You can find the original post for this tutorial atThe Tally Tales.

Today's DIY project will feature the following item…

I know there are a million fabulous tutorials out there for burlap flowers (I did the Pinterest search), but I wanted a really simple technique that would produce a casual-but-classy flower product. I know rosettes are a particular favorite, but they aren't necessarily my style. I found inspiration for the method I am using today at Engaged, Now What?, and this has been the perfect technique for me.


I started with a basic roll of burlap ribbon. I cut a strip of random length. Seriously, no measuring here… this tutorial is easy. For those of you who prefer to use measurements, my strip was close to 1 1/2 feet in length. I wanted a larger size flower. If you want a smaller one, you might not want to use that much length.


Apply a thin strip of hot glue along the edge of one end of the strip.


Fold the glued end over approximately 1/2 inch. This is a great little technique for helping secure the threads so they don't slip or pull out as you work!

Insert scissors approximately one inch inside the non-glued end. Use the scissors to pull one thread loose from the ribbon. I did not cut this thread.

As you can see below, this will give you a nice, single thread with which you will work to create the flower.

Slowly begin to pull the loose thread, allowing the rest of the fabric to bunch together. Make sure you do this slowly and steadily; too much force may break the thread.

Continue pulling the thread until you cannot pull it any longer. You will see the flower start to take shape. Simply wrap the thread around the middle of the flower, and tie it to itself. This will secure the shape of the flower, but you can always add a dab of hot glue in the center if you need a little extra stability with the shape.


How easy is that?!?

If you follow The Tally Tales regularly, you may remember my earlier tutorial for a Rustic Fall Vase. If so, then these items will look familiar to you. I have converted those vases into interior decor items, and this little burlap flower has made the perfect embellishment for one vase.


My Attempt at Being Crafty

$
0
0

I saw this post about how a mom cut out a heart for every day leading up to Valentine's day. She wrote something she loved about each of her children and taped it to their door every night. 

I am not a crafty person.  I am not an organized person but I thought this would be really cute to do for my boys and my husband.

First I thought I would really go above and beyond and do this for the entire month of February.  I did some math and figured out I would need 112 hearts.  I bought colored paper and sat down to trace and cut out my hearts.

I got three hearts cut out and decided this sucked and there had to be an easier way.

I went to the local 'party supplies store' or as I like to call it 'the 7th circle of hell' and found these: 

Day 1:  The oldest wondered what I was putting on "his" door.  The others haven't noticed yet.  Husband has not mentioned any hearts.

Day 2:  The oldest read his and rolled his eyes.  The others haven't noticed yet.  Husband has yet to mention the hearts.

Day 3:  The oldest asked if he could take the hearts down before his friends see them.  The others...sigh... haven't noticed  theirs yet.  Husband has not noticed his freaking hearts yet.

Day 4:  The oldest took his hearts down.  The middle put monster truck stickers on all of the remaining store bought hearts.  The youngest ate half of a heart.  Husband still has not noticed hearts.  He has, however, noticed there is a bed made for him on the couch. 

Day 5:  Screw this...they will all get Valentine's at school and daycare.  Blah...

Ravellenics

$
0
0

Is anyone playing along with the Ravellenics?  I'm captaining a team for Hufflepuff.  There was quite a bit of controversy over the games, but I'm glad they got it worked out, since I love crafting competitions.  I'm planning on doing some pieces for my newest modular baby blanket, Owl Obsession.  It's crocheted and definitely the trickiest I've tried yet.  I haven't managed to get a piece right without some ripping yet!  I love watching it come together, though, so it's worth the trouble.

Here are some pictures of the pieces I have done.

 
I love watching yarn with long color changes!  I can't wait to show you guys more pieces after the Ravellenics are over.

Dinosaur Felt Play Mat – DIY Tips and Printable Templates from The More With Less Mom

$
0
0

Dinosaur Felt Play Mat - DIY Tips and Printable Templates from The More With Less Mom

This Christmas I made several gifts for the little ones in my family. One of the things I made was a felt dinosaur play mat. I kept track of the process so I could share some tips with you, and a PDF set of templates. There are multiple posts for dinosaur play mats out there, but most of the ones with templates are for little ones. I must say mine is nice and big, and the templates make it easy to crank it out. This is how I did my DIY dinosaur felt play mat.

Skip to the template download

The first thing you do when making a gift like this is to go on Pinterest and get some ideas. Then get distracted by Pinterest for an entire day. Then get back on track, and get some actual ideas.

Sketch

Make a sketch of what you want. Plan what colors you need and gather your materials. If you have any important props, like little dinosaurs, you need those so you can make sure you have the right scale. I got mine from the dollar store.

I knew I wanted a volcano, cave, hill, tar pit, lake, stream, beach, palm trees, rocks, and ferns.

Mock up

Use brown kraft paper, which you can get at the dollar store, to make a full-size mock up.

I vaguely traced the lines from my kraft paper to make samples of my 3D elements, using another piece of kraft paper.

I knew sewing would take forever so I used hot glue for my project.

Mock up

I used newspaper to stuff the paper hill.

I made darts in the rounded items to help the curves come together.

Mock up

Use your little dinosaurs/figures to make sure things fit right. I made sure the dinosaurs fit in the cave and the tar pit.

I used white chalk to trace my pattern pieces onto the felt. I also neglected to take a single photo during this process. I may have been delirious from sleep deprivation at that point. I may have procrastinated until the literal 11th hour, thus the dark nighttime photos, except for the ones that are in glaring morning sun. Sorry!

Dinosaur mat

In this photo the strap is laid out on the bottom of the mat.

For the mat I got one yard of 72" width green felt (off of eBay for under $10, actually I bought more so I could make one of those wall Christmas tree thingies). I cut a strap about 3 inches wide off of the short side, to use as a tie for the mat. There are lots of solutions for keeping these play mats together. I was going to make a bag to attach to the strap, but then I realized how big the volcano was going to be and decided there was no need.

I cut the remainder of the felt in half and then used (lots of) school glue in between the layers to give the mat a little structure. I may suck at cutting stuff, there was a little trimming to be done to neaten it up. You can also glue some cardboard to the bottom so the mat does not stick so much to a carpeted floor, but I knew this wasn't an issue for the house it was going to. This dried overnight but I didn't do anything else to it so I could do this the same night. I left the mat plain on purpose so later I could make different felt sets and it would be open to the child's imagination.

I bought paint pens ($1 each, black, white, and glitter) to add detail to our felt features. You can also try fabric markers but I'm not sure how well that would show up on the felt.

Tar pit

The tar pit is two circles, one slightly larger so there is a little bit of a pouf. There is a slit in the larger circle for the dinosaurs to fit through. Kid #2 painted some tar swirlies and glitter on it.

Volcano

The volcano is three conical pieces and a circle for the bottom. The sides are about the height of a regular piece of felt. If I was going to use primary colors I would have made this purple. I put in darts for the curve. I put the sides on so that one piece was "on top" so I'd have a pretty side, but I think it looks ok regardless. The 4 year old who is getting this totally doesn't care. This was the hardest one to put together, do an easier one first to get the hang of it.

For the lava we free-handed based on our kraft paper templates. We cut red, yellow, and white and made each color smaller. Apparently I lost these pieces at some point, so there is no template for the lava. I think next time I would layer some larger red pieces, and then smaller yellow pieces with different lines, so it looks like it's flowing rather than lined up and layered. I put glitter on some of the lava.

Cave

The cave is two circles, one much larger. I cut the edge off of the larger one. I used darts for the curve. Kid #2 drew stones on it.

Hill

For the hill it is two circles, one much larger. I had scraps from making a felt Christmas tree so I used the same color as the mat. I cannibalized a dollar store stuffed animal for stuffing. I think you could get away with using kraft paper or newspaper for stuffing. I put darts in the sides to make it fit the curve. On my sketch there were two hills, but I thought the mat was too busy so I only made one.

Strap with name

For the strap we just left the felt as is. Kid #2 used the paint pens to write the recipient's name on it.

Lake

For the lake we cut blue felt in a circle, following our template so the beach would match. Maybe it should have been a kidney. We painted squiggly lines on it.

For the beach we followed our moon-shape template from the kraft paper so it would fit on the lake. I traced the side of the lake to get that touching edge right. I do not have a template for the beach. We added glitter so it would look like sand. If I had sandpaper on hand I would have cut some of that and glued it on top.

Stream

For the stream I cut the whole thing from kraft paper first. We painted wavy lines on it, you could make more waves for rapids, or widen and narrow it. I cut the stream into thirds so the little can turn them and change the stream (don't cross the streams!!). The template seems like a waste of felt, I might make it more narrow so I could get more pieces.

Palm tree

For the palm tree trunk I wrapped brown felt around a pipe cleaner cut in half. For the base you can use a layer of hard cardboard like the back of a legal pad, a poker chip or quarter, and a layer of felt that matches the mat. It has three large leaves and three small ones, with small notches cut in them. You could try using two layers of four leaves each. The leaves were pretty floppy so I ran a line of hot glue like a vein down the middle of the leaf underneath. You could also glue pieces of pipe cleaner underneath.

Fern

The ferns were scraps cut in a shape like a hill, with notches cut out. If you use scraps from the base this won't stand out as much on the dark background. But you can use lots of colors to make different ferns. I may have procrastinated my way out of a pretty forest of different-colored ferns.

I was going to make little bushes like short palm trees, but apparently totally spaced on this part. If you want to make bushes just make a much shorter palm tree.

Rocks

For the rocks once I had the scale I just free-handed them. Kid #3 helped to decorate them. There are babies in the recipient's home so I didn't make any little ones. You can use scraps to make a bunch of different colored rocks.

Pieces in volcano

All tucked away

All of the pieces except the mat fit in the volcano. You can pack it all away in there, roll the mat up and tie it with the strap, fold it over and stick the bottom of that in the volcano. Then the whole thing can be tucked away.

These are not strict templates. I saved the kraft paper mock ups from my freehanded sketch and scanned them. They may need adjustment and I invite you to customize them.

Download dinosaur felt play mat templates

Download dinosaur felt play mat templates, black and white 16 page PDF

More Dinosaur Play Mats On the Web

Dino Play Mat from the Romantic Seamstress sewing, folds up
Dinosaur Play Mat from Serving Pink Lemonade small, fusible web, printable templates
How-To: Dinosaur Play Mat from Make: Craft Magazine sew and fusible web, templates for parts
No Sew Dinosaur World Playmat from Fun at Home with Kids big, glue

Pinterest Boards:

DIY Handmade Gifts For Kids
DIY Handmade Gifts (Not Food)
DIY Felt Gifts

Participated in Fabulously Frugal Thursday, Healthy, Happy, Green & Natural Party, and Meal Planning Monday linky parties

The Early Bird Gets The Worm Game for Preschoolers
*Also see our The Early Bird Gets The Worm Game for Preschoolers
OR
Halloween Dyed Eggs
Halloween Dyed Eggs

Photo credits: Mat photos by me, The More With Less Mom

Original post: Dinosaur Felt Play Mat – DIY Tips and Printable Templates ~ The More With Less Mom - Words of wisdom to live frugally and well

GLUE ROCKS! LEARNING ABOUT ADHESIVES & POLYMERS WITH KIDS…. PLUS, A TERRIFIC ELMER’S TEACHING KIT & BOOK GIVEAWAY!

$
0
0


IMG_8961

Like most homeschoolers, kids, and crafters, we LOVE GLUE!

Would you like to teach your kids what glue is made of? Do you know what monomers and polymers are?

Last week, Captain and I spent some good times learning about adhesives, polymers, cohesion, the history of Elmer’s glue, and, truth be told, got some delightfully sticky messes going on! We did a unit about adhesives that was provided to us by Elmer’s Glue. Right up front I would like to say that I was given “The World of Glue: A cross-curricular investigation of adhesives for grades K-5″, 3 bottle of Elmer’s glues to try, and a copy of the wonderful book, “Too Much Glue!” written by Jason Lefebvre and illustrated by Zac Retz, in exchange for an honest review and to host a giveaway of these products. I can promise that I will only give my honest opinion, and it is easy to do. We really enjoyed the experience together, and I must admit that I learned almost as much as Captain did!

STAY TUNED TO THE END AND BE SURE TO ENTER THIS GIVEAWAY! ~  It is informative and fun! The winner of the random drawing will receive the book “Too Much Glue”, the teaching-unit, and some bottles of glue to mess around with.  Captain went right for the glitter glue and sat down immediately and made a lovely picture for me called “Mountains”:

IMG_8963

The teaching toolkit speaks directly to educators in clear, easy to understand terms, and provides history, lab instructions and sheets, Venn diagram templates, evidence logs, a timeline, vocabulary notebook sheet, links etc. Homeschoolers and teachers can photocopy the enclosed student pages and handouts. We simply followed along and learned a lot! We started by reading the story of “Too Much Glue” in which the young character, Matty, goes delightfully bonkers with ALL of the bottles of glue in class one day and turns himself into a giant work of… well… art!

IMG_8885

It is a fun book that Captain has had me read several times to her, and then she read it once to me :)  Kids are invited to use the provided template in the toolkit to create their own “glue-suit” like Matty’s.  Here is Captain’s:

OLYMPUS DIGITAL CAMERA

IMG_8920

Who wouldn’t want to make a giant one of these to wear?

The labs include comparing various types of adhesives, making your own glue out of simple stuff around the house, creating a polymer “slime” and more. We decided to do a little experimenting of our own and mixed ice cream salt with food coloring in a bowl and then poured in lots of Elmer’s glue. It didn’t turn into the moldable material that we were expecting, but became something even cooler in the end when we glued our groovy concoction into a family mosaic called “The Tree”:

IMG_8955

IMG_8987

This quality teaching unit, glues, and delightful book were fantastic for this homeschooling family. I believe that it would be a great addition to homeschools, and also very fun for a more traditional classroom setting. Having lots of kids around when doing the activities, letting them partner-up for labs, and make sticky, messy glue-suits together would be very fun! I invite you to enter the giveaway for a chance to try it yourself, for free!

Here are a couple of links to some of Kartwheels favorite projects that use glue:

Make Fun Egyptian Gold Bracelets!

DIY: Cool Art With Aluminum Foil, Glue & Shoe Polish!

Simple, Fluffy Valentine’s Day Hearts!

Thanks so much for sticking around, and a wonderful week to all!

Visit Kartwheels Kids Projects to enter!

Karen

Homeschooling mom on the loose, creator of natural body products, writer

Kartwheels Homeschooling & Kid's Projects

TUTORIAL: A Charlie Brown (Mailbox) Valentine’s Card

$
0
0

Valentine’s Day is next week, and I committed to help make some decorations for my son's class party. Since I was planning to pull out my crafting supplies, I thought I might as well make some handmade Valentine’s Day cards.

I don’t know what made me think of Charles Schulz’ famous comic strip, Peanuts, but perhaps it was a recent reading of Be My Valentine, Charlie Brown that inspired this tutorial.  If you’re looking to make a Peanuts-inspired Valentine card this year, then look no further.

Charlie Brown Valentine Card final

Materials/Supplies:

- templates
- scissors
- glue
- red/pink/light blue/any other colored card stock
- white printer paper

Instructions:

Step 1. Print out templates.

Mailbox = Envelope
There are two versions of my mailbox design, essentially the envelope for the Valentine card. The first version offers a mailbox design with a front flap closure. The second version offers two mailboxes on one page to save time and space.

tutorial charlie brown valentine card mailbox template

Envelope = Valentine Card
The confusion with this particular Valentine card is that the mailbox represents the envelope, and the envelope represents the Valentine card. I provide two versions of the envelope, one with a Charlie Brown cartoon sketch by Charles Schulz and one without.

tutorial a charlie brown valentine card envelopePersonally, I think the one with Schulz’ cartoon sketch connects the whole Charlie Brown mailbox Valentine theme, but you may prefer a simpler version that speaks to the essence of receiving a Valentine by mail, feel free to use that version. Hopefully, this gives you enough creative freedom to make a personalized Valentine for a loved one this Valentine’s.

From here on out in the tutorial, I will refer to the template pieces as mailbox and envelope.

Step 2. Cut out envelope with or without the Charlie Brown sketch.

tutorial a charlie brown valentine card, Step 1 -  Cut valentine envelope

Fold along the lines inward to create the look of an envelope. You can add a sticker, such as a heart, to close and secure the envelope. However, the envelope will fit snugly into the mailbox, so you don’t have to add a sticker embellishment, if you so choose.

Step 3. Cut out mailbox (simple or elaborate version). Note: The photos in the tutorial will be demonstrated with the elaborate version.

tutorial a charlie brown valentine card mailbox


Fold along lines, so the black lines are facing inward.Note: If your cardstock is colored one side, while the other side is white, make sure you print your template on the backside of your colored card stock paper.  This will ensure that the color you want for your mailbox is facing outward.

tutorial a charlie brown valentine card mailbox

Step 4. Glue right and bottom side of mailbox.

tutorial a charlie brown valentine card glue

Step 5. Insert envelope into mailbox. Use “c” hooks to enclose the envelope in the mailbox.

Charlie Brown Valentine Card final

Interesting Note: The enclosure was a happy accident, since I originally wanted the “c” hooks to link in opposite directions. I think it worked out in the end.

Step 6. Voila! Project complete!

TUTORIAL A Charlie Brown Valentine Card 2

Now you have your very own Charlie Brown (Mailbox) Valentine Card.

In the past, I have given free access to my templates, so that you can make your craft project. However, this time I thought I would try something different. If you like this tutorial, or if you would like to obtain a pdf file of these templates, please like Hometown Betty on Facebook, and I’d be happy to send you the file(s).

Next week, I hope to share several interesting posts about best practices to learn Korean language (or any language), a tutorial to make a Valentine’s party banner, and my 24+ hour painting project that has taken about three years to complete.

Related:
TUTORIALS: Class Christmas Party Banner, Mini-Paper Garland


From my hometown to yours,

Betty

LEGO Pinata Tutorial

$
0
0

LEGO Pinata Tutorial

LEGO Pinata Tutorial

Do you have a LEGO fan in the house. Let's get excited together and build excitement for the newest LEGO Movie. This LEGO Pinata is a sure win for an awesome LEGO Party. Make sure to check out other LEGO Party Ideas. Build the best LEGO Party with some easy to create ideas. Customize your party and have some friendly building competition! Remember an easy large LEGO decoration can be a wall of LEGO's made from plastic tablecloths purchased from Dollar Tree. Get one of each color and you will have a bright colorful wall.  

What you Need:

- Red Tissue Paper - Cardboard Box - Tape - Bungee  

How to Make:

1. Take an elongated box or if you are like me I used pieces from an Easter display box I got from Dollar Tree. Cut your pieces and tape together.Step 1 LEGO Pinata 2. Add your Bungee cord for the handle loop.Step 2 LEGO Pinata  3. Now that you have your bungee looped and secured attach it to the remainder of the box.Step 3 LEGO Pinata

Finish LEGO Pinata Tutorial

A Cub Scouting Race Day

$
0
0

I really adore my son's Scouting group. I think I have actually learned more than he has. I am always excited to hear how to correctly start a fire or set a snare with a rope. (Rope can save your life. I shit you not.)

So, I am not surprised to find that some of the boys events are completely overtaken by the father's need to craft things. Today was the Pinewood Derby. It was my first time going. It was not theirs.

Read More >>

Cub Scout Race Day


Three New Layouts

$
0
0

I have three new layouts to share with you today. Two of the layouts use photos from my childhood. The third is another art journaling piece.  One unique thing about all three of today's layouts was that they were all created using the new Page Candy Collab from Crafty Button Designs and Tracy Martin Designs (plus other stuff of course).

As I said earlier, two of the layouts were created using photos from my childhood.  Because these photos are from the 70s, they are not the best photos.  I still feel very luck to have them and be able to use the photos in my layouts.

The first layout contains a photo of myself and my sister when I estimate that I am about 4 and my sister about 1.5 years old.

Margi & Me

For this layout, I created all the blocks for the photo and paper pieces and then clipped the papers and photo to the blocks I had created. It took me a bit to get all the blocks created and position as I wanted, but I thought it was worth it. I really like the way it turned out.  In addition to the Page Candy Collab, I used the Page Candy Add-on Papers and Candy Freebie Papers from Tracy Martin Designs to complete the page.

This next photo is a picture of my mom, my sister and myself.  I am pretty certain it is Easter Sunday, although it's not certain.  We would definitely be on our way to Hillcrest Baptist Church, which is the church I attended as a child.

My sister, my mom and I

I decided to blend a larger version of the photo into the background so that you could better see the features without having to see a lot of blurriness. For this page, in addition to the Page Candy collab, I also used Tracy Martin's Candy Freebie Papers.

The final page I want to show you today is a digital art journaling page that I created.  The page is based on a song called Gentle from Michael McLean that has been wondering around my head for a few days.

Life Can Be Hard

Apart from the Page Candy Collab, I can't begin to list all the products I used for this page. But if you click on the image above, you'll see a list of all the products used.  I really enjoyed working on this page, because of all the paint I used on the page.

I hope you enjoyed the pages I shared today.  I hope to create a few more pages tomorrow.  I have several more pages I wanted to create this week.  I plan to work on a few more tomorrow.

I hope you are having a great weekend!  Until next time, don't forget to document your memories.

How To Make A Valentines Burlap Heart Garland

$
0
0

I have a lot of my readers ask me how to create the Burlap Garland Banner that I did for my daughters first birthday. (you can read the whole post here). I love decorating for every holiday, even if it something small. Here is a small burlap garland that I made for Valentine' Day that is simple and easy for you to make, even with the kiddos!

Valentines Day Burlap Heart Garland

This is pretty easy to make. You just have to have some of these items lying around, or go to your local Michaels Craft Store and get them.

Items You Will Need:

Burlap

Twine

Craft Brush

Stencils

Craft Paint

Hot Glue Gun and Glue sticks

Scissors

After gathering everything you need, cut the heart using a template that I created. You can download the Heart Cutout here.

Use the heart to create one, and then I just kept tracing and cutting out the other 3 using they same heart. I wanted to do the word LOVE, so it was easy to only have to cut out 4 hearts.

valentines day heart garland burlap

Lay all the cutouts on a piece of newspaper, or whatever is easiest for you to grab to not have the craft paint stick onto your surface you are working with. Get your stencils, paint and brushes ready. And paint away!

valentines day burlap garland

Your little ones can even help make the final touches on the paint!

IMG_7712

After getting all the stencils painted on the burlap, wait for about 10 minutes to dry. Then line them up and get your hot glue gun and twine ready.

valentines day heart burlarp garland

Wait for it to dry and then hang it up anywhere in your house you would like!!

CHEERS!!!!

NICOLE


10 Fun Crafts for Valentine's Day

$
0
0

Valentine's Day tends to be a love it or loathe it holiday and I have to confess I fall firmly in the middle. I don't like the pressure for romance but there are aspects I do like. I always had so much fun making Valentine's Day crafts when I was kid, perhaps because hearts are one of the shapes I can draw fairly well. Seasonal crafting doesn't end when you grow up so I went out to find what our bloggers were making in their craft rooms for Valentine's Day. I think you'll like what I found.

Heart and Arrow Valentine Garland

Heart and Arrow Valentine Garland
Image Credit: Spool and Spoon

When you think about Valentine's Day it's not at all unusual to think of Cupid. Cupid makes me think of cherubs I am not a big fan of cherubs. I love this heart and arrow garland. It makes me think of Cupid but there's nary a cherub in sight. Perfect.

NEXT ⇒

Valentine's Day Keepsake Handprint Art

Valentine's Day Keepsake Handprint Art
Image Credit: The Classroom Creative

Don't you love a good handprint keepsake craft? I know I do.

NEXT ⇒

Fortune Cookie Valentines

Fortune Cookie Valentines
Image Credit: Feels Like Home

Want to slip a note to someone special on Valentine's Day? Put it in one of these fortune cookie Valentines.

NEXT ⇒

Leather Conversation Hearts

Leather Conversation Hearts
Image Credit: Polka Dot Chair

I have a fondness for conversation hearts. I like how you can use these leather conversation hearts all year round. I bet they'd make excellent bookmarks.

NEXT ⇒

DIY Poppers

DIY Poppers
Image Credit: At the Picket Fence

I usually associate poppers with Christmas but I love the idea of Valentine's Day poppers.

NEXT ⇒

Gold Conversation Hearts

Gold Conversation Hearts
Image Credit: Homemade Ginger

If red and white isn't your thing, how about gold? This simple gold conversation hearts craft will only take minutes to make.

NEXT ⇒

Key to Our Hearts Valentine Art

Key to Our Hearts Valentine Art
Image Credit: Home Made Modern

I like it when older items find new life. An old sign, some scrapbook paper and an Ikea armoire key found new life as key to our heart art. What do you have in your house that you can repurpose?

NEXT ⇒

Love Birds Embroidery Hoop Art

Love Birds Embroidery Hoop Art
Image Credit: Smashed Peas and Carrots

I don't know how many embroidery hoops I have around the house with half-finished projects on them. Fine, half finished is probably generous. Maybe it's time to finally admit that I'm not going to finish some of those projects and turn them into something like this adorable embroidery hoop love birds art instead?

NEXT ⇒

Candy Heart Bracelet

Candy Heart Bracelet
Image Credit: Lollyjane

I am not really a big fan of heart-shaped jewelry but when you're taking about a candy heart bracelet I'm totally down with that.

NEXT ⇒

Homemade Pixie Stick Valentines

Homemade Pixie Stick Valentine
Image Credit: Simply Notable

I realize these homemade pixie sticks toe a fine line between treat and craft. I can't help myself. I love pixie sticks, I want to make them and I think it's a most excellent use of paper straws.

What crafts are you making for Valentine's Day?

Karen Ballum is a Community Moderator on BlogHer.com. She also blogs at Sassymonkey and Sassymonkey Reads.

Easy Valentine's Crafts for Toddlers and Preschoolers

$
0
0

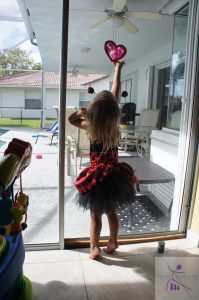
0204141345In addition to the delicious Valentine's Day Goodies we had at our Valentine’s party yesterday, I also got Sugarplum back in her Halloween costume (which I vowed to do months ago after I was Done and Down).  She actually spent more time in her costume for the Valentine’s party than she did on Halloween, even wearing it to pick Honeybun up from school when we forgot to change before it was too late.  She “flew” almost all the way to school, running and flapping her arms down the sidewalk!

Aside from a reason to get together with friends, the idea behind our party was to make cute Valentine’s Day crafts.  We had planned to do the same at Christmas time but everyone had to cancel at the last minute so I promised Sugarplum we would do Valentine’s Day.  We had a small crowd (4 other mommies and 5 kids) and the mommies did a lot of the crafting but we had a great time nonetheless.

I didn’t know what the age group would be as I invited a large community group of mommies I’m a part of.  Finding toddler appropriate crafts for Valentine’s Day proved a little tricky but I found a few great ideas that we all had fun with.

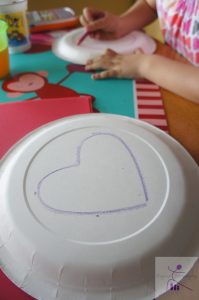
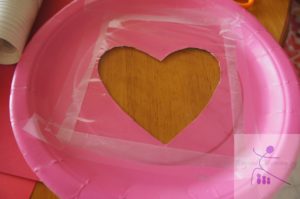
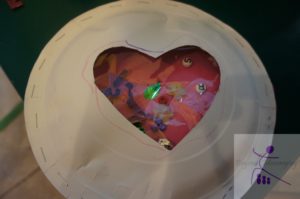
The first we did, which the kids were fully involved with and enjoyed, were paper plate shakers.  The adults cut a heart shape into one paper plate and then the kids colored it and another.  When they were done coloring, we taped cellophane wrap over the heart cut out and stapled the plates together (you could also use tape or glue if your child can be patient while it dries) leaving a small opening.  The kids then dropped in some beads and confetti and we sealed up the last little bit to make a not-too-noisy Valentine’s Day instrument which they loved dancing around with!

SONY DSCSONY DSCSONY DSC


SONY DSC

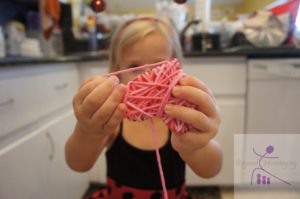
 The second craft was harder for the kids than I expected.  I took some plastic canvas and cut heart shapes, making sure to have rough edges.  We then took variegated yarn and had the kids wrap the yarn around the heart shape.  I found it easiest to pull the end of the yarn through one of the holes in the plastic to hold it while the child wrapped.  Some of the littler ones had trouble keeping the yarn pulled tight as they wrapped it but the hearts came out so cute and I can’t wait to find a place to hang up Sugarplum’s!

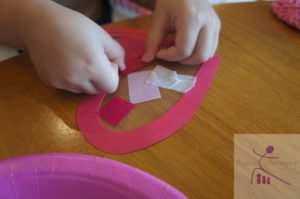
The last craft was tissue paper suncatchers.  We cut a heart frame  out of red construction paper and a heart out of clear contact paper then the kids placed small squares of tissue paper all over the contact paper to make a cute little suncatcher!

SONY DSCSONY DSC

A Kid DIY Valentine- And It Doesn't Take All YOUR Time!

$
0
0

If you’ve got a budding artist, put him (or her) to work. Invite him to create an original piece for his valentine class exchange. Don’t you remember what it was like getting a valentine from your special friends?

Once the artwork is complete, “reproduce” it! A color copy machine is perfect… you’re half way done!

Mount the artwork onto a beautiful valentine themed sheet of paper. (We found a red, velvet type of construction paper at a craft store.) Then roll it up into a scroll, tie some pretty ribbon around it andvoilà… you are DONE! Your child can hand out his/her unique, one of a kind Valentine to all those special someones.

Here’s an example of what Jackson created for his kindergarten class. Only a six year old could come up with this. It’s an elephant blowing heart kisses out into the world. A tiny green bird sits atop the elephant tweeting out hearts! valentine 2014

What will your little Valentine come up with?

Happy Valentines Day!

LOVE TO ALL!

craftytotheroot

$
0
0

I have wanted to start blog for a while now.  Like two or three whole weeks and for my generation, that's a while.  I love blogs.  I hate them too (b/c holy moses can I waste some time on them), but generally, I've found amazing ideas, tons of practical help and advice, lots of humor and people living their lives so openly for the rest of us to read (or at least faking it so openly for the rest of us to read).  I've blogged before, but this time, I want to blog about something that I can't NOT do.  Some call it crafting.  Others DIY, or even occassionally, the high assignment of ART.  Whatever it is--I can't stop.  I get ideas people.  Lots and lots and lots of ideas.  I was raised in middle America by a set of frugal and creative people respectively.  My Dad is so good at so many things- build your own house?  Sure.  You may break an arm here and there, but man, why would you pay someone else to do what you can do yourself?  This is deeply in my DNA.  And my mom.  She is creative to the core.  She would rather make something pretty, comb a flea market or a clearance sale, or pour over beautiful blogs than make dinner or do the laundry or pretty much do anything else  (to her credit, she cooks the dinner and does the laundry, and engages the world in loving and sacrificial ways, and then she goes home and crafts!!!  She's cool like that.)  She is in my crafty DNA in countless ways.  When my mom and I go to a craft sale or an expensive boutique of custom handmade stuff, we echo the same mantra the whole time (sorry, we can't help it)--"We could do that!" 

Project Life 2014: Weeks 3 & 4

$
0
0

I am back with my second Project Life layout for 2014.  That I now have four weeks covered means I have already done better than 2013.  Yea, I just did not do that well last year.  The switch to a two-page layout for every two weeks works much better.

I once again went with a more artsy style layout, but I still feel like this style is missing something.  Next week, I will try adding more paint to my pages.  Maybe that will be the thing that makes the layout what I want.  For this week though, the layout is done.  Here is my layout for weeks three and four of Project Life.

Project Life 2014 Weeks 3 & 4

Just like last week, I turned to Anna Aspnes for the products I used to create my pages. This week, I used ArtPlay Palette Imagination, 4x6 ArtsyKardz Imagination and FotoInspired Template Pack 2A. If you are interested in a more artsy style for Project Life, I cannot more highly recommend Anna Aspnes.  her ArtPlay Palettes and ArtsyKardz are perfect for a more artsy Project Life.

If you are participating in Project Life and blogging about it or sharing on Flickr, please link me up in comments so I can see your work.  You can see last weeks layout, as well as all future layouts, in my Project Life 2014 Gallery.

Until next time, wherever you find life taking you, don't forget to document your memories.


Valentine's Day Dyed Eggs From The More With Less Mom

$
0
0

Valentine's Day Dyed Eggs from The More With Less Mom

Dyeing eggs is a frugal activity that can be practiced the whole year. You should already have all the items you need. This is a craft that is easy to scale to different age groups.


Step 1: Hard Boil Your Eggs

There are a gazillion ways to hard boil eggs.
Use your preferred method, or use the Simply Recipes method. Quick version: Boil, sit 10 min covered, ice bath. I did this last time and they came out absolutely perfect.
Save your cartons to store the eggs in when you're done, but don't put them in until they are completely dry or the carton will scratch off some of the color.


Ready to color Valentine's Day Dyed Eggs

Step 2: Pre-Dye Decorating for Your Eggs

There are a bunch of things you can do to your eggs before you dye them.
You can use the wax-resist method, color your eggs with crayons and the dye can't penetrate the wax. We did this on a dish towel so the eggs wouldn't roll away. The same thing goes for stickers, apparently this was not as fun this time around and we skipped them. You can wrap rubber bands tightly around your eggs to make lines. I love this look but the 4 year old nixed it.

Crayoned eggs ready for dye


Step 3: Dye Your Eggs


You don't need a kit to dye eggs! You have the stuff.
Take a mug, I used my soup mugs. Bowls won't work, they aren't deep enough (never mind the photos, that was me letting my boy help set up).
Add 1 1/2 cup hot tap water.
Add 1 teaspoon/a splash white vinegar.
Add 20(ish) drops food coloring. We made red, pink, purple, blue, and teal.
You can see that I used brown eggs, which gives you more rustic colors. I thought they were pretty but your results can be a little different than you expect. The brownish color you see was from using straight blue to dye it. If you know your color theory you know blue and orange make brown.
If your eggs got a little cracked no worries, you just get a marbled pattern on the actual egg. I think it's pretty, and it's just food coloring, it won't hurt you.
Dip your egg in the dye, using your fingers, a spoon, a whisk, a wire dipper thingie...
The longer you leave the egg in the deeper your color will be.
You can re-dip parts of the egg to get layers of color, changing position and/or colors. A whisk is helpful for holding an egg partially submerged. This is how I got the almost ombre stripes.
Or cover parts with tape and re-dye.
I put a kitchen towel down to dry them on, you can gently roll them to encourage them to dry.


Drying and dyeing eggs

Step 4: Post-Dye Bling for Your Eggs


There are many ways to decorate your dyed eggs. You can use markers to draw faces and designs on them, or crayons. You can add stickers. You can add glitter. We painted on glitter glue, but if you glitter them odds are good you will be eating glitter. You can paint them. You can glue tissue paper pieces or hole punches on. You can use pipe cleaners to make arms, legs, wings, etc. Make holders for your eggs with little strips of cardboard taped into a circle. Store your eggs in the fridge and eat them within 5 days.

Love egg

Write words on eggs with crayon - Love and Beauty

Write curlies on eggs with crayon, re-dip to get layers of color

Lots of pretty eggs - a flower

Other Fun Things to Do With Dyed Eggs

Sticker Stenciling on Dyed Eggs
Rubber Cement Dyed Eggs
Melted Crayon Eggs from Spoonful
Tissue Paper and Parsley Eggs from Aunt Peaches

*This is a rehash of my Halloween Dyed Eggs post

Valentine's Day Pinterest Board
Chocolate Pinterest Board

Halloween Dyed Eggs
*Also see our Halloween Dyed Eggs OR
Dinosaur Felt Play Mat – DIY Tips and Printable Templates
We hope you enjoy our Valentine For One - Chocolate Mug Cake Mix

Photo credits:
Mug cake Lori Mama on Food.com Thans Lori!

Original post: Valentine’s Day Dyed Eggs ~ The More With Less Mom - Words of wisdom to live frugally and well

DIY: Jar of Hearts-Last Minute Valentine's Day Gift Idea

$
0
0

iHeartRuthie

 iHeartRuthie: Last Minute Valentine's Day Gift Idea: Cookie Jar of Hearts[/caption]

Hmmm Hmm Hmmm......! How do I store or package all of my Valentine's Day Baking in a cute way? And I also was thinking.. what am I going to do for valentine's day gift ideas? I thought about this and when I want to brainstorm, I look around the house for cute ideas. And wouldn’t you know it?  I came across a Mason Jar, some unused fabric and random twine.

This is a simple diy and a very quick way to throw together a last minute gift! What You Need:

  • Mason Jar or any Jar with a lid
  • String/Twine/Yarn
  • Fabric of your choice (Hint: If you don’t have any fabric laying around, just cut up an old shirt! I guarantee you probably have a shirt or two that would like darling if you used it to top off your mason jar
  • Scissors
  • Name Tag-completely optional and you can create your own by writing on a piece of paper
  • Cookie

 Step 1: Place your cookies in your jar and seal the lid. You can use any cookie of your choice. If you want to create this look follow this recipe. This is the perfect sugar cookie with frosting recipe because once the frosting dries, it won’t smudge all over the place. Trust me—I have tested it and this recipe will do the trick ; ) Short on time? Toss in some candy and store bought cookies and I am sure they will be just as delightful.  Cookie Jar of Hearts iHeartRuthie: Last Minute Valentine's Day Gift Idea: Cookie Jar of Hearts[/caption]    

Step 2: Place your jar of cookies in the center of your fabric. Cut around in a circle. You will want to leave about 10 inches across in diameter for room. Why? It will make it so much easier to tie on your lid and you can clean it up afterwards. It is so much easier than cutting a precise circle and freehand cutting is fast and looks so much better! It’s a no fail….well I think you’re awesome so whatever. Cookie Jar of Hearts iHeartRuthie: Last Minute Valentine's Day Gift Idea: Cookie Jar of Hearts Cookie Jar of Hearts iHeartRuthie: Last Minute Valentine's Day Gift Idea: Cookie Jar of Hearts

Step 3: Freehand cut the edges of the fabric to your liking. Just make the edges look clean and tidy. Step 4: (Optional) if you have a name tag, tie it around the lid of your mason jar.

 Cookie Jar of Hearts iHeartRuthie: Last Minute Valentine's Day Gift Idea: Cookie Jar of Hearts

 Check it out on iHeartRuthie


Show Them the Love

$
0
0

I saw this cute Valentine’s Day idea on Pinterest. I think they had called it a “Heart Attack.” I didn’t pin it and I can’t find it. It was a simple enough idea to remember. Here’s how to show your kids or even your spouse a little love this Valentine’s Day.

What you need:

  • Construction paper (I picked everyone’s favorite color.) or precut paper hearts
  • Scissors
  • Tape
  • Marker(s)

What to do:

1. Fold paper and cut several hearts out from it. (I initially cut 9.)

20140213_11414420140213_11422320140213_114255

2. Write special thoughts on each heart about that person.

20140213_11453320140213_114749

3. While they are sleeping, tape the hearts onto their door.

20140213_120301

What a neat way to show someone you love them!

If anyone knows the link to the original "Heart Attack" idea, please share it in the comments.

Amber Tincher and Amy Leckrone

Co-founders of Camp Mommawatchi

Purchase at-home camp curriculum at www.campmommawatchi.com

Friday Faves: Prints Charming Studio

$
0
0
Y'all, this might be the most excited I've been about a post! Prints Charming Studio is an adorable Etsy page with custom illustrations. Carrie hand draws the illustrations (based on a photograph), it's inked and then scanned into a computer. She digitally colors them and then sends them as PDFs to customers so they they can print as many as they want. Carrie also has an option for you to have her print your cards as notecards (mine are on their way!). So why am I sooo excited? Because Carrie did a custom illustration of my family to share with y'all! Ready...

Visit http://www.georgiapeachmommy.blogspot.com to see it!

Xo,

Stamped Winter Scene Card

$
0
0

Tired of Winter yet? I decided it was better to embrace the beauty of the season than to be frustrated with yet another schedule crippling storm. It really is so beautiful to see the glittering snow as it's falling.

I created this hand stamped card using Stampscapes stamps and various ink techniques that can be found on their website. For more ideas and inspiration visit the Creative Destinations Guide

Stamped Winter Scene Card

Viewing all 1382 articles
Browse latest View live