Quantcast
Channel: Crafts - BlogHer Topic Feed - All Posts
Viewing all 1382 articles
Browse latest View live

Easy DIY Spring Wreath

$
0
0

spring wreath tutorial

If you've been reading my blog for a while, you'll know I've been working on making wreaths for the different holiday seasons—I'm wreath obsessed! (Here are some past ones: Christmas, fall, and Valentine's Day.) So I just made a "spring" wreath, even though it snowed over the weekend (seriously, wtf?) I figure this should last me through at least the beginning of summer. This wreath was simple and love how it turned out.

spring wreath supplies

For this project, I bought all my supplies at Michaels. I got some fake flowers, a wreath form, two rolls of wide white ribbon and a pretty floral ribbon that seemed spring-y to me.

spring wreath supplies - ribbonThe ribbon.

First, just wrap the ribbon around your wreath form. I used mostly white ribbon, with some floral as an accent for the top, where I will be hanging the wreath. To secure the ribbon to the form, I just stapled the ribbon right onto the form. Just make sure to keep all the bad ends on the back.

spring wreath supplies - flowersThe flowers.

I trimmed some random stems from the fake flower bunches (you need to use wire cutters) and applied the stems to one side of the wreath with hot glue.

spring wreath, wrapped

Then I made a little bow to cover over the stems/glue at the bottom of the arrangement.

spring wreath, hanging

Then I just added another piece of ribbon (which I cut too short but was too lazy to fix) to the top. All done!

spring wreath, hanging

I don't foresee doing any other real "seasonal" decorating for a while, so this wreath will be our only seasonal décor—I think. Maybe I'll add some other things in the summer, but we'll see. Hopefully this spring (if it ever effing gets here) and summer will be able taming the craziness of our yard to make it look somewhat reasonable.

Anyone else doing any spring decorating?


Painting Fun

$
0
0

I thought it would be a fun project for the kids to do a kind of sticker resist painting. I was inspired after seeing this post at PlayDrMom. I thought the shamrock painting was super cute however I was not able to find the die-cut shamrock stickers. I still wanted to do some kind of painting like this. So instead of using stickers, I decided to use painter’s tape to make our initials. I was able to find 8 x 10 inch white canvases at Micheal’s. I had the craft paint at home from previous projects as well as painter’s tape.  The kids had so much fun with this project and it ended up being a great room decoration for them also.

What you need:

  • 8 x 10 inch white canvas
  • Craft paint (multiple colors)
  • Paint brushes
  • Painter’s tape
  • Paper towels and paper plates

What to do:

1. Using the painter’s tape, create your design on your canvas.

20140405_163241

2. Make your paint palette on the paper plate.

3. Paint the entire canvas.

painting T

4. Allow to dry for a few minutes.

5. Remove the painter’s tape carefully.

painting 120140405_170337

Amber Tincher and Amy Leckrone

Co-founders of Camp Mommawatchi

Purchase at-home camp curriculum at www.campmommawatchi.com

Thoughtfulness Thursday: E's Second Birthday Party

$
0
0

I'm not sure if you know this about me, but I'm a crazy party planner. As we enter April, I have already planned E's 3rd (yes, THIRD) birthday. As that thought process is about to come to fruition (with his party next week), we can reflect on his second birthday (which was posted on Hostess with the Mostess on July 1...BTW that's a big deal and I might have screamed when I heard!).

The post below is what was on the site...that's why it's in third person :)
 
 
To continue reading, visit: http://www.georgiapeachmommy.blogspot.com
 
Xo,
J

Kitty Rabbit!

$
0
0


Card Making ArtistsFree Digital Stamp Design by Tam Hess

My favorite is the cut out kitty on the left, with the bird on his head instead of on the basket.  These are cats dressed as rabbits or bunnies.  Special for Easter! See the pin on his cotton tail?

I’m offering this digital stamp in JPEG and PDF formatted to 3.5 x 2.5 with a light gray line for easy cutting out and attaching to cards, exactly like you see above. For more information about digital stamps and how to use them go HERE!

have a retired kitty HERE similar to the one shown only he has a little sweater on.  It’s part of my “Kitty” digital stamp collection.  More digital stamps from the Kitty collection coming soon. Check back often! For more.....

The Rainbow Connection

$
0
0
Photo by The Big Change Project

The Rainbow Loom craze has hit the nation!  So we've created a great service project and community building event (with a fundraising component, if you like) centered around the Rainbow Loom.  Grab your group and host your own looming "Party for a Purpose."  Jimmy Kimmel might have made a suit out of his - but here are some other fantastic ideas.

•    •    •    •    •

As the mothers of tweens, we follow a great blog called Tween Us written by fellow Chicago blogger Shannon Younger.  Recently, Shannon shared a post on her Facebook page from The Educators' Spin On It entitled "Kids Helping Kids."  It addresses the common problem that many parents face theses days - your home FILLED with Rainbow Loom bracelets!

If you have kids, you know what we're talking about.

Rainbow Looms have swept the nation, but just like past trends Crazy Bands, Yu-Gi-Oh cards and Webkinz, it leaves us wondering... other than making a suit out of them like Jimmy Kimmel, what do we DO with all of them??!!!

In her post, Jenny suggests donating them to the Orlando-based community outreach program A Grateful Mind.  We loved this idea!!

But, it got us thinking - could we create a Big Change event centered around the Rainbow Loom?  Of course we can!!!

Remember, at the core of the Big Change Project is Service and Community Building.  That is what makes us different from other fundraising organizations.  We fundamentally believe that if you include service and community building into the development of your fundraising, not only will you raise more money, you will leave an even more important lasting impact on your community and others.  (Check out our older posts about the Big Change Model for more information about the 6 core components to our philosophy.)

Our Rainbow Loom event isn't fundraising-centered.  It is created to be a service project and community building event that could include an additional fundraising component if you so choose. The event would be great if hosted by a school PTA/PTO, a middle-school or high-school club, a team, a church/temple group, or any organization that is geared toward children.  The idea is to create an event where children (and parents, if you want) loom together with the purpose of creating bracelets, necklaces, keychains, rings - whatever you decide - that will be given to someone else.

Photo by The Big Change Project

Here's the plan:

  • First and foremost, find a partner to receive your amazing creations (we've listed some incredible non-profits below who are looking for donations).  Where are the items headed when they are done?  They could be donated to a local children's hospital or cancer center, a nursing home, a program for homeless children or a foster care facility, other children's social service agencies, or to another organization to be sold to raise funds.
  • Find a location for your event such as a school cafeteria or lunchroom, the public library or park district community room, a church/temple room, or even a private room at a local restaurant willing to donate it to you for your event.  If the weather is warm, how about a local park or school playground?
  • Determine how many people can attend your event based on your location and decide if parents will be required to stay with their children or, particularly if it is hosted by a school PTA/PTO and held at the school, if this is a kids-only event.
  • Advertise the big event to your community.  Remember - it's all about publicity!
  • Reach out to your local toy store to see if they might be willing to donate a package of Rainbow Loom bands to each participant.  It's good publicity for them and great community partnering.

Here are some great organizations you could contact for your donations:

  • Looms for Love - a fabulous non-profit organization started by an amazing 8-year old named Mia LaRoux, Looms for Love creates rainbow crafts and handwritten cards for children who are hospitalized and seniors in nursing homes.  The organization is "dedicated to advancing the importance of community service and the values of caring and compassion with other kids." Way to go, Mia!!
  • Message of Hope Foundation- created by mother Emi Burke in honor of her son Conor, Message of Hope's mission is to deliver hope to children with special needs and chronic illness. Message of Hope creates "Happy Hope Bags" including art supplies, playing cards, Chap-Stick, toothbrushes and iTunes gift cards.  It is their goal to give away 15,000 Happy Hope Bags and 15,000 Hope Bracelets by the end of 2014!  To see the Message of Hope Foundation in action, you can check out their YouTube video here.
  • Create a Blessing- gives bracelets and notes of inspiration to children in need of a little love and support.  Click hereto download their flyer for more information.

Other Rainbow Loom service project ideas:

  • Instead of donating your creations, sell them and use the funds raised to purchase Rainbow Loom kits.  Donate them to be used or distributed at a women and children's shelter, foster care program, after-school program or children's hospital.
  • Use the sale proceeds to support a local charity of your choice, or maybe donate the funds to one of our favorite charities - Feed My Starving Children.
  • Collect Rainbow Looming supplies at your event and create looming kits to donate to a hospital or other program.

Fundraising ideas:

  • Charge a fee to participate in your looming event.
  • To increase your participation fee and raise additional funds to donate, bring in a Rainbow Loom expert to host a class either at your single day event or create a weekly mini-course over the course of weeks.
  • Include Rainbow Loom items available for purchase such as additional bags of bands, looms, charms, pre-made items or instructional books.  Better yet - create your own instructional booklet to sell!
  • Partner with a local toy store to donate back a portion of their sales of looms and bands to your organization when participants purchase with a flyer.

Rainbow looming is a great activity for kids and can be a terrific way to bring your community together for the benefit of others.  Happy looming!

Do you have a creative idea for what to do with your Rainbow Loom creations?  Let us know!

BCP BIG Tag Line

The Big Change Project

http://thebigchangeproject.com/

Plastic Easter Egg Pineapple String Lights

$
0
0

What do you do with all those plastic eggs after the Easter bunny has made his exit? Mine seem to accumulate in my yard, making me crazy. I have painted them with puffy paint, used them as dinosaur egg molds, and filled them cinnamon—and this year, I converted some yellow eggs into pineapples.

Easter Egg Pineapple Lights

Light-up pineapples, to be exact, and they are pretty rad, if I do say so myself.


SUPPLIES

Easter Egg Pineapple Lights Supplies
  • Yellow plastic Easter eggs
  • LED outdoor string lights
  • Black marker
  • Drill or awl
  • Green spiky floral picks
  • Hot glue and glue gun


PINEAPPLE-IFY YOUR EGGS

Easter Egg Pineapple Lights drawing

First, I turned my plastic eggs into pineapples by drawing triangles on them, starting along the edge of one half of the egg. I made the next row by connecting two sides of the triangles to the bottom two points below.

Easter Egg Pineapple Lights designs

After you have one half of the egg decorated, put the other half of your egg on and do the other side, matching up your pattern. The "pointy" side of your egg will be the top of your pineapple, so be sure your triangles point that way. Add diamond shapes if you want.


EGG HOLES

Easter Egg Pineapple Lights drill

Using either a drill or an awl, make two holes in the "pointy side" of your egg. I made the holes after I drew on the eggs, but in retrospect, it might be better to make your holes before you decorate them—the less handling of the eggs, the better, because even permanent marker can rub off. Make sure your two holes are large enough for a string light and a floral pick.


PUT A CROWN ON IT

Easter Egg Pineapple Lights

The green leaves at the top of the pineapple are known as the crown. I used a floral pick from Hobby Lobby as my crown. You could also make your own using some sort of weather-resistant green plastic (maybe an office folder). Put your pick through one of the holes and close your egg, sealing the crown with a bit of hot glue.


LIGHT IT UP

Easter Egg Pineapple Lights

My string lights came with small lanterns, which I removed and saved for another project. Once I had naked lights, I inserted one into each pineapple egg, adding a bit of hot glue around the top to hold the light in place.


DISPLAY

Easter Egg Pineapple Lights night

I strung my lights underneath my outdoor table umbrella. I can't wait to take a dip in my pool, then come sit under my pineapple lights one warm night this summer, sipping a piña colada.

Easter Egg Pineapple Lights day

Be sure to keep an eye on your lights, and unplug them when not in use. I have low-temperature lights; that's important. Be sure yours are low-temperature, too, so they do not melt your eggs. The instructions on my lights also said not to use them for longer than an hour at a time.

I love my new lights! This might be my favorite non-Easter Easter craft of all time. I have seen red and pink eggs made into strawberries—I'm now thinking about green egg limes and yellow egg lemons. By the time my marker and I get done, I will have a whole fruit bowl filled with plastic eggs.

Check out more of my Easter adventures on my blog.

The Dark Side Of Grandma

$
0
0

She's been gone for a while ––traveling to far away places and living large. And today is her birthday.

Happy birthday, Mamacita!

**Click image to read full article**

sassypiehole

DIY // Golden Eggs for Easter

$
0
0

golden eggs2

The sweet little pink and yellow peeps that adorn every grocer's front aisle, the pastel doughnuts, the tulips, the excuse to buy matching outfits… and also? It's that time of year to paint, dye, color and bedazzle little eggs. While my kids are a fan of the most colorful eggs possible, I like the more subdued tones and natural look. My Pinterest Easter board is full of natural muted dye options and golden eggs, and this year, more than ever, I'm a fan of the gold leaf or gold foil. It's so pretty, and it's so expensive. Maybe if it were for a project that I would keep around for more than a few days before we eat the eggs (which you usually can't do with gold foiled eggs because of the glue process, and also, I'm not planning on blowing out the eggs so that I can try and store egg shells all year), I would be happy to play with gold leaf, but for this project, I needed something wallet friendly. My solution was simple. And by simple, I mean really simple. I had some metallic gold paint from our recent Fresh Event with West Elm, and I decided to go for faux gold leafed eggs. The result is a more golden egg, and a little less gold-foil-look, but beautiful none the less. And cheap. And easy.

Meaning, perfect for me right now. (Not that I'm cheap OR easy, but I like my eggs that way.)IMG_4599IMG_4607

To begin, just lay down some paper towel and squirt a squiggle or dollop of metallic gold paint. I used the multi-surface paint from Martha Stewart because it really is multi-surface and goes on anything! You could also play with colors and use a robin's egg blue or silver… whatever color your crave.IMG_4616

Then, while the paint is wet, just roll the egg around in it a bit. This is the fun part, and once my son noticed how much fun I was having with it, he asked to join in.IMG_4622IMG_4625IMG_4653

I also wanted to have a couple eggs with geometric lines, so I taped off on the bias and then we used a brush to add the gold.IMG_4687

Just leave the eggs on the paper towel to dry, and voila, golden eggs! golden eggs1

 What colors are you loving for Easter this season? Do share!

xo

signature

blog | instagram | facebook | twitter | pinterest


Four Fun Easter Bunny Crafts You Can Make

$
0
0

I don't know about you but I went from thinking Easter was weeks away to being shocked to find out it's almost here. I started decorating Easter eggs and I've planned my Easter dinner but that's all I've done. My Easter plans are currently lacking in Easter bunnies but here are some crafts that can change that.

Sock Bunny

sock bunny
Credit: Craft Passion

I really don't know if I can handle the cuteness of this argyle sock bunny. I want one.

Easter Bunny Cupcake Wrappers

Easter Bunny Cupcake Wrappers
Credit: Double the Fun Parties

I'm not really sure why but I think cupcakes are the perfect Easter dessert. I love these Easter bunny cupcake wrappers that were featured on Double the Fun Parties. I also love that you can use them on store-bought or bakery cupcakes.

Bunny Mask

Bunny Masks
Credit: The Classroom Creative

Every holiday needs a good kid craft. Nicolette's bunny mask and paper plate craft doesn't take long to make. Make enough for the whole family and take a fun Easter photo!

Bunny Goodie Bags

Bunny Easter Goodie Bags<
Credit: Minted Strawberry

It's always nice to send your guests away with a little treat. Aki's bunny Easter goodie bags are adorable.

What are you crafting for Easter?

Karen Ballum is a Community Moderator on BlogHer.com. She also blogs at Sassymonkey and Sassymonkey Reads.

Easy Peasy Children's Party Bags!

$
0
0
Need some party bag inspiration? Here’s how I created some simple, but effective party bags to satisfy not only children but also adults too. Plus they’re pretty budget friendly as well!!.....
Easy Peasy Children's Party Bags

Sprout is coming up for her 4th birthday in a few weeks so over the weekend we hosted a small party for her and a couple of her friends who are very close in age to her. We met these families when we attended antenatal classes together just before all our babies were born. Way back then we all lived in the same city and used to meet up a couple of times a month, but over the course of 4 years we have all move further afield and now only manage to catch up a couple of times a year.
 
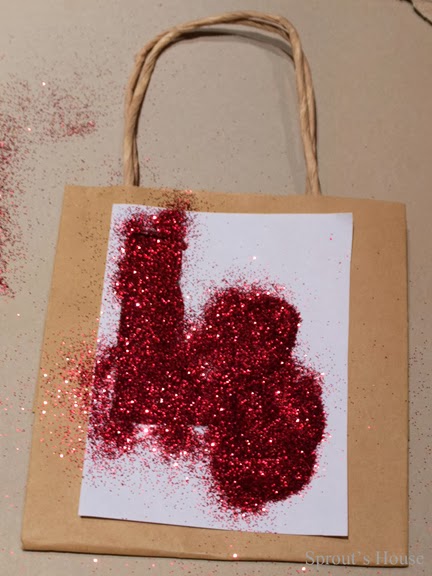
As 4 seems a bit of a milestone in all our small people’s lives, I thought it would be nice for each child to take home a party bag. First I purchased some brown gift bags from Hobbycraft. Then I searched Google for a simple image of a number four. I copied it into word and resized so it was the correct size to fit the front of the bags. Once printed, I trimmed off the excess paper and cut out the inside of the 4.


Easy Peasy Children's Party Bags
 
Using blu-tac I stuck the 4 template on the front of each bag, brushed some PVA glue inside the 4 and then sprinkled with red glitter.
 
Easy Peasy Children's Party Bags


Easy Peasy Children's Party Bags


Easy Peasy Children's Party Bags

Even quicker were the bags that I conjured up for the younger siblings who were attending the party too. Instead of a glittery number 4, I used washi tape and stuck their initials on the front of each bag.  It must have taken 5 minutes max!


Easy Peasy Children's Party Bags

As for the contents, I kept it really simple. Each bag contained a Kinder egg, a bottle of bubbles and my favourite item - a fabulous set of two homemade crayons from Mummy’s Mini Scribblers! Have a look at her Facebook page for tons of great homemade crayons!


Easy Peasy Children's Party Bags

I ordered each small one the first letter of their name, and then butterflies for the girls and tractors for the boys. Each set came beautifully packaged and the customer service was superb from start to finish especially as I left ordering quite late!!


Have you ever designed your own party bags? Pop your tips and ideas in the comments section! Check back for adult party bags later in the week!
 
Sprout’s House
      xox

Awesome Adult Party Bags!

$
0
0
Happy Wednesday, People!! We're half way through the week!!
 

On Monday, I blogged about children’s party bags – now here’s the adult version! Last month it was my sister’s big three-oh and she decided that she wanted a small intimate dinner rather than a big bash. So with only 10 guests it meant that I could really go to town on the details without it taking hours.
 
Adult Party Bags
 
Again I purchased these small brown gift bags from Hobbycraft. Using a snowflake stamp coated in PVA, I stamped each bag three times in different patterns. Then I shook gold glitter over each gluey snowflake and allowed a couple of minutes drying time before shaking it off and doing any touch-ups. Once the bags had dried over night, I repeated the process on the back of each one.
 
Adult Party Bags
 
To each bag, I added two packets of Chocolate Slab. One flavoured with sour cherries and macadamia nuts, and the other with popping candy. I also added a couple of party poppers!
 
Adult Party Bags
 
The finishing touch was to add a simple white name label that I customised using gold washi tape and a gold pen. These were tied on using gold ribbon and the top of the bag stuffed with hot pink tissue paper.
 
Adult Party Bags
 
Et voila – super sophisticated grown-up party bags!
 
Sprout’s House
      xox

FOR THE LOVE OF PAPER-My Love Affair With Decoupage

$
0
0

Decoupage (or découpage) is the art of decorating an object by gluing colored paper cutouts onto it in combination with special paint effects, gold leaf and so on. Commonly an object like a small box or an item of furniture is covered by cutouts from magazines or from purpose-manufactured papers. Each layer is sealed with varnishes (often multiple coats) until the "stuck on" appearance disappears and the result looks like painting or inlay work. The traditional technique used 30 to 40 layers of varnish which were then sanded to a polished finish.

My love for decoupage, started way back in the 90s when I used to decorate my art school portfolio cases with old picture cut outs from magazines and newspapers. The result was so outstanding that some my friends and students from other batches also started to ask for the same. I’ve always loved paper. In books. In stationery sets. Cards. Pretty envelopes. Diaries. Magazines. Brochures. The works.

I'm a crafter and am always drawn to working with paper. It's such a humble yet versatile medium. I played around with different kinds of paper and finishes for a new outcome for every project. But the experiments sort of stopped once I finished college and started a job as an Art Director.
But in 2006, just after my daughter was born, I began to fiddle with the thoughts of starting my own small, boutique design studio. That would have given me ample time to spend with my lil’ one and home. But the main reason was the itch to do some creative work, based upon my own whims and fancies J I believe that design is functional...design is human. not virtual. because it is meant for people. design is meant for a purpose. if it does not communicate, holds no interaction, then it is not design.
Decoupage fitted perfectly into the picture.
So in Dec 2006, I began hand making some basic wooden home décor accessories like trays, keepsake boxes and coasters etc. I called it, Design5 Studio.
 
design5 studio handmade decoupaged keepsake box

design studio handmade decoupage keepsake box

design5 studio handmade decoupage keepsake box

At Design5 Studio, I create 'eco-whimsical’ and fun, decoupaged wooden home decor accessories out of eco-friendly wood. Wood that comes from various sources is laser cut into required shapes and turned into customized wooden home décor accessories. 

My designed products reflect my belief that a good design touches you. tickles you. At times, hopefully, even leaves you amazed. A visually stunning graphic piece of work that arouses your senses. any of them. sometimes all of them.

The best part was designing my concepts. But when the designs came back to me after being printed on to paper, they became so alive! I loved decoupaging these papers onto my wooden products. The paper melts into the wood, making the products transform from my ideas to a functional designed real product. I love paper, and layers of it!

Been a while here now. I'm still here. Still crafting. Designing when I can. Still passionate about paper


These decoupaged beauties are available at many e-stores online and some stores in various cities in India now. 


How to Blow Out Easter Eggs (and Dye Them Naturally)

$
0
0

I don’t dye hard-boiled eggs (although you can certainly do that, if you like). I prefer using “blown” eggs, so that I don’t need to worry about spoilage and I can use them for a good long time (sometimes a month leading up to Easter) in arrangements throughout the house. Here's how to blow them out.

How to Blow Easter Eggs

It’s not often I share a post that doesn’t involve a recipe or a nutrition article, but this one, I must share. Because I love using natural dyes in my baking projects, I couldn’t resist using them to color Easter eggs, too. (I’m not the only adult with no small children who still does this…am I? Good! Didn’t think so.)

I don’t dye hard-boiled eggs (although you can certainly do that, if you like). I prefer using “blown” eggs, so that I don’t need to worry about spoilage and I can use them for a good long time (sometimes a month leading up to Easter) in arrangements throughout the house.


How To Make Blown Easter Eggs

Follow these steps using raw, white eggs. Reserve the egg carton.

1. Soak eggs for 30 minutes in warm water. This will soften the shell slightly.

Blown Easter Eggs-soaking

2. Remove eggs from their warm-water bath and pat them dry. Place eggs in reserved egg carton, and use a large needle to poke a hole in one end of each egg. Work gently and carefully. You may need to hold the needle in place and “hammer” it into the egg. (I used a small yet thick hardbound cookbook I had handy to tap the needle into the eggs.)

Blown Easter Eggs punctured at each end

3. Next, turn the eggs over and do the same thing to the opposite end—but this time, make the hole just a bit bigger.

Blown Easter Eggs with one hole larger

4. Now comes the “blown” part. Cut a straw to 3 inches in length (I find the larger paper straws work very well here). Working over a bowl (to catch the white and yolk of the eggs), place the straw over the smaller hole at one end of egg. Hold the egg with the larger hole facing down into the bowl, and blow through the straw to force out the white and yolk.

Blowing Easter Eggs /></a></center></p><p><strong>Tip:</strong> Using the needle you used to poke the holes in the ends of each egg, give the inside of each egg a “stir” before blowing.  It will break up the yolk, making it easier to get the insides out.</p><!--pagebreak--><!--pagebreak--><p>Once all your eggs are blown, it’s time to place the hollow eggs into the dye. (Turmeric is my favorite all-natural item for making colored eggs—such a gorgeous yellow!)</p><p><center><br /><h1>Coloring Easter Eggs with All-Natural Homemade Dyes</h1><p></p></center></p><p><center><a target=Easter Eggs Using All-Natural Dyes

First, you will want to prepare your all-natural dyes. Do this by using my tips on making homemade food coloring from fruits and vegetables. For each cup of food coloring (strained, of course) you make, add 3 teaspoons of white vinegar. For example, if you make 1 cup each of blue, pink, and yellow, you would add 3 teaspoons of vinegar to EACH cup of colored liquid.

Once the dyes are made, it’s time to prep the eggs.

If you are using boiled eggs, boil them, cool them, and carry on with the dye process by soaking the eggs until your desired color is achieved. The longer you soak the eggs, the more intense the color.

Notice that the hollow, blown eggs float on the liquid dye…

Blown Easter Eggs - hollow eggs float

We solve that issue by placing a small plate on top like this…

Blown Easter Egg with plate holding egg in dye

(The plate is clear so that you can see through how it holds down the egg; turn the eggs to color each side.)

Once the eggs are colored to your liking, remove them to the reserved egg carton to dry, then use them for a lovely, natural Easter decoration!

Blown Easter Eggs Using All-Natural Dyes

Happy, all-natural Easter, everyone!

xo

Gigi ;)

GlutenFreeGigi.com

All content copyright Gluten Free Gigi, LLC. Please share courteously, providing link back and full credit for my work. Thank you. 

Weekly Photo Journal Process

$
0
0


Thought I would share my photo journal process on the blog today! With all the photos that I take with my phone | camera I always struggle with actually printing any off, so they sit on my computer, never to be seen again.

Recently I decided to try and do a scrapbook/photo page a week to try and use some of the photos, but also add a journal aspect to try and help my feeble mind to remember everything we get up to in a week. This is the process that I use to put it together!


Selecting my fave photos from the week and write up my journalling card.


Choose paper and some embellishments...


Do you have a photo journal or scrapbook to document your life? Share it with me! I LOVE new ideas and inspiration!

Make a Living as a Crafter

$
0
0

Make a living as a crafter

I’ve mentioned before that I’m not a risk taker, at least when it comes to money. I take a lot of comfort from knowing I get a paycheck that will be roughly the same amount of money every two weeks. The idea of being a small business owner without that income guarantee was always a bit unfathomable to me.  And the idea of even trying to make a living as a crafter: ridiculous!

Doubting Crafter

Well, I’ve come to the slow realization that what was holding me back from really trying to make a living as a crafter was…wait for it….FEAR. Yup, I’m a big ole scaredy-cat.  Well, crafting is hardly a high-risk occupation, so what is there to be afraid of? Oh, the usual female-type insecurities and fears: What if my crafty things aren’t good enough and nobody buys them? Or worse, someone thinks my pretties are awful! What will people think if I make a living painting furniture? Will they think I’m some high-school drop-out flunky that can’t get a “real” job?!? What if I try it out and fall flat on my face, and discover I really CAN’T make a living as a crafter?

So silly. After nearly two years of crafting, selling, and blogging as a hobby, I’m finally seeing an upswing in my crafty/bloggy income. Clearly, some people find what I do appealing. And some folks find the projects and info on my blog inspiring and helpful (which is so nice!)  And honestly, as a nurse, I could quit my job today, and have a new one tomorrow, so it’s not like trying this out is going to put me in the unemployment lines. If I do fail as a crafter, I still have nursing to fall back on. And I can arrange a work schedule to suit me, and still work a “real” job while pursuing my somewhat new dream of being a successful crafter/entrepreneur.  SO I’m going for it. In another two years, I want to be a full-time, self-employed crafter, making an income equivalent to what I earn now as a nurse. There. I said it out loud. Well, OK, I typed it, but all the world can see it, so how’s that for a commitment statement?!

Steps to success as a crafter

Making the leap to self-employment isn’t really that hard, now that I’ve had some time (2 years) to think about it.  And a chance to overcome those fears. For anyone who’s thinking of giving crafter entrepreneurship a try, here’s some free advice (and worth every penny, too!) to help you overcome those self-doubts:

1. Learn to believe in your product. If it’s selling, then somebody likes it. Folks aren’t spending their money on your product because you need cheering up. They buy it because they like it, and you’ve got something unique, handmade, and worth having.

2. Take a chance and put yourself out there. Honestly, the first few craft shows about wore me out emotionally. I was so keyed up about what I had and if anyone would like it, I couldn’t even enjoy the show. But watch what sells, listen to what people have to say, and learn from everything you do. And you will get better!

3. Be reliable, helpful, friendly, etc. Take a $30 custom order, make it, deliver it on time, and send a thank you note with it. You are trying to build your brand, so you want to make a good impression, and be someone your customers come back to see!

4. Learn. Learn all you can about business, marketing, selling, being a business owner, getting better at your craft. The more you learn, the more you have to offer your customers, and the more successful you will be

5. Quit worrying about what others think. In the grand scheme of things, doing something I really enjoy is more important than people knowing that I’m a Master’s-prepared nurse.  Who cares if they think I’m a high school drop out? At least folks will think I’m a talentedhigh school drop out, if they take the time to think about it at all.  And moving away from nursing doesn’t mean I’m a failure, it means that what I want out of life is changing, and who wants to do the same thing forever, anyway?

6. Have a plan. My blog didn’t really start going anywhere until I made a plan, and a commitment to follow it. I have monthly goals, and editorial calendar, a project calendar, etc and I stick to it. And what do you know, my blog traffic is skyrocketing, and I’m actually seeing a bit of income. Because I’m being intentional in my pursuit of a successful blog. You can’t get where ya want to go without a plan.

7. Do what you love. For years I’ve loved nursing, and I still enjoy it. But I also really enjoy working with my hands, being covered with paint, and spending the day in a hot garage with the country music blaring. That is my happy spot. And I want to spend more time there!! Where do you want to spend your time??

You can do it! Make a living craftingPin this!


 Originally posted at http://flyingc-diy.com

Cori Warner

FlyingC-DIY.com

"Just Wing It!"


Paper Bowl & Plate Easter Bonnets

$
0
0

Paper Bowl & Plate Easter Bonnets

Paperplatebowleasterbonnets.jpgOnce a month at work, we have a pizza party to celebrate all the company birthdays for the month. They bring in a variety of different flavored party pizzas, salad and cakes & cookies. I love this about my job. On this same day, there is always a theme. This past week the theme was crazy hats. I have a large floppy sun hat that I wanted to dress up a bit to give it a little more of a Derby look. I asked my mother-in-law if she had any old ribbon that I could borrow to jazz up my hat. Did she ever? She brought me over two full bags of ribbon. I not only found exactly what I was looking for, I found an inspiration. With all of the beautiful pastel lace ribbon & with the day of the hats, it brought to mind Easterbonnets. As a child I always wore an Easter bonnet on Easter. I love hats, always have & now my daughter is following in my footsteps. Tonight’s fun mommy & daughter project…yup, you guessed it, it is Easter bonnets.

What you will need:

Paper plates

Paper bowls

Water colors

Ribbon

Plastic flowers or other embellishments

Elmer’s glue

Directions:

Paint your bowl using a color of your choice

Paint your bowl using a color of your choice

013

015

With a pair of scissors cut out the inside of the paper plate.

022

Paint your plate & let the bowl & plate dry

030

Place the painted bowl over a stack of extra bowls

031

Using glue, glue the paper plate to the bowl by putting the plate over the bowl as shown. Place another stack of bowls over the top to aid in keeping the pieces together as they dry.

036

Pick a ribbon to use for your hat.

038

Glue a piece of ribbon around the hat

039

Choose some embellishments

040

Glue your embellishments to your hat

047

Let your hats dry & then it is dress up time.

This is a cute, fun & easy craft that you can do with your child. If your kid likes hats as much as mine does, they will love it.

http://thepinterestedparent.com/2014/04/11/paper-bowl-plate-easter-bonnets/

Happy Easter from the Easter Puppies!

$
0
0

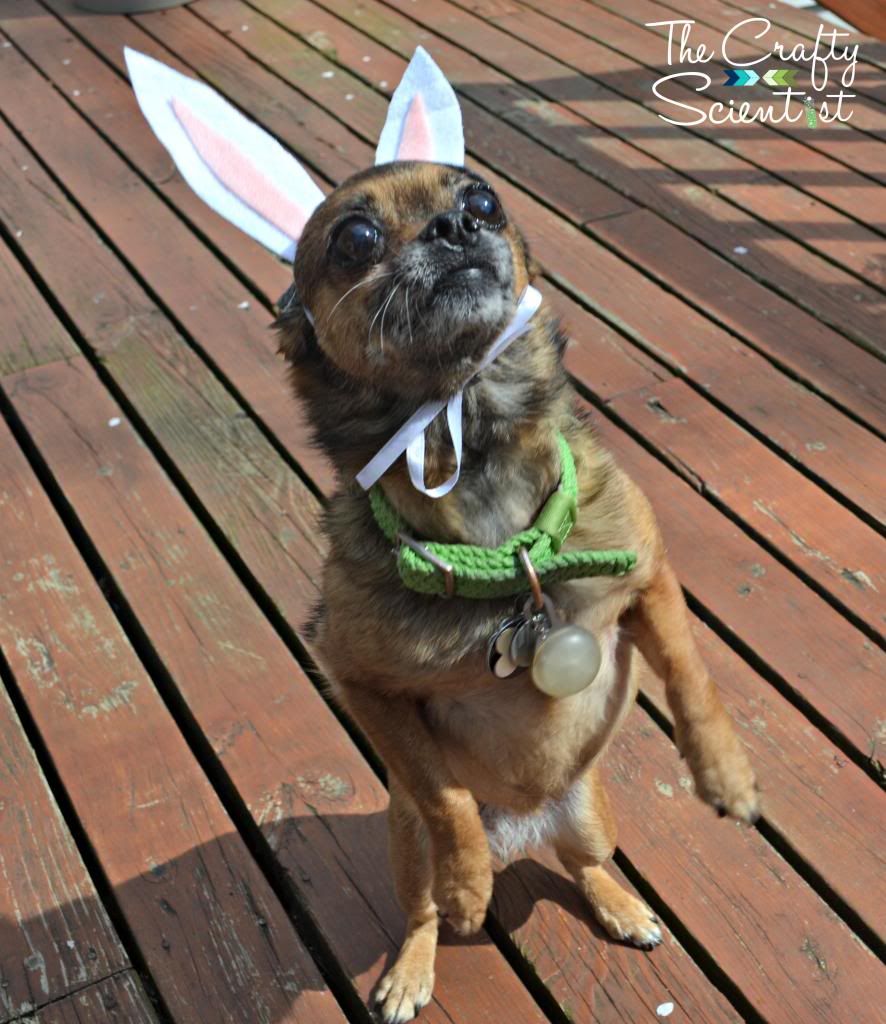
The whole gang wanted to wish you a very happy Easter...

Bella the puppy in Easter bunny ears


Max the puppy in Easter bunny ears yawning


Max got pretty into the photo shoot despite early efforts to go to sleep in the sunshine on the porch...

Max the puppy in Easter bunny ears


With and without the snaggletooth...

Max the puppy in Easter bunny ears


She really liked the bunny ears (as did Max), no matter what they might tell you if they figure out how to dial an iPhone with their fuzzy little paws...

Bella the puppy with Easter bunny ears


Bella the puppy with Easter bunny ears


Some day I'll show you how I made these little bunny ears, but you can probably figure it out from the pics here - it's felt, some fabric stiffener, needle and thread, and some ribbon. The puppies really did like them and both attempted to take naps in them. We also turned these pics into little Easter/Passover cards for friends and family. In other news, Target's photo center disappointed us again. Twice this time. But that's a story for another time.

For now, happy Easter from all of us, especially those us with bunny ears on!

-Mel the Crafty Scientist

How To Be A Successful Card Maker

$
0
0

Hand made card designed by Erin Taylor.     Hand made card designed by Erin Taylor.

I was really excited when Erin Taylor agreed to be one of my featured artists.  She has an amazing clean style that I love and admire.

Erin has been very successful with her card making endeavors.  She has been published in various magazines including, Card Creations Volume 12, Handmade Cards for paper Crafters, Birthday Creations and Stamp It! Erin has a long list of recognitions I’ve included a link, HERE!  As you may have read on my site, I’m terrible at challenges so I REALLY admire Erin. Those darn challenges take practice and talent to get the recognition. Erin has both practice and especially talent so she rocks the card making challenges!

Eight things that lead to Erin's amazing success, read more....

Clipping bunnies before the NY Easter Hat Parade

$
0
0

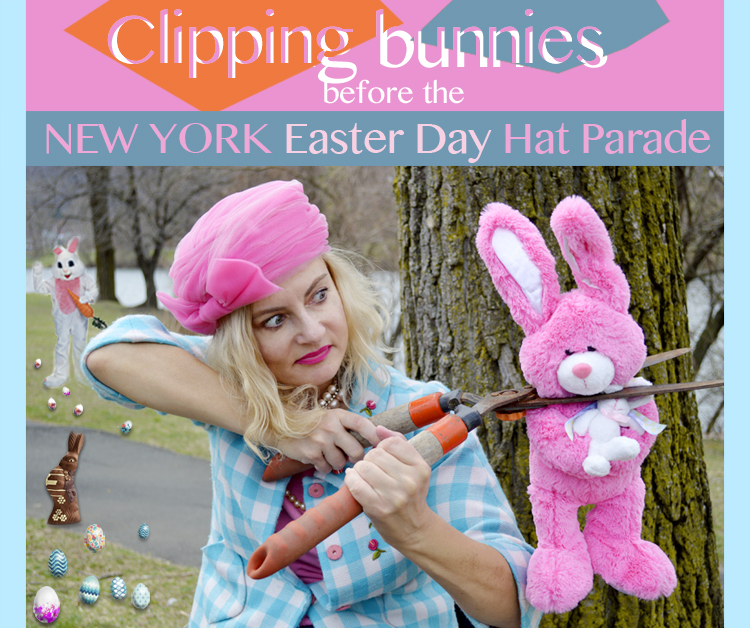
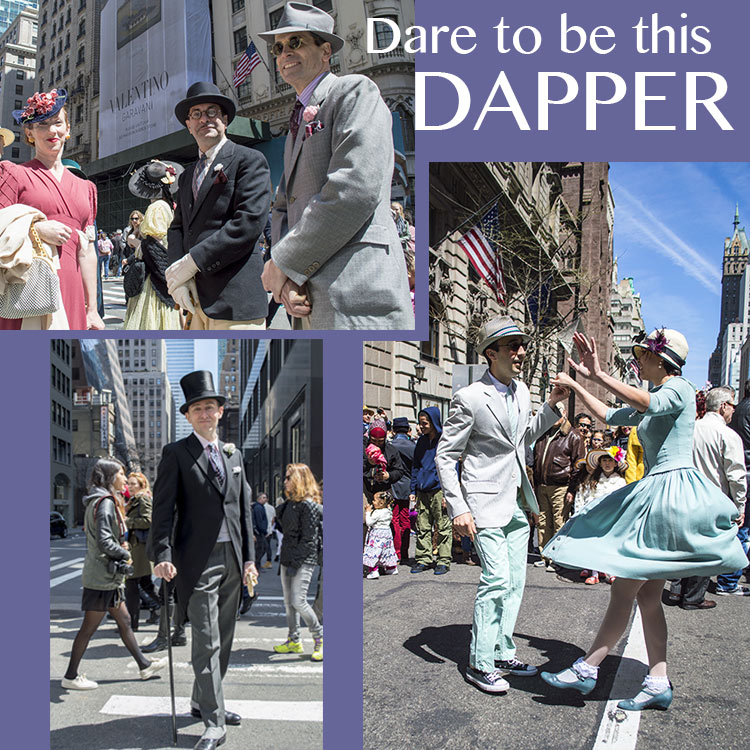
clipping bunnies before the NY Easter Day Hat ParadeI don't generally like parades because they are too orderly and rigid. I want the freedom to walk back and forth, photograph people and talk to them without having to march for blocks on end without stopping. This year, as last, I attended the NY Easter Hat Parade on a beautiful sunny, warm day. While it was a lot more crowded than the previous year, I was entranced by the menagerie of blinged out dogs and idiosyncratic attendees vying for the click of every DSLR. If you couldn't attend this year, here is a compendium of what I witnessed all afternoon.

best dog costumes NY Easter Hat Parade 2014 My favorite dog is the one in the center that looked so "over it" and fancies pink blush.

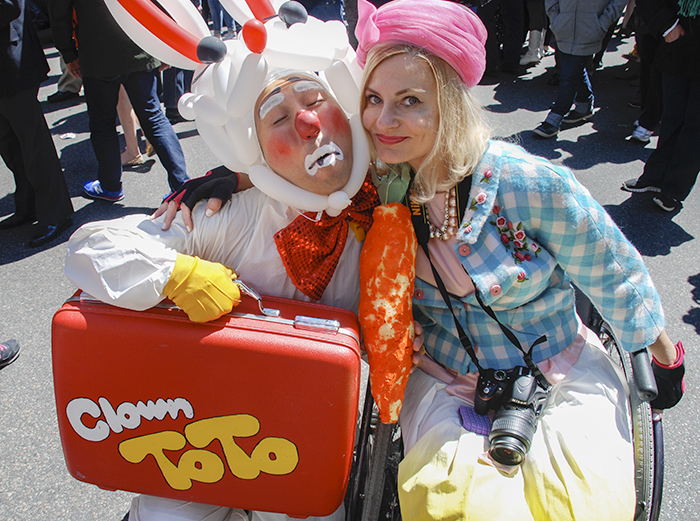
Magda with clown easter hat parade I accosted Clown Toto and told him he needed a career change. He proceeded to cry uncontrollably.

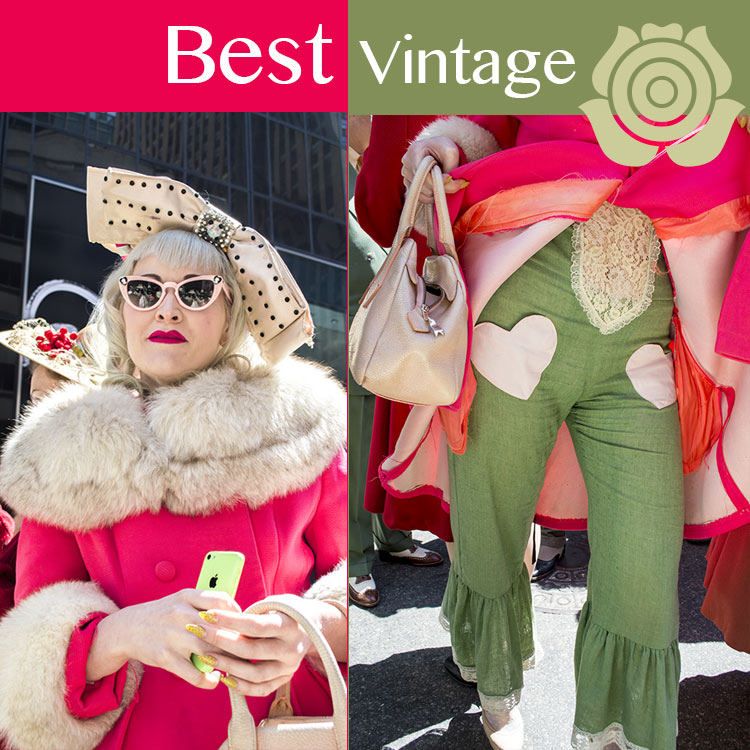
Best Vintage Easter HAT PARDE 2014BEST DRESSED  vintage mavens at the NY Easter Hat Parade 2014best dressed vintage woman at the NY Easter Hat Parade 2014 This was the most creative, gorgeous vintage ensemble. How amazing is her 1920s showgirl head piece and avocado green pants with heart pockets?

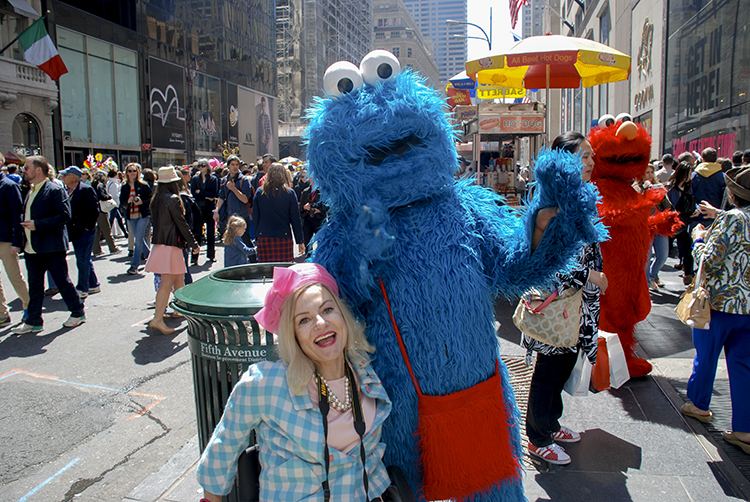
Cookie monster at the NY Easter Hat parade 2014 I have an unhealthy obsession with Muppets. When I saw Cookie Monster across the street, I roared louder than the rumble of Vesuvius. I raced across, knocking people over and flew into that fuzzy, blue bastard's arms. I drool over Muppets the way fanatics drool over human celebs. "C is for cookie, that's good enough for me!"

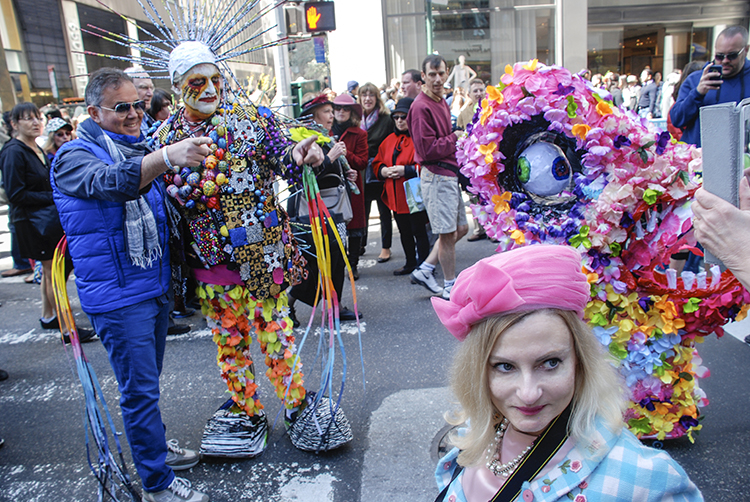
colorful costumes at the NY Easter Hat parade 2014

Drag Queens at the NY Easter Hat Parade 2014 What the hell kind of a parade would it be without guys in drag?

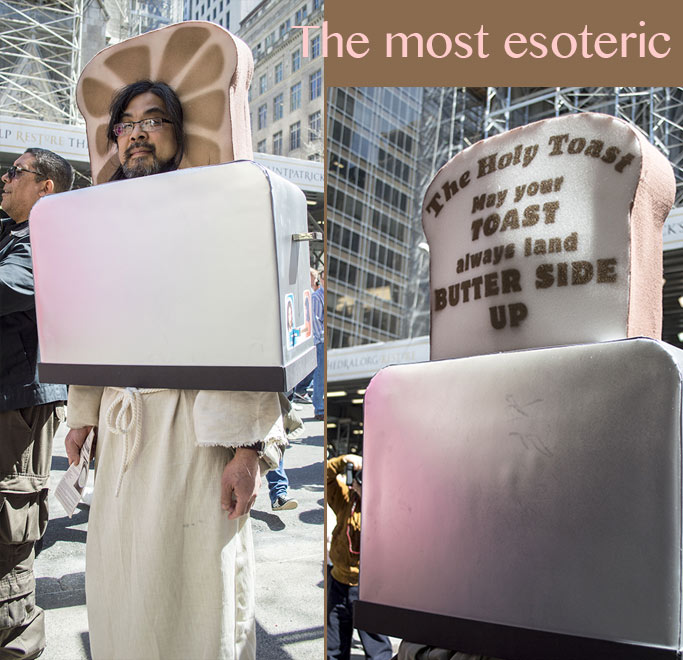
Ok this was the most esoteric costume, which still has me scratching my head. What does "The Holy Toast May your TOAST always land butter side up" mean? When he turned around, he was in a Messiah costume with Jesus stickers on the side of his toaster oven. He didn't talk to anyone or smile, but was wearing a styrofoam piece of toast on his head. Then I glimpsed at the literature he was holding in his right hand, assuming it would have something to do with Jesus. But no, it had the word CHALLAH written in big bold text at the top. Is he a challah salesman? Is he Jewish by day and Christian by night? Damn, I wish I talked to the guy. weirdest costume at the NY Easter Hat Parade 2014

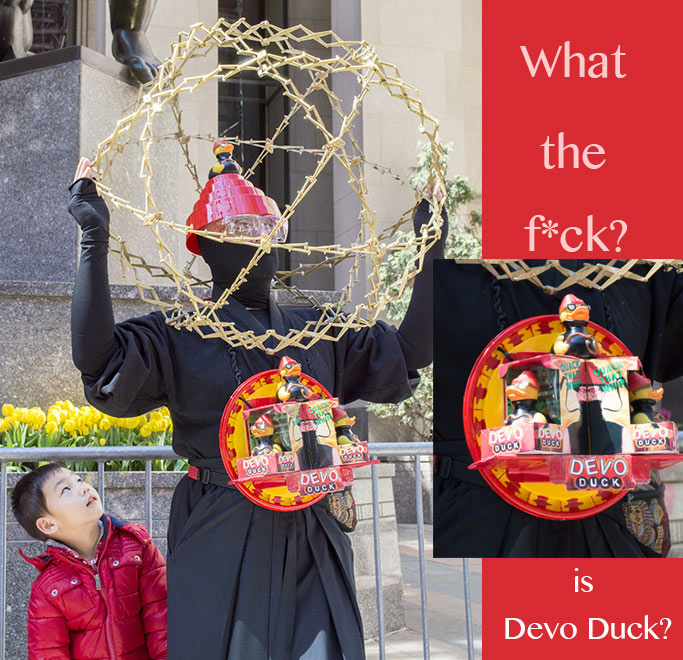
Remember the early 80s new wave band, Devo known for their quirky outfits and tiered glossy hats? So please explain Devo duck. Maybe ducks rock out to 80s music. Maybe this guy loves Devo and ducks. It could have been a rhino, but he chose a duck. There is no denying this guy's creativity, so I found his web site, which looks like it was designed in 1995 and hasn't been updated since. I love the quizzical kid who is practically ready to poke Devo-Duck man.

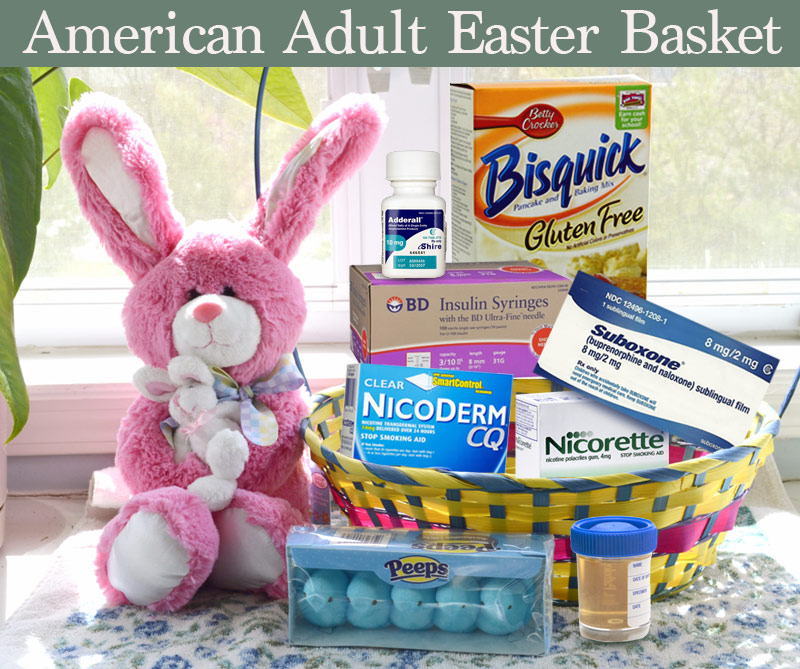
Devo Duck Easter Hat Parade 2014There was something I pondered throughout the day. Why do kids get Easter baskets, while adults look on covetously? Here is a basket that adults should receive from a Jesus-hating-bunny consumed with the proliferation of sin and sweets. Adult Easter baskets filled with nicorette gum, urine specimen cup, gluten free bisquick and insulin needlesWhat should you include in a well designed anodyne adult Easter basket?

1.Blue Peeps - These are a great pick-me up in case you don't have access to your 5th energy drink of the day.

2. Nicoderm CQ - Quitting smoking cold turkey doesn't always work. Cover your entire back with patches to make sure you get an adequate amount of nicotine into your blood stream.

3.Nicorette Gum - Just in case nicotene patches aren't enough, chomping on gum will quickly release even more chemicals into you body.

4.BD insulin syringes - I can take a wild guess that someone you know has diabetes type 2. These store nicely in any glove compartment.

5.Suboxone - Perfect for those who are not sure whether they want to kick heroin entirely, can now substitute one opiate for another.

6. Adderall - Like seriously, who can pay attention to anything? The pharmaceutical companies want to label all of us. If you don't have ADD, you need to call your doctor and demand "As an American I am entitled to be labelled! Find something damn you!"

7. Bisquick gluten-free pancake mix - Nothing makes me feel happier than waking up on a Sunday morning and eating a stack of empty carbs the height of a 1st grader's Ikea storage unit. I usually try to factor in a nap around 10:45 am.

8.Urine filled specimen cup - This is perfect when you want to get a job in a Fortune 500 company and you know you will be drug tested. This kit comes with a specimen from a vegan, triathlete who was been juice cleaning for 6 weeks. Finally here are more photos from the parade. Enjoy. [gallery type="slideshow" ids="3290,3291,3289,3292,3293,3294,3295,3296,3297,3298,3299,3300,3301,3302"]

Happy Easter to everyone who celebrated on Sunday and a Happy Passover to all my friends and readers. Be well and please stop eating so much damn candy.

Printable Lunch Box Notes

$
0
0

I mentioned awhile back that I have been learning Adobe Illustrator. I am still at it and set a small goal or "homework" for myself to help me use what I'm learning and more importantly stay focused and finish a project. 


First assignment? A set of printable lunch box notes. Since school is almost over I included 2 notes with blank spaces where the number of days left can be written in. 


I am also finding my way in the game of offering printables. I am trying out Google Docs but am also looking into Dropbox as well. In the meantime, would you let me know some feedback on how this one worked? Thanks and enjoy! 


Click the picture to print! 


Viewing all 1382 articles
Browse latest View live