Quantcast
Channel: Crafts - BlogHer Topic Feed - All Posts
Viewing all 1382 articles
Browse latest View live

Food Allergy Awareness Week: Sunbutter Craft

$
0
0

This week is Food Allergy Awareness Week. Unlike, say, Valentine's Day or the Fourth of July, this holiday (if I can call it that), which affects 15 million Americans, does not have many crafts associated with it.

My son Baxter is one of those 15 million.

Crafts help bring awareness to a holiday or event. I've decided to make it my mission to make more crafts related to food allergies. My little man Bax is the sunbutter to my jelly, and I wanted to make him a sign to show him that!

Sunbutter to My Jelly

Sunbutter is a peanut butter alternative that we started using when my son Baxter was diagnosed with a peanut allergy. I have come to love it as much as my old favorite. I have often seen goodies in the scrapbooking and crafty world with the cute saying: "You are the peanut butter to my jelly." This is my allergy-aware take on that idea.

Sunbutter to My Jelly

The canvas and medium you use for this craft is not important; what is important is the message. I used a combination of canvas, plates, paper, stickers, felt, pom pom fringe, paint and more. I'm a mixed-media kinda gal.

Sunbutter to My Jelly

Making your two pieces of bread is really easy. I used felt, burlap, and paint. The pieces are held together with good, old-fashioned Tacky Glue.

Sunbutter to My Jelly

The sign fits in perfectly on the gallery wall in his room. Mission complete: I wanted Baxter to know how much I love him, and to help spread the gospel about food allergies in a crafty way.

Sunbutter to My Jelly

There is nothing fun about food allergies, especially life threatening ones, but that does not mean crafts about food allergies can't be fun. Baxter is in good company: one in 13 kids has food allergies. Why not let one of those other kids know they are the sunbutter to your jelly, too?


Sew your own curtains

$
0
0

Here are some very simple curtains that you can sew yourself! If you don’t have a sewing machine, you could try it with fabric glue.


You will need:

  • About 2 yards of fabric
  • Ribbon to match
  • Fabric scissors
  • Straight pins
  • Sewing machine or fabric glue

What to do:

1. Cut your fabric to the width of your window, adding a little extra for the side hem. The length of my curtains (after hemming) is about 18 inches. Add about 4 inches for the top curtain opening and bottom hem for a total length of 22 inches.

2. First, sew your side hems. I only tucked under about 1/4 inch and then sewed it.

3. Pin down a hem on the top and bottom. I tucked under about 1/2 inch which left  a 1 1/2 inch hem.


4. Sew your top and bottom hem.


5. Trim your ribbon with an angled cut so that it won’t fray. I think I did about a yard. You can trim it if it’s too long.


6. Insert your curtain rod into the top hem opening. Hang your curtains. Tie a ribbon on each side and adjust to your liking.


Amber Tincher and Amy Leckrone

Co-founders of Camp Mommawatchi

Purchase at-home camp curriculum at www.campmommawatchi.com

Refold your handmade quilts every few months

$
0
0

A handmade quilt means someone has put in many hours of thought and hard work.  You will want it to stay beautiful for many years to come.

Whether you display them on a quilt rack or store them in a closet, you need to refold them every few months - not longer than every six months.  The batting will get thin and worn where the folds are.  Refolding will help your beautiful quilts to last much longer and look nice for many years.

If you are displaying them on a quilt rack they will fade where they are exposed to the sun.

Quilts can be handed down from generation to generation, but they need proper care to last.

cheap skate

$
0
0

I am trying to save money by making my own Tailor’s Ham, but it turn out like a Tortoises Shell. It might be because I did not stuff enough sawdust in it, there was still some space in it. Well next time I will know and I will make it with calico/muslin and wool fabric. Why don’t you tell me what you think it looks like? Have a nice sewing week. I got the pattern from Tilly and the buttons blog, and the design of the patterns is Victory Patterns. You can download the pattern from Tilly website http://www.tillyandthebuttons.com.

 Image: My Talior's Ham

Tailor's Ham

Converted Candle Holder Terrarium

$
0
0

Some people plant vegetable gardens. Others might invest in a spot of landscaping. I, on the other hand, like to find plants that have been spray-painted hot pink, plop them in neon gravel, and paint them a turquoise chevron home. To each her own.

Candle

I'm all about the hanging air plants and succulents. Cute vessels for these plants seem to be few and far between, so I have been forced to take matters into my own hands. Recently, I have yarn-wrapped planters and added pompoms almost bigger than the plants. I made a video all about using gel pens on glass to create your own customized boho planters. Today, I took it to another level and converted a candle holder.

This candle holder came from World Market, but you can find similar ones almost anywhere.

Candle

The first thing I needed to do was remove the small tray inside the glass hanger, where the candle would have been. I used pliers and wire clippers.

Candle

The glass candle holder was not sealed, so I knew that water would leak out. I thought I might hang my terrarium inside, so I needed to fix this problem. I used a clear glue on the inside and outside seams of the terrarium. Allow this to dry overnight. (If you want to hang your planter outside, skip this step.)

Candle

Next, using Shape Tape (which comes in several different patterns for painting your walls), I wrapped my terrarium. I know, I know—I said we should all swear off chevrons in 2014. I just happened to have this roll of Shape Tape.

Candle

When all the tape was in place, I used several coats of Gallery Glass. Gallery Glass will dry transparent, so it's perfect for glass. If you prefer an opaque design, most craft paint will work on glass. I applied my Gallery Glass with a sponge brush, allowing for drying time in between coats.

Candle

When the Gallery Glass was dry, I removed my Shape Tape. I must admit that I had to use an Exacto knife to cut the paint away from the tape. I think this was because I did not allow for enough "curing time." Sometimes reading the manufacturer's instructions pays off. Who knew?

Candle

Next, I needed to choose the right plant. I knew I wanted to stick with my air plant or succulent theme. When I rolled up to my local Wally World and spied their amazing painted plants, I knew this was the one. For the record, they have teal and gold, too. Yes, they are alive. Yes, it is slightly weird to paint plants. Yes, they are STILL alive.

Candle

I filled the bottom half of my new terrarium with a mixture of cactus potting soil and neon yellow aquarium gravel. I popped my hot pink plant in and watered well (not a single leak).

Candle

All that was left to do was add a tassel on the bottom and hang.

Candle

diy maternity banner tutorial

$
0
0

we took our maternity pics this past weekend and when looking up props we could use, i stumbled across the cutest sign ever that i just had to replicate. this was a super easy project, too – only took me about 20 minutes to complete! score!

so adorable – i honestly didn’t peek at her website before jumping into the project so my instructions are a tad bit different than hers – but either way, it’s such an easy craft and came out super adorable! and – i updated it a little to reflect our two baby girls that are on the way!

matbanner5x

materials:

twine
cross-stitch fabric
sharpie
scissors
hot glue gun/glue sticks
pen

matbanner1

i just picked up a small pack of cross-stitch fabric from my local craft store – it was only a little over $3 a pack and was thicker material, so it was easier to cut than tweed or a similar fabric would be. the twine came from the dollar store, and i already had the glue gun, sticks, scissors and sharpie marker on-hand.

instructions:

  • i free-cut a banner shape on a piece of paper to help trace out the sheets on the cross-stitch fabric
  • i then counted outed the number of letters i would need and trace those out

matbanner2


  • after i traced them all out – i simply cut them and made sure that i had enough for what i needed. i did make them a little longer because i didn’t want to sew the twine through them, but wanted to glue the tops over twine

matbanner3


  • next i wrote out the words that i wanted which were “we love you both already” and then used the sharpie to write the corresponding letter on each cut-out and just did that free-hand [i did mess up a little with the heart and the word "love" but it's quirky and we decided we actually like it ... so, we love-love!]

matbanner4


  • then using the twine, i took each letter individually and slightly wrapped the very top, using hot glue to secure the twine in between the top of the letter and wrapping it over slightly. i did three separate strings so that we just held them together and let the bottom two strings drape more dramatically in the picture so you can read the banner more clearly.

matbanner5

i’m really excited for how they turned out and can’t wait to share the picture with you!

_______________________

want to learn more?

visit my blog at http://www.sunnysideshlee.com

follow me on twitter @shlee83


Hair sticks and Hair Combs

$
0
0

Ornaments for your Tresses

If there is one thing women can admit to is we go crazy over our hair. We do things to our hair that God never meant for hair to do. We curl it and crimp it with hot irons and strange oblong rollers. We color with dye that in all reality could make us bald. We spray copious amounts of hair spray in it and attempt to get it to sit up like a lap dog. Then once we are done we go out and gush over somebody’s hair with jealous zeal.

In response the retailers of the world jumped on the band wagon and offered head bands, bobby pins, hair combs and small fancy beads. If you hail from the UK you can also enjoy the over the top hats and combs that Europe became famous for ever since Princess Beatrice wore a pink ensemble that resembled a toilet lid. However those who don’t have access to such things need not fear....there are some things you can create in order to make your hair unique!

Hair sticks are great for use with long hair especially hair that hasn’t gotten a lot of get up and go. I myself have long rather limp hair that I have to fight with in order to give it volume and yet every time I get in the ring with it my ego gets as flat as my hair style. So I decided if my hair was going to be such a pain I might as well try something a little different.

I bought some chopsticks and sanded them down until they were smooth. Then I took a very small drill bit, you can ask the man in your life to do this, and drilled holes either at the thickest top part or through it across. Once that was done I painted it with wood varnish to seal in the wood and prevent chips and slivers of wood from getting caught in my hair.

If you don’t want to use wood varnish any craft store sells many different kinds of sealants for wood crafts and clay crafts. Check them out and be sure to check for any kind of allergy you may have before you paint the chopsticks. I decided in this case I wanted to paint the sticks white. white is not the best color because of the fact it can get dirty and hair color can bleed on it but I very much wanted something romantic so white it was. I than painted some small flowers on it.

Once they were dried I moved on to the decoration. I had some lovely dots that had been bought for a scrap booking project. the sweet pink color was a wonderful compliment to my color choice. At this point you can branch out however you like. A pearl and cubic zirconia wrap around the top of the stick would be lovely. A string of pearls dangling from the top of the step would add a very classy look. One thing you must keep in mind however is not to make any dangles too heavy.

Once your decorations are attached glue them with super glue or some other very strong glue and then seal the hair stick to keep both the paint and the decorations safe.

Another thing to use would be hair combs. Hair combs unlike hair sticks have a much broader base to work on. Taking a piece of poser board you can cut out any shape you like and glue it to the hair comb. Once that is done you can paint and or add decorations of any kind. I did a hair piece using shells which turned out to be very popular. I also made a comb for a wedding in England which was a lot of fun and gave me a chance to purchase specialty feathers and become familiar with them.
If you are craft with wire you can wire up tiny flowers on regular bobby pins or you can make a crown which frames your face. Try getting adventurous...think Angeline Jole in Maleficent. A true statement when it comes to crowns. There isn’t any reason why you can’t be inspired by fantasy, sci fi, or royalty.

After all it’s your hair and you can certainly dress it up however you wish even if you decide not to wear it out of the house.

Mason Jar Card Fireflies in a Jar

$
0
0

With the weather finally getting warmer, I started to think about summer nights as a kid growing up in the country. My brother and I used to catch fireflies and put them in jars. They were so mesmerizing to watch. Expecally when we brought them inside...... and let them out!!

Mason Jar Card

See complete instructions for this hand stamped card at Creative Destinations Guide


Gorgeous Gold Glitter Mason Jars

$
0
0
 
Fancy jazzing up your table with a quick and easy centre piece? These gold glittery mason jars are perfect for bringing the WOW factor to any occasion.
 
 
Gold Glitter Mason Jars by Sprout's House

This post contains affiliate links.
*Not sure what an affiliate link is? – If you click on any of the links in this post and make a purchase I will earn a small percentage of what you have spent, however it will cost you no more than normal! Thanks for your support!*

Way back in January, it was my sister’s 30th birthday and she asked me to organize her party. I decided on a gold theme with splashes of hot pink – here’s a look at the party bags if you missed that post.
 
Equipment:
a selection of glass jars - I used two sizes of mason jar and then a smaller hexagonal jam jar

 
gold glitter
PVA glue
old paint brush
low tack masking tape
newspaper
rubber gloves
Time: 1-2 hours plus drying time
 
1. Remove all the lids and sticky labels. 
2. Wash the jars to remove dust and the sticky residue from the labels. Allow to air dry.
3. Set up the area where you are going to spray by laying out newspaper and covering anything that might get sprayed. I used an old paper bag lined with newspaper to create a little spraying station. (Ideally spray outside or with all your doors and windows open. The spray paint can be pretty potent stuff!!)

Gold Glitter Mason Jars by Sprout's House

4. Lightly spray the jars. Allow to dry and then spray again until each jar is completely covered. You may have to repeat this cycle a few times.

Gold Glitter Mason Jars by Sprout's House

5. Let the jars dry for at least 24 hours.


6. Decide how much of the jars your are going to cover in glitter and carefully mark in pencil. I decided to cover the bottom third of each jar with glitter.
6. Using your pencil marks as a guide, wrap masking tape around each jar above the mark.
7. Brush on PVA glue and sprinkle with glitter. I did one side at a time and then moved on to the next jar. Repeat until you have covered each section of the jars.
8. Leave the jars to dry and then carefully remove the masking tape. Touch up if you need to.
9. Add water and flowers to create your centre piece.

Gold Glitter Mason Jars by Sprout's House


If you enjoyed my post, I'd be really grateful if you shared it using the PINK buttons below.

Sprout’s House

  xox

 
PinterestPinterestTwitterGoogle+BloglovinEmail

Ikea Hack ~ Sprout's New Play Kitchen

$
0
0
Are you on the look out for a play kitchen, but can't find what you're looking for? How about trying this simple Ikea hack?....


This post contains affiliate links.
*Not sure what an affiliate link is? – If you click on any of the links in this post and make a purchase I will earn a small percentage of what you have spent, however it will cost you no more than normal! Thanks for your support!*

As you may have gathered, Sprout is quite a girly girl! She will only wear skirts and dresses - the pinker the better. Trousers are a definite no-no in her world!! With this in mind, when Sprout's Daddy and I decided to buy her a play kitchen for her birthday we knew instantly what the number one search criteria would be - it had to be pink!

After having a good scout around, we chose the Ikea Duktig kitchen for a couple of reasons - firstly it was pretty reasonably priced at £65, second height wise it seemed to be one of the tallest with the option to make it 3 different heights and lastly it wasn't a sickly pale pink colour! The great thing about the Ikea play kitchen is that you can easily customise it to suit your child's tastes or just leave it as it is.

Equipment:
Ikea Duktig Kitchen
Rust-oleum Surface Primer
Rust-oleum Painter's Touch - Sprout chose Berry Pink!
sand paper
damp cloth
drop cloth
Time: 2-3 hours over 5 days

1. Decide which pieces of the kitchen you want to spray. 
2. Lightly sand each piece to provide a key for the primer.
3. Use a damp cloth to wipe the dust off each piece and allow to dry.
4. Set up your spraying area. I used a couple of pallets over a drop cloth - you will definitely need to be outside for this part.


5. Spray each section with surface primer and allow to dry. It is always best to start lightly and then re-spray if you need to. This will help to avoid drips!
6. Allow to cure for 24-48 hours.


7. Spray each section with your chosen colour. Allow to dry and re-coat until you have completely covered the each piece and built up a good depth of colour.
8. Allow to cure for 24-48 hours.
9. Build the kitchen! (I have to confess that this took me a good two hours to do! Although Ikea, provide an Allen/Hex key you will definitely need a Phillips screwdriver and a hammer too!!)


For her birthday, we also bought her the Ikea Duktig cookware set, utensil set and also a plate and bowl set to get her kitchen started! She was lucky enough to receive all the other bits and pieces from friends and family - Early Learning Centre eggs and tea set, GLTC cupcake decorating set and a Melissa and Doug cookie decorating set.

This is my first Ikea hack. Have you ever done an Ikea hack? For some amazing inspiration, have a look at this selection of boards from pinterest. Happy Hacking!!
 
Sprout’s House
  xox
 
PinterestPinterestTwitterGoogle+BloglovinEmail

Pink Princessy Party Favors

$
0
0
Here's a great idea for creating pink princess inspired party favours!!


This post contains affiliate links.
*Not sure what an affiliate link is? – If you click on any of the links in this post and make a purchase I will earn a small percentage of what you have spent, however it will cost you no more than normal! Thanks for your support!*

As lots of you will know, Sprout recently turned four and we held a princess birthday party complete with bouncy castle, a pink castle cake and at the end of the party we gave out  pink princess-y party favours.

Due to a couple of bouts of Sprouty illness - chicken pox and an ear infection - my organisation of the party was fairly haphazard and by the time I got around to shopping for party bag treats the selection on offer was rather dismal. Instead, we found these great Playmobil figures at Toys R Us. Each bag contains a selection of pieces that make up a surprise Playmobil figure - although you can narrow it down a bit by choosing a blue or pink bag depending on your child!


So you might get an Egyptian queen or an ice skater, a surfer, a cowboy or a pirate. One of the great things about these little packages is that they encourage you to create your own characters too. For example,  you could add the surfer's head to the cowboy's torso and then give him the ice skater's legs!! Lots of scope for imaginative play!


Reality Check!!.....What I'm about to share would have occurred if I lived in an ideal world!! However back in the real world, I had just finished an incredibly busy term and Sprout was fighting off temperatures of 105˚F so although we did hand out little pink packages at the end of the party containing a Playmobil figure and a mini-packet of Haribo - it was minus the 'pretty' bits!!
Equipment -
silver pen
Time: 3-5 minutes per favour

1.Cut your tissue paper to the correct size - I used 5 or 6 layers to for each parcel. The fewer layers you use the more see through your package will be!
2.Wrap the party favours and seal with strips of washi tape.
3.Cut 50cm of curling ribbon and wrap around the package.
4.Double knot and then use the blade of a pair scissors to curl the each end of the ribbon.


5.Wrap two pieces of washi tape around the end of the parcel tags, punch a heart through the tape and label with a guest's name.

6.Repeat until you have wrapped all your parcels!!


These really are easy to make, and you could customise them in so many different ways - green tissue paper with a dinosaur punched tag, purple paper with a butterfly punched tag or yellow paper with a star punched tag. The possibilities are endless...


What kind of party favours do you give out at parties? 
Leave your suggestions in the comments!

Sprout’s House
  xox
Pinterest
Pinterest
TwitterGoogle+BloglovinEmail

$1 DIY // Yarn Container (Cat Proof)

$
0
0

 
Today I want to share a easy and cheap DIY with you. I love to crochet! I love my cat! But these 2 things don't get along very well. There are trazillions of times when I came home to something like this:
 
naughty kitty
via Pinterest
 
There must be a way to store your yarn so it's cat-safe, AND you can easily access it when you want to continue your crafts. 
 
 
I was cleaning and when I was about to throw away an empty container of wipes, I stopped and looked at it more closely. I did buy one of these fancy (and costly) "Yarntainers" not too long ago. And I realized: It is so easy to turn this $1 wipe container into a small yarn container as well! I got started right away:


_______________________________________


 Yarn Container DIY


1. Grab one of these wipes at your local Dollar Store if you don't have one at home already. Look at the lid: It is perfect to hold the yarn! Remove the wrap carefully. You will need the measurements if you want to design your own yarn container wrap.
 
 
2. Measure and design! If you don't want to or just can't  do your own design, you can download my ready to print wrap here:  CLICK
 
3. Cut it out, and glue or tape it to your container! I used washi tape on the top and bottom part. It worked fine!
 
4. DONE! Your yarn is safe now, and no more knots and other stuff that could stop your crochet-flow! Or knit-flow... Or whatever you use yarn for :)


about clean eating and crochet ...

$
0
0


Hello my dear friends <3 
It's been too much time since I last bloged .... I just realized  
But work / exams / seminars keeps me very busy with almost no access to the internet that is why I instagram more often . So go ahead and follow me on instagramm @juliasblog :) 
Well , summer is already here and I try to do something for a healthy toned body . As I already told you I try to do some walks / workouts ( not enough this past month ) and eat as clean as I can . We bought the Smoothie 2go Blender from Kenwood and it is the best !!!! Every morning I am preparing my smoothie . I am obsessed with apple/banana/strawberry/rasberry and spinach . It keeps me full till lunch ! Also a lot of herbal teas , in the morning pu erh tea and through the day cold fruit with mint teas . They are so delicious and energizing. Last week I made my favorite snack which is dried apple slices . I can't find them here in Greece and waiting fror my Mom sending them from Germany takes too much time . They were yummie BUT ...it takes a loooong time to dry them out . I put them into the oven at 50 degrees for about 6 hours ! Next time I will hang them onto a string for a couple of days . 
 
Fav smoothie , dried apple slices , favorite teas 
walking and some fitness 
marco got a haircut 
what I see during my walks ... no filters 
My new passion and stress control is crochet . It is so relaxing and you can make beautiful things . My first project was this T-Shirt . I sew the lace on the back and cut the fabric out . 
Second project and I am very proud of .... my vest ! What do you think ???
I hope you all have a beautiful day ....full of Sunshine - Love & Happiness
Hugs & XXX
post signature

Create a Kid's Play Shop!

$
0
0
Here's a really cheap and easy way to make a play shop for your little one.
 
 
This post contains affiliate links.
 
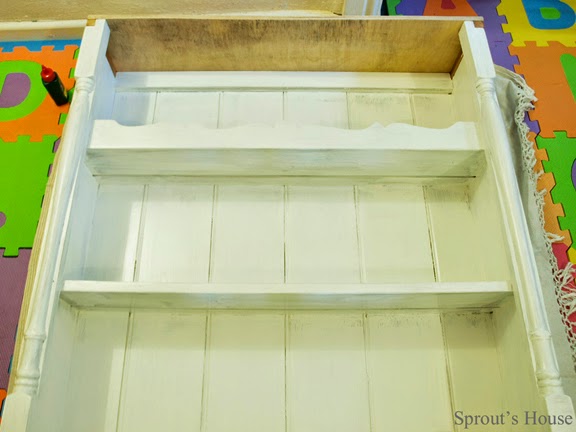
Sprout's Daddy and I purchased this set of shelves from eBay for about £15 - it was originally the top from a dresser.
 
 
The shelves came with these little pieces of wood that slotted into either side of the shelves to help them balance on the bottom half of a dresser.
 
 
We decided to turn the shelves upside down so that they would be more stable. Then we sanded and primed them using a gloss primer.

 
Once dry, Sprout's Daddy used an off cut of wood to add a top to the (upside down) shelves. He sawed off the ends of the shelf supports and used them to fill in the little gap underneath the new top. These were glued in place and then the off cut was glued and nailed to the top. The curly parts of the supports were glued to the front of shelves to hide the where we had attached the new top and make it look a bit prettier! All this was sanded and primed too.
 
 
The final job was to paint the shelves - I used Crown's Non Drip Gloss in Duck Egg Blue and gave it a couple of coats.

For the shop, we used a mixture of food packaging we had saved, some bits that Sprout's had received as presents and then we also bought a few bits and pieces too.

(In case you're interested, the grocery set (white rice, brown rice, sugar etc), food group baskets, till, scales, cupcakes and lollies are all from GLTC.)

Once everything was arranged on the shelves and Sprout officially opened the shop I decide that although the curly sections had prettied up the front it still looked a bit bare. So I made a simple banner.


Using Word, I chose a really simple font (easier to cut out!) and typed in the letters I wanted. I printed it out and cut out each letters. I chose some off cuts of fabric, drew around the letters and then cut them out. I glued each letter on to some ribbon and then stuck the ribbon to the shelves using mini glue dots from Hobbycraft.


Have you re-purposed a piece of furniture recently? Was it for you or for you children? Share your ideas in the comments.
 
Sprout’s House
  xox
 
PinterestPinterestTwitterGoogle+BloglovinEmail

Handmade Bath Bombs

$
0
0

After the end of a long day I love taking a long hot soak in the tub; I don’t know what it is about sitting in a pool of hot water but it’s amazing!


You know what makes a hot soak even better? Bath bombs, otherwise known as bath fizzies. They fill the bathroom with a lovely scent and the water is infused with oils and epsom salts. When you get out of the tub your skin feels soft and it glistens. You can run down to the store and buy yourself a bag or box or whatever it is that they come in, but bath bombs are best when you make them at home; you can choose whatever you want to put them in terms of the essential oils and and the base oil…and you can make them in pretty colors to match a theme or your favorite color and you can even make them in a wide range of shapes!

So let’s get started!

You will need:

  • mold for bath bombs
  • 1 cup baking soda
  • 1 cup epsom salts
  • 1/4 tsp water (you might need a little more, but add very slowly)
  • 2 tsp essential oils make sure it’s safe to use on skin
  • 1.5 to 2 tsp like rosehip, jojoba etc
  • 2 drops of food coloring (don’t use more because you don’t want it to stain the tub)

Last ingredient to mix in:

  • 1/2 cup citric acid

Mix the first 6 ingredients until the food coloring is mixed thoroughly, this will let you know that all the ingredients are mixed evenly. Once you get the first 6 ingredients mixed together add your citric acid (you don’t want to add this while you’re adding the liquid ingredients or it will ruin the fizziness). Make sure the citric acid is mixed in well and grab a small handful and squeeze, if it holds together you’re ready to go; it will be slightly crumbly but it should hold after a squeeze. You don’t want your mixture too wet or they won’t set properly. For your molds you can use Easter eggs, plastic fillable Christmas ornaments or silicone pans which are my favorite because it’s so easy to get them out.

Start filling your molds and firmly pack it. Let the mixture sit for 24 hours in which time they will be dry and firm. If they haven’t set in that amount of time there was probably too much liquid used or it was humid when they were made, so just give it another shot…but they’re still good just not quite as amazing! When your bath bombs are dry, put them into an airtight deal like a hermetic jar to keep them from getting soft and swelling.

Now you’re ready to take a hot soak or having a party with enviable party favors of handmade bath bombs!

For more crafts and DIYs you can visit Woods of Bell Trees for new ideas 3 days a week.


Mini Succulent Place Settings: Party Favor DIY

$
0
0

DIY succulent party favors

Skill level: EASY peasy!

You can make these cute little place settings/take-home party favors in a snap... and they're easy for guests to care for, too!

Supplies:

DIY succulent party favors

(For each party favor):

  • 1 succulent
  • 1 wide-mouthed half-pint mason jar with lid
  • cactus soil
  • twine

(For tags):

  • mini hole punch
  • cream paper
  • kraft paper
  • chalkboard paper
  • chalk

Instructions:

1. Remove lid from mason jar and place the ring back on without the cover. add your succulent and soil.

DIY succulent party favors - assembled favors

2. Use Microsoft Word labels 3112 stickers 1.5 inch option, and print out your sayings for your tags.

DIY succulent party favors - how to print tags

3. Punch them out with shape punches or hand cut. I used a circle punch, and hand-cut the cream paper with the year on it.

DIY succulent party favors - cutouts

Then, I punched out my hexagons and wrote names in chalk.

DIY succulent party favors - tags with banners

4. Use a small hole punch on the tags. Loop twine through tags and tie to the metal ring around your mason jar.

DIY succulent party favors - Paula

Care:

Succulents in a jar will only need a little water once or twice per month.

DIY succulent party favors - overhead

Happy making!

xoxo,
krystina

lollipopscards.com

DIY Mothers Day Gifts

$
0
0

So Last mothers day was my year as a mum and I didnt even get a card! This year I made sure I got someting that I could keep forever!!  I did two projects, one for the boys and one for the girls in my household. 


First off we have the girls:

I made home made paint- flour, water, and food coloring.

I used Scrapbook paper (Its all we have in the house haha)

paint and paper

Paint and paper

Little miss

Miss doing the project

Abbey doing the project

Abbey doing the project


Abbeys

Abbeys (Above and Below)

bbeys


HAileys

Haileys (Above and Below)

Haileys

Haileys


Now for he boys They made stepping stones.

I got the kit from Micheals

blakes


Bens- we painted in the hand so you could see it better

Adding an Extra Half Square Triangle

$
0
0

Using an extra block between traditional blocks can add a compelling eye-catcher. #quilt #quilting

I was tooling around the Internet when I found Kay MacKensie's wonderful "ruminations," as she says, of her fondness for Jill Finley's book from Martingale Press called, "Home Sweet Quilt." Kay's web site and blog, "All about Applique," has much to offer, and in reading her post, I noticed a fun and simple design option easy to employ in your next project.

Winding Down All About Applique wo type

"Winding Down"

Traditional quilts often use "Solid Sets," where all blocks are the same pattern. Or, they can alternate a pattern block with a same sized block of fabric to produce, "Alternate Sets."Here, a simple Pin Wheel block, made of half square triangles get dressed up!

Jill Finley introduces a bit of sashing and a single half square triangle block to join her patterned "Alternate Set" blocks on the diagonal. What an interesting effect! It gives more negative space where the eye can rest, while surprising the viewer with an unexpected rhythm. To enjoy Kay's web site and read her review of Jill's book, go here.


Click for a preview.


 SunbonnetSmart.com is authored by a little bird who loves to lure unsuspecting BlogHer bloggers to her web site, daily newspaper,
The SunbonnetSmart.com NewsFlash, and Facebook Fan Page


ROYGBIV Quilts, Say What!?!

$
0
0

Crazy letters! What in the world do they mean? If you are are a scientist, a quilter or observe the Chakra energy centers, you probably know!

The letters ROYGBIV stand for the colors of the rainbow, or visible light spectrum: Red, Orange, Yellow, Green, Blue, Indigo and Violet. All of the light we see is divided up into these colors or their variations. In addition, white is the absence of any color and black is the summation of all of the colors.

Rainbow Chipotle May 2014 w type

 Rainbows are spectrums in the sky.

Working as fabric artists, the appreciation for and understanding of color is essential. Quilters love color so much that sometimes, they want to display the whole spectrum in one quilt. There are infinite ways to play with the patterns to include all seven colors, and their infinite variations. Quilts that include all seven colors of the spectrum are called ROYGBIV Quilts. They have become so popular, that some quilt shows and exhibits have separate ROYGBIV entry categories.

Jessica, the quilter behind the web site and blog, "Quilty Habit," decided to make a quilt to celebrate her wedding. She decided upon a glorious ROYGBIV Dresden Plate, full of love and outstanding color blends. Be sure and visit Jessica and share in her joy.

Quilty Habit Rainow Center

 A ROYGBIV Dresden Plate by Jessica of "Quilty Habit"

Scientists study color, just as they do all other natural phenomenon, in fact, at RIT, the Rochester Institute of Technology in Rochester, NY, the Munsell Color Science Laboratory has been granting Masters Degrees and Ph.D.'s in the theory and science of color since 1983. This course of study is not the artistic application of color, as one would find in art school, but rather, the actual scientific study with research on wavelengths of light as they interact and are perceived by the eye.

If you are interested in the study of color, both artistic and scientific, this list, found on the web site, Color Matters, will be valuable.


Click for the preview


 SunbonnetSmart.com is authored by a little bird who loves to lure unsuspecting BlogHer bloggers to her web site, daily newspaper,
The SunbonnetSmart.com NewsFlash, and Facebook Fan Page


Coconut Oil for Sunburns: Just in Time for Summer!

$
0
0

I am a big proponent for coconut oil. I slather the stuff on my skin; use it in my baking and as an agent for soothing sunburn.

Coconut oil works wonders as a moisturizer, so when I came home from the beach the other day with a nasty sunburn on the backs of my legs (we’ve all been there, you know, that upper part near your butt that you always miss when you put on sunscreen), I decided to try a little coconut love.

Let me backtrack, I had originally been plucking aloe vera leaves off my one plant, and it didn’t seem to be helping much. When I had harvested about half my aloe vera plant in about three hours after returning home, I decided I needed something more. That was when I thought about the moisturizing miracle of the coconut. Besides, those aloe vera plants have pokey sides that feel like knives when rubbing them on tender, sunburned skin.

So since I like having an aloe vera plant that has actual plant components to it, I got to work.

In a small jar I spooned out about a cup of coconut oil. The oil wasn’t melted enough to be a liquid, but it was soft and easy to spoon/stir. I added some lavender oil (about 10 drops) and squeezed some aloe vera (straight from the plant) into the jar as well. I stir the concoction until it was… well, stirred.

I used a spatula (straight from the kitchen drawer and never to return) to rub that glorious white goop all over my body. While the backs of my legs were suffering the most (they were burning, really), my entire body felt itchy as if I had overdone my vitamin D dosage for a few days.

The results were fantastic! Immediately, my skin felt cool and calm. I kept slathering the stuff on and within 24 hours, my burn was no longer burning all the time. Within two days, my burn had turned to a tan and I was one comfy camper. At home. Out of the sun.

Now, be warned. Coconut oil melts. And it gets everywhere. I stained my bedding because of it. You should sit on a towel and not make the same mistake I did. Also, wear a giant t-shirt, or a dress you don’t care about, as the oil may stain your clothes as well.

The lavender oil I used. Lavender is one of those oils that doesn't require a carrier oil (such as coconut or olive) to apply to the skin.

coconut oil 1

The harvested aloe vera plant.

coconut oil 2

My finished product. Goopy goodness for after sun fun!

coconut oil 3

Viewing all 1382 articles
Browse latest View live